How to Upload a ZIP File to Google Drive
A ZIP file keeps many files together as one compressed package. Instead of uploading documents, images, or project files one by one, you can upload a single .zip file to Google Drive.
It is useful for project archives, client deliverables, folder backups, and other files that need to stay bundled, organized, and easy to download.
Google Drive stores a ZIP file as a single archive. It does not unpack it automatically. To use the files inside, download the ZIP and extract it on your device.
In this tutorial, you will learn how to upload a ZIP file to Google Drive using three methods, along with guidance on when to use each one.
Table of Contents
Prerequisites
Before you begin, make sure you have everything required to upload the ZIP file smoothly.
- A Google account with access to Google Drive
- A ZIP file saved on your computer or phone
- Enough Google Drive storage for the ZIP file
Tip: Rename the ZIP file before uploading it. Use a clear name like
client-project-files.zip,website-backup-may-2026.zip, orstudent-assignment-files.zipso you can identify the archive without opening or downloading it later.
If the ZIP file needs to go into a shared folder, see how to upload files to a shared Google Drive folder so you can check your upload access before adding the file.
Uploading a ZIP File to Google Drive on the Web
You can upload a ZIP file to Google Drive directly from your browser. This works best when the ZIP file is saved on your desktop or laptop.
Uploading the ZIP File
-
Go to Google Drive and sign in.
-
Open the Google Drive folder where you want to upload the ZIP file.
Tip: Google Drive uploads the ZIP file to the folder you are currently viewing. Open the target folder before uploading.
-
Click the + New button in the top-left corner.

-
Select File upload.
-
Choose the ZIP file from your computer.
-
Click Open.
-
Wait for the upload to finish.
Note: Large ZIP files need more upload time. Keep Google Drive open and stay connected to stable Wi-Fi until the upload finishes. If storage is full, delete unused files, empty Trash, or upgrade storage before trying again.
Once the upload is complete, the ZIP file appears in the Google Drive folder you selected.
Alternatively, you can drag and drop the ZIP file into the open Google Drive window. Google Drive will upload it automatically.
Result: Your ZIP file is now stored in Google Drive. You can open Google Drive later, search for the file name, move it to another folder, or download it when needed. To share the ZIP file with others via a link, see how to upload files to Google Drive and share a link.
Uploading a ZIP File to Google Drive on Mobile
You can upload a ZIP file from your phone using the Google Drive app on Android or iPhone or iPad. This is useful when the ZIP file is saved in your phone storage, Downloads folder, Files app, email, or messaging app.
-
Open the Google Drive app.
-
Tap +.
-
Select the upload option.
- Android: Tap Upload.
- iPhone or iPad: Tap Upload File.

-
Browse to the folder where the ZIP file is saved.
Tip: ZIP files are usually in Downloads or Recent. If the file came from WhatsApp, Gmail, or a browser, check that app's saved files folder.
-
Select the ZIP file.
-
Tap Location to change the upload folder if needed.
-
Tap Upload.
-
Wait for the upload to finish.
Result: The ZIP file is uploaded to Google Drive. You can open it from another device using the same Google account.
If needed, you can move the ZIP file to another folder later from inside Google Drive.
The mobile app works well when you only need to upload a ZIP file to Google Drive. But it does not help you track the uploaded file in Google Sheets. If you need to upload and track ZIP files in one workflow, use the next method.
Uploading Multiple ZIP Files to Google Drive using Drive Explorer Pro
Drive Explorer Pro is a Google Sheets add-on for uploading files to Google Drive and logging their details in a spreadsheet.
Use this method when you need to upload and track ZIP files in one place. This is useful for project archives, client delivery files, backup ZIPs, assignment files, invoice folders, and document packages.
Why use Drive Explorer Pro
- Upload ZIP files from Google Sheets.
- Choose the Google Drive folder where ZIP files should be saved.
- Add file names, links, sizes, MIME types, and file IDs automatically.
- Build a clear ZIP file record without manual copy-paste.
- Add new ZIP uploads below existing rows without replacing old data.
Install Drive Explorer Pro from the Google Workspace Marketplace:
Launching Drive Explorer Pro
Launch the add-on from inside Google Sheets once it is installed.
- Open Google Sheets.
- Go to Extensions > Drive Explorer Pro > Open Drive Explorer Pro.
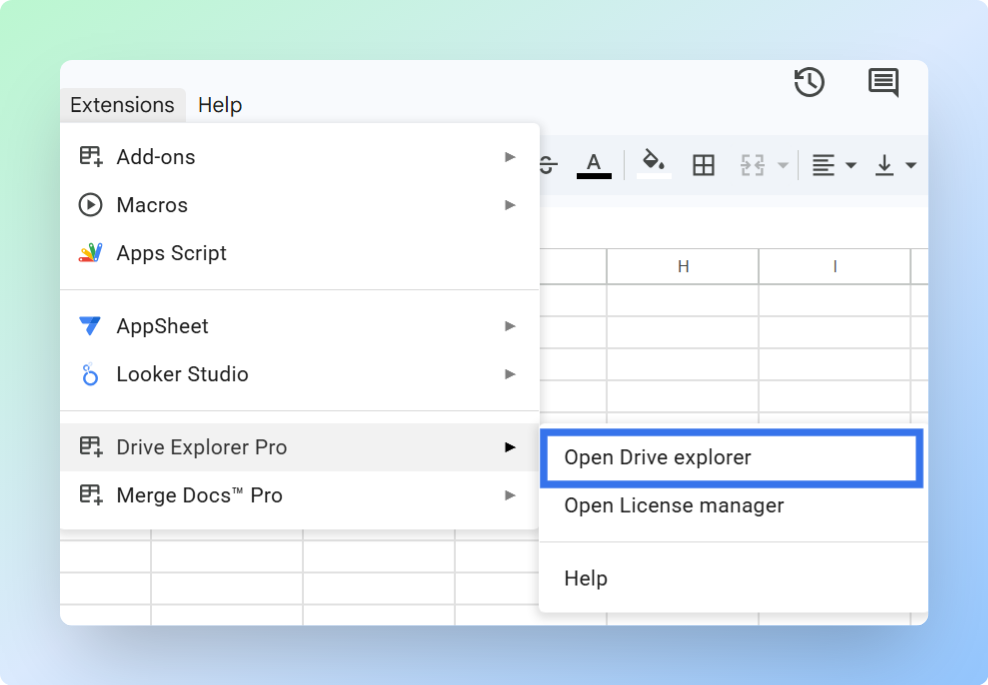
- The Drive Explorer Pro sidebar opens on the right side of your sheet.
Before uploading the ZIP file, complete this one-time setup. Drive Explorer Pro can reuse these settings for future uploads:
- Folder - where the ZIP file will be saved in Google Drive
- File details - what information appears in Google Sheets
- File access - who can open the uploaded file, if you need links to work later
Choosing the Google Drive Folder
Choose the Google Drive folder where the ZIP file should be uploaded.
- In the Drive Explorer Pro sidebar, click Change under the Default Google Drive Folder section.
- Browse to the Google Drive folder where you want to save the ZIP file.
- Click the folder to select it.
- Click Select to confirm the destination folder.
Configuring File Attributes to List in Your Sheet
Now choose which ZIP file details should appear in your spreadsheet.
- Click the List Files tab in the sidebar.
- Under Start listing file from, choose one of the following:
- Currently selected cell - starts listing from the cell you selected in the sheet.
- Append below existing data - adds the new ZIP file details below the existing rows.
Choose Currently selected cell when you are starting a new ZIP file log or want the results to begin from a specific cell.
- Under Select File Attributes to list, choose the file details you want to log as columns.
| Attribute | What It Logs | Best For |
|---|---|---|
| File Name Linked to URL | Clickable ZIP file name that opens the file in Google Drive | Opening the uploaded ZIP file from the sheet |
| File URL | Standard Google Drive file link | Keeping a Drive link record |
| Direct Download Link | Link that downloads the ZIP file directly | Download-focused ZIP workflows |
| File Size (MB) | ZIP file size in megabytes | Tracking large compressed files |
| Mime Type | Technical file type information | Filtering uploaded files by format |
| File ID | Unique Google Drive file ID | Advanced tracking or automation |
For ZIP upload tracking, select File Name Linked to URL, Direct Download Link, File Size (MB), and File ID.
To understand how direct download links work for different file types, see how to create a direct download link in Google Drive.
- Click Save Selected Settings as Default to reuse these settings later.
Setting File Access Before Uploading
If only you need access to the uploaded ZIP file, leave the access setting unchanged. If the ZIP file needs to be opened by other people later, choose the right access setting before uploading. For a full guide to Google Drive sharing options, see how to create a Google Drive link to share files.
- Go to the Settings tab in the sidebar.
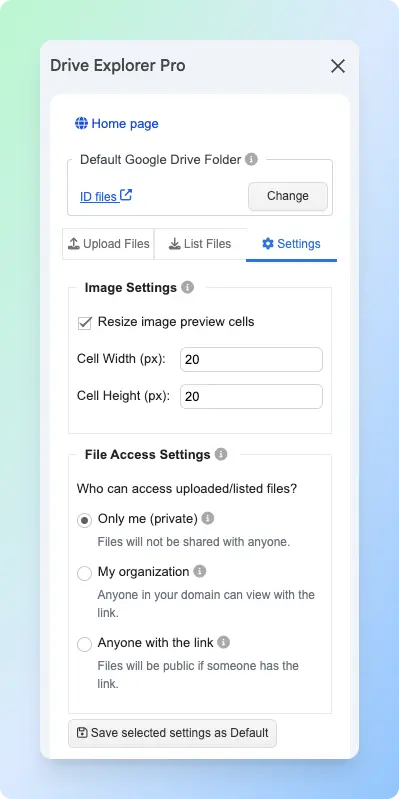
- Under File Access Settings, choose the access level you need.
| File Access Setting | What It Means |
|---|---|
| Only me (private) | Only you can open the uploaded ZIP file. |
| My organization | People in your organization can open the ZIP file when they have the link. |
| Anyone with the link | Anyone with the link can open the ZIP file. |
- Click Save Selected Settings as Default.
Note: This setting applies to newly uploaded files only. It does not change ZIP files already stored in Google Drive.
Uploading the ZIP File and Listing It in Google Sheets
With the folder, file attributes, and access settings ready, upload the ZIP file.
- Click the Upload files tab in the sidebar.
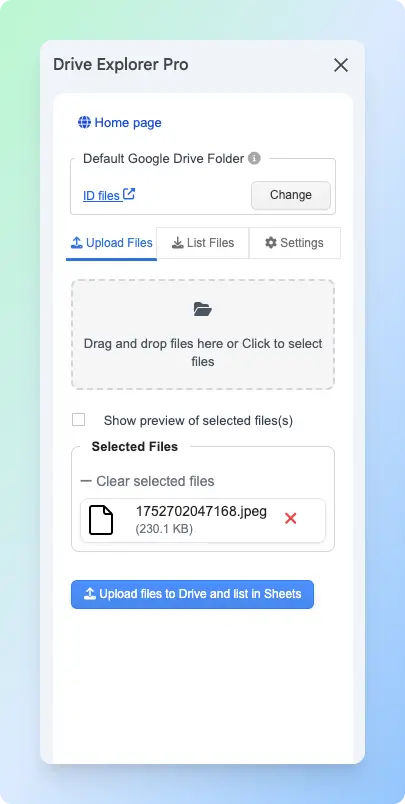
- Drag and drop the ZIP file into the upload box, or click the box to browse and select the ZIP file from your computer.
- Check that the selected file is the correct
.zipfile and that the destination folder is correct. - Click Upload files to Drive and list in Sheets.
- Wait for the upload to finish.
Drive Explorer Pro uploads the ZIP file to your selected Google Drive folder and adds the selected file details to your spreadsheet.
Result
The ZIP file is now uploaded to Google Drive, and its details are listed in Google Sheets automatically.
This gives you a clean upload record with the ZIP file name, link, size, type, and file ID in one place.
Choosing the Right Method
Each method uploads a ZIP file to Google Drive, but the best choice depends on where the file is saved and whether you need a record of the upload.
| Method | Best For | What You Get |
|---|---|---|
| Google Drive web app | Uploading one ZIP file from a desktop or laptop | ZIP file saved in Google Drive |
| Google Drive mobile app | Uploading a ZIP file from Android, iPhone, or iPad | ZIP file uploaded from your phone |
| Drive Explorer Pro | Uploading a ZIP file and recording details in Google Sheets | ZIP file saved in Drive and listed in Sheets |
Use Drive Explorer Pro when the ZIP file needs to be part of a tracking sheet, upload log, delivery record, backup list, or file inventory.
If you also want computer folders to sync to Google Drive automatically, see how to automatically back up files to Google Drive.
Conclusion
Uploading a ZIP file to Google Drive makes it easier to store, organize, and share large groups of files without uploading each one individually.
Use the Google Drive web or mobile app for everyday uploads. If you also need a searchable record of uploaded ZIP files, Drive Explorer Pro can save file names, links, sizes, and other details directly to Google Sheets, helping you keep everything organized in one place.