How to Automatically Back Up Files to Google Drive
Backing up files to Google Drive keeps an online copy of important folders, photos, videos, PDFs, and work files. This helps you access the same files from another device and recover them if your computer or phone is lost, damaged, or replaced.
But uploading files to Google Drive one by one is not the same as automatic backup. A manual upload saves only the files you choose at that moment. Files you add or edit later will not appear in Google Drive unless you upload them again or set up automatic backup.
In this guide, you will learn how to automatically back up files to Google Drive using two methods, along with guidance on when to use each one.
Table of Contents
Prerequisites
Before you start, make sure you have:
- A Google account
- Free storage in your Google account, check your storage at Google Storage
- Google Drive for desktop installed on the computer that has the folders you want to back up
- Google Photos app to automatically back up photos and videos from your phone, install it on Android or iOS
Google Drive, Gmail, and Google Photos share the same Google account storage. If your storage is full, new backups will not complete.
Backing Up Computer Folders with Google Drive for Desktop
Google Drive for desktop syncs selected folders from your computer to Google Drive. When you add or edit a file inside a selected folder, the change syncs to Google Drive automatically.
Use this method for folders you work with regularly, such as documents, invoices, client files, school files, or project folders.
Important: Google Drive for desktop can sync deletions. If you delete a synced file from your computer, the copy in Google Drive may also be removed. Keep a separate copy of files you cannot afford to lose.
For more details, see Google's guide to Google Drive for desktop.
Installing Google Drive for Desktop
-
Go to the Google Drive for desktop download page.
-
Download the installer for your computer.
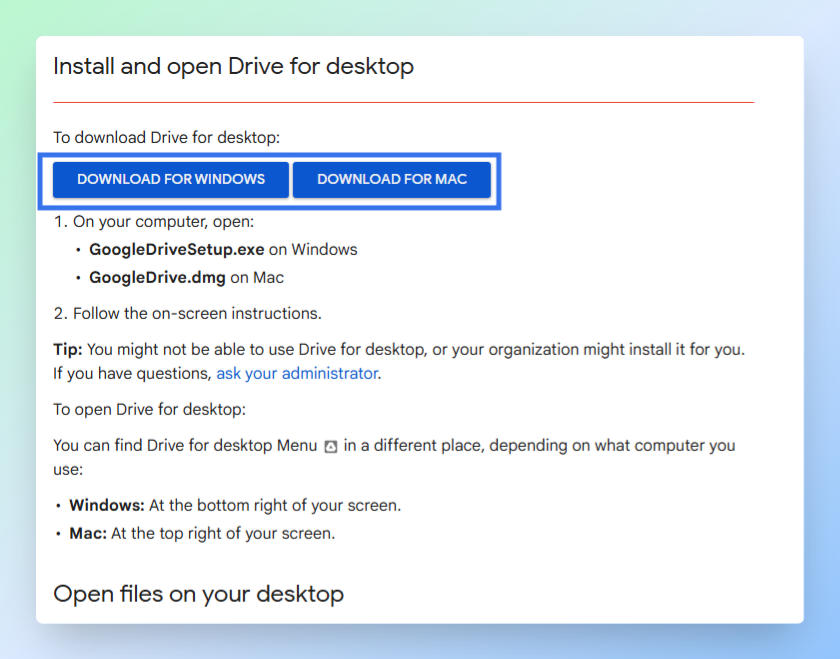
On Windows:
- Open GoogleDriveSetup.exe from your Downloads folder.
- Follow the on-screen instructions.
- Open Google Drive if it does not open automatically.
- Click Get started if shown.
- Click Sign in or Sign in with browser.
- Sign in to the Google account where you want your files to back up.
Result: The Google Drive for desktop icon appears in the Windows taskbar. The app is installed and running.
![]()
Adding a Folder to Back Up
-
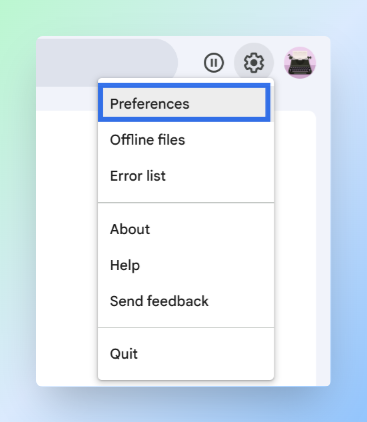
Click the Google Drive for desktop icon.
- On Windows, check the taskbar or system tray.
- On Mac, check the menu bar.
-
Click the Settings icon.
-
Click Preferences.
-
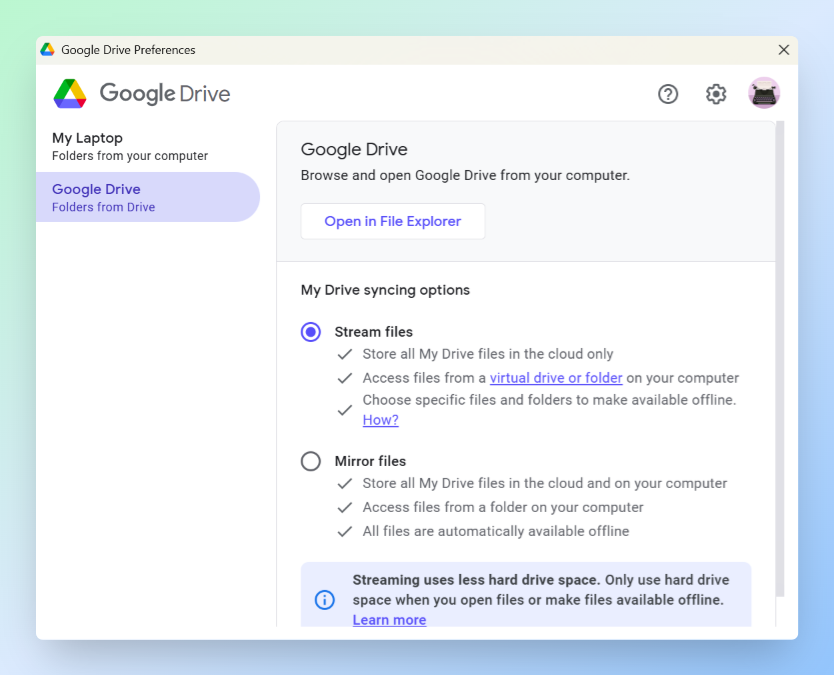
In the left sidebar, click Google Drive or Folders from Drive, depending on the label shown in your version.
-
Under My Drive syncing options, keep Stream files selected.
Stream files keeps your Google Drive files in the cloud and lets you open them from your computer when needed. This saves space on your device.
-
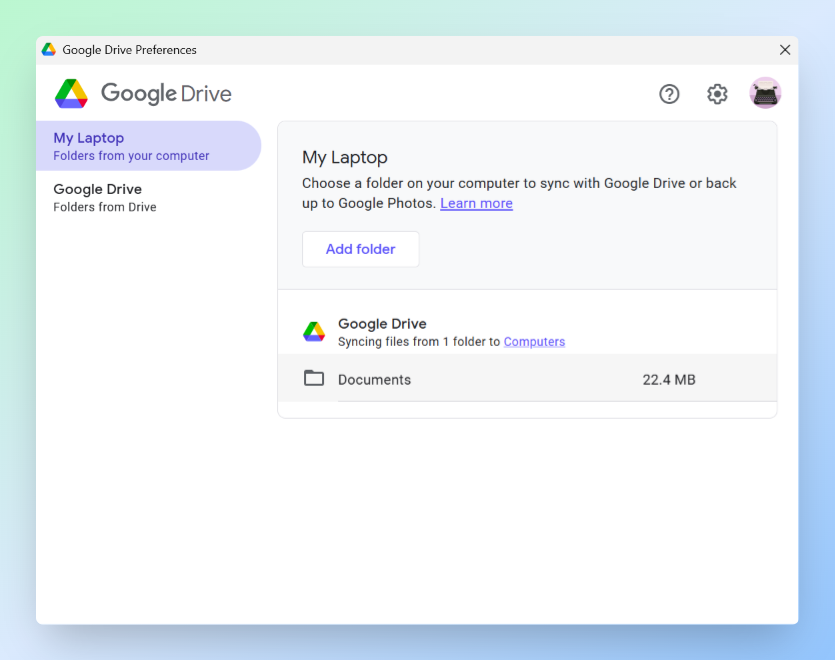
In the left sidebar, click My Laptop.
-
Click Add folder.
-
Select the folder you want to back up.
-
Click Select Folder.
-
Choose:
- Sync with Google Drive for documents, PDFs, spreadsheets, ZIP files, and other regular files.
- Back up to Google Photos only for folders that contain photos and videos.
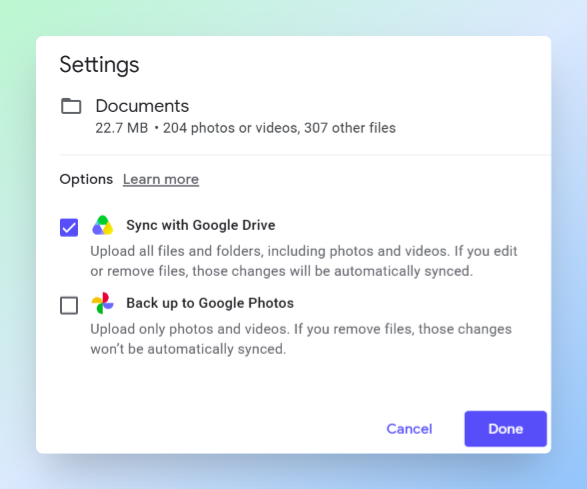
-
Click Done.
-
Click Save.
Result: The selected folder syncs to Google Drive automatically. You can find the backed-up folder in Google Drive under Computers.
Checking the Backup
Test one file before you rely on the backup.
- Open the folder you added to Google Drive for desktop.
- Create a small test file and name it
test-backup.txt. - Click the Google Drive for desktop icon and check the sync status. A spinning icon means syncing is in progress, a checkmark means the file synced successfully.
- Open Google Drive.
- Click Computers in the left sidebar.
- Open your computer name and find the synced folder.
- Confirm that
test-backup.txtappears there.
Result: If test-backup.txt appears in Google Drive, the computer folder backup is working. To download all your Drive files as a local backup, see how to download all files from Google Drive.
Backing Up Phone Photos and Videos with Google Photos
Google Photos automatically backs up photos and videos from your phone to your Google account. Once backup is on, every new photo and video syncs to Google Photos without any manual steps.
Note: Google Photos backup saves to Google Photos, not to My Drive. It still uses the same Google account storage shared by Google Drive and Gmail.
- Open the Google Photos app.
- Sign in to your Google account.
- Tap your profile picture.
- Tap Photos settings.
- Tap Backup.
- Turn Backup on.
Result: Google Photos starts backing up your phone photos and videos automatically. The first backup can take time if you have many photos and videos.
To confirm the backup is working:
- Open the Google Photos app.
- Tap your profile picture.
- Check for Backup complete.
For more details, see Google's photo backup guides for Android and iPhone or iPad.
Finding Your Backed-Up Files
Once your files are backed up, you can list them in Google Sheets with file names, links, sizes, and file types using Drive Explorer Pro.
This gives you a searchable index you can filter or share without opening each folder in Google Drive one by one. See how to list files from Google Drive into Google Sheets for the full workflow.
Conclusion
Your computer folders and phone photos now back up to Google Drive automatically. Google Drive for desktop keeps selected computer folders in sync, Google Photos handles phone photos and videos.
Before you rely on either, confirm the backup worked. In Google Drive, click Computers in the left sidebar to check your computer folders. Open Google Photos and look for Backup complete to confirm phone photos backed up.