How to List Files from Google Drive into Google Sheets
Google Drive stores your files, but it does not give you a spreadsheet-style list you can filter, sort, or share with your team.
But opening Drive and copying file names and links one by one into a sheet takes too long and there is no native export option that gives you rows of file details.
To list files from Google Drive in Google Sheets, use Drive Explorer Pro. Open the add-on inside your spreadsheet, select the files from a Drive file picker, and it writes each file's name, link, size, and other details as rows automatically, no coding required.
In this guide, you will walk through the Drive Explorer Pro workflow step by step.
Table of Contents
Video Tutorial
Prerequisites
Before you start, make sure you have:
- A Google account with access to Google Drive and Google Sheets
- Read access to the Drive folder or files you want to list
- Edit access to the spreadsheet where the list should appear
- Permission to install add-ons from the Google Workspace Marketplace
If you only need to link one or two files, see how to link a Google Drive file to Google Sheets.
Listing Files with Drive Explorer Pro
Drive Explorer Pro is a Google Sheets add-on that lets you create a file inventory from Google Drive directly in a spreadsheet. Choose a folder, shared drive, or search criteria, select which file details to include, and the add-on adds one row per file automatically.
When to use: You want to create a file inventory in Google Sheets without writing code.
Why use Drive Explorer Pro
- List multiple Drive files at once - no copying file names or URLs one by one.
- Choose which details appear as columns: file name, link, download link, size, file ID, and more - all logged automatically.
- Set file access before listing so every link works for recipients the moment you share the sheet.
Install Drive Explorer Pro from the Google Workspace Marketplace:
Launching Drive Explorer Pro
-
Open the Google Sheets spreadsheet where you want the file list.
-
Click Extensions → Drive Explorer Pro → Open Drive Explorer Pro.
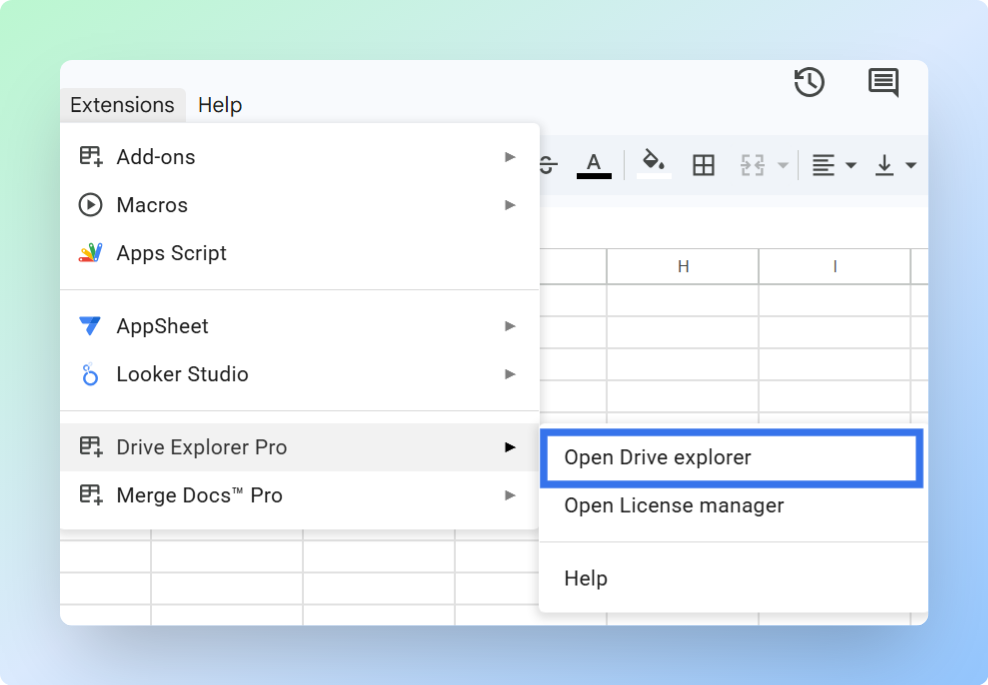
Note: If Drive Explorer Pro does not appear in the Extensions menu, refresh the Google Sheets page.
The Drive Explorer Pro sidebar opens on the right side of your sheet.
One-time setup: Complete the steps below once. Drive Explorer Pro saves your settings for future tasks.
Configuring What Gets Listed
Before you list files, set up the List Files tab once. Drive Explorer Pro reuses these settings on every run.
-
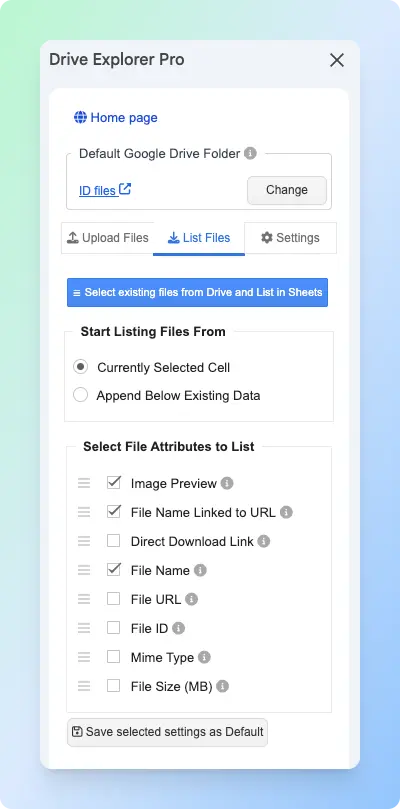
Open the List Files tab in the sidebar.
-
Under Start listing file from, choose:
- Currently Selected Cell for a new list starting at your cursor, or
- Append Below Existing Data to add new rows without overwriting old ones.
-
Under Select File Attributes to List, check the columns you want. Common choices:
- File Name Linked to URL - clickable file name
- File URL - standard Google Drive link
- Direct Download Link - link that starts a download
- File Size (MB)
- Mime Type - the technical file format (for example,
application/pdffor PDFs orimage/jpegfor photos) - File ID
- Image Preview - thumbnail for image files
-
Drag attributes to set column order, then click Save Selected Settings as Default.
Now set who can open the file links before you run the list.
Setting File Access
Set who can open the file links before listing. This prevents recipients from seeing a Request access page when they click a link in your sheet.
-
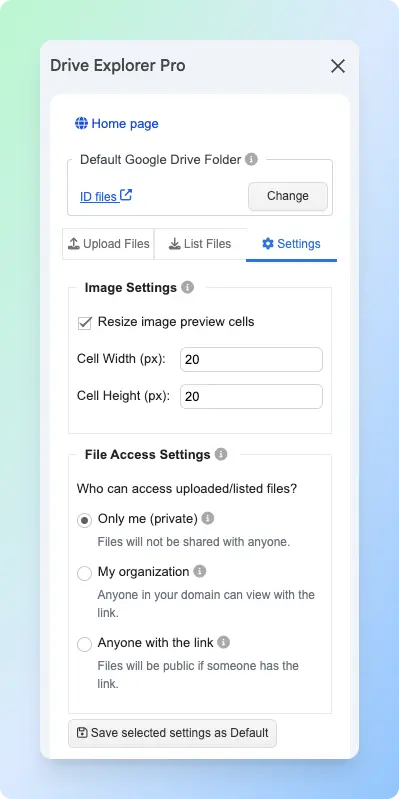
Click the Settings tab in the sidebar.
-
Under File Access Settings, choose the access level you need.
| Setting | Who can open the file | When to use it |
|---|---|---|
| Only me | Only you | Files not ready to share |
| My organization | People in your Google Workspace organization | Internal team files |
| Anyone with the link | Anyone with the link | External sharing with clients or recipients |
- Click Save selected settings as Default.
Important: This setting applies to the files you select in this session. It does not change permissions on files already in your Google Drive that you do not select.
Selecting Files and Building the List
- Go back to the List Files tab.
- Click Select existing files from Drive and List in Sheets.
- Browse to your folder and select the files. Hold Ctrl on Windows or Command on Mac to select multiple files.
- Click Select and wait until all rows appear.
Note: Do not close the Drive Explorer Pro sidebar while it is listing files. Closing it early can stop the process and leave rows incomplete.
Tip: To grow the list over time without overwriting existing rows, go back to the List Files tab, set Start listing file from to Append Below Existing Data, and run the list again.
Result: Each file appears on its own row with the columns you selected.
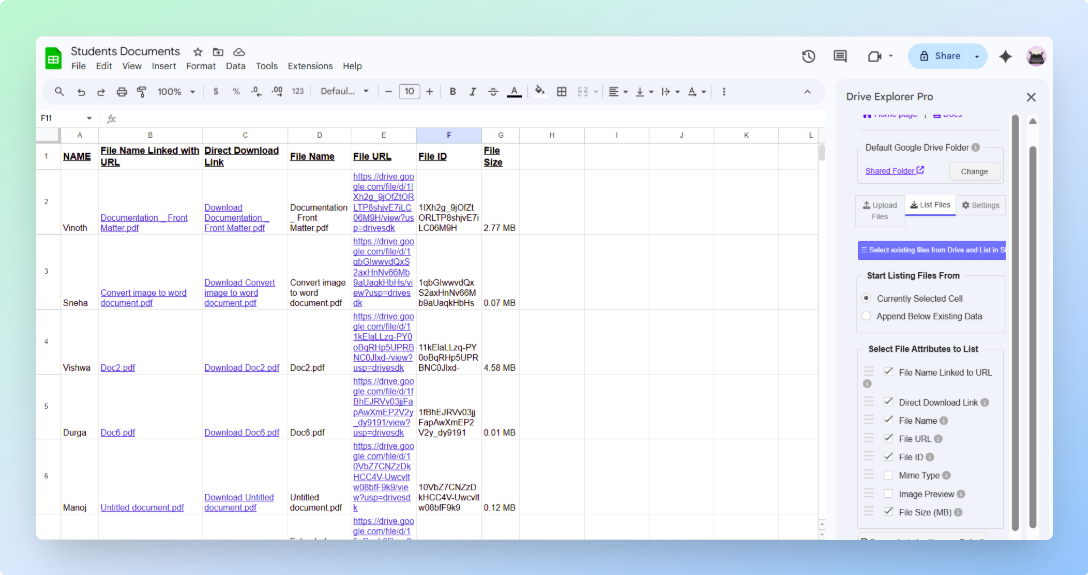
Click a link in the sheet to confirm it opens the file in Google Drive.
If you are listing PDFs and want to format the links with display text or use the HYPERLINK formula, see how to add a PDF link in Google Sheets.
If you also need to add new files to Drive and log them in the same sheet, see how to upload files to Google Drive and share a link.
Related Free Tools
Building inventory or procurement trackers in Sheets? Pair your file list with PDFs these tools generate:
- Goods Received Note Generator — GRN PDFs for incoming stock
- Packing Slip Generator — shipment packing slips
- Stock Keeping Unit Generator — SKU codes for product rows
- Purchase Order Generator — PO PDFs to store alongside delivery files
- Browse all 29 free business tools
Conclusion
Drive Explorer Pro is the fastest way to list Google Drive files in Google Sheets - pick your files, choose your columns, and build a searchable inventory in rows.
Before sharing the sheet, confirm file access on the listed files. If a file is still Restricted, people may see Request access even when the link is in your spreadsheet.