How to Link a Google Drive File to Google Sheets
Google Sheets lets you link files from Google Drive directly inside a cell. Instead of searching for a file every time, you can open it from the sheet in one click.
A Google Drive link can appear in Google Sheets in different ways. A pasted link shows the full URL, which works but looks messy. A smart chip shows the file name and Drive icon, so the sheet is easier to read. Your method also affects file access, not just how the link looks in the sheet.
In this guide, you will learn how to link a Google Drive file to Google Sheets using three methods, along with guidance on when to use each one.
Table of Contents
Video Tutorial
Prerequisites
Before you start, make sure you have:
- A Google account with access to Google Drive and Google Sheets
- The file must already be in Google Drive. If it is still on your computer, upload it to Google Drive first.
Linking a Single File Using the Built-in Methods
Google Sheets gives you two built-in ways to link a Google Drive file. The two approaches differ in how the file appears in the cell.
- Use copy-paste when you only need a clickable URL in the cell.
- Use smart chip when you want the file to appear as a clickable card (showing the file name and icon) directly inside the cell.
When to use: Use these methods when you need to link one or two files.
Linking by Copying and Pasting
Copy the shareable link from Google Drive and paste it into a cell. No formulas or add-ons needed.
Important: Set the file's sharing access before you paste or send the link. If the file stays Restricted, recipients will see a Request access page instead of the file.
For the exact Google Drive sharing steps, see the official Share files from Google Drive.
-
Go to Google Drive and sign in.
-
Right-click the file you want to link.
-
Open the Share menu, then click Share.
-
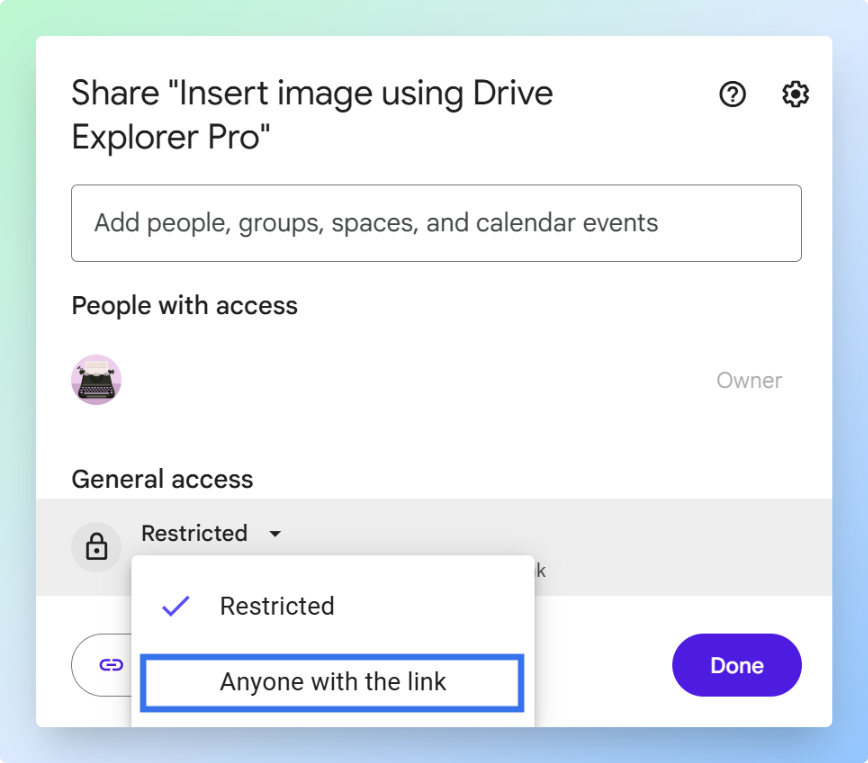
Under General access, click the dropdown and select Anyone with the link.
-
Set the role to Viewer. This lets recipients open the file without being able to edit or delete it.
-
Click Copy link, then click Done.
-
Open the Google Sheets spreadsheet where you want the link to appear. This can be a new sheet or an existing one.
-
Select the cell where you want the link.
-
Paste the link using Ctrl + V on Windows or Command + V on Mac.
-
Press Enter to save the link and move down.
Result: The cell shows the full URL as a clickable link. Clicking it opens the file in Google Drive.
Alternate step: If the cell shows the raw URL, you can replace it with clean link text.
- Click the cell.
- Press Ctrl + K on Windows or Command + K on Mac.
- Add the file name in Text.
- Paste the Google Drive URL in Link.
- Click Apply.
Now the cell looks cleaner and still opens the same file.
Linking by Inserting a Smart Chip
Google Sheets lets you insert a file as a smart chip using the @ symbol.
Note: A smart chip only changes how the file link looks in the cell. It does not update the file's sharing access. If the file is still set to Restricted, others will see a Request access page when they click the chip. Change General access to Anyone with the link before sharing the sheet.
-
Open the Google Sheets spreadsheet where you want to insert the chip.
-
Select the cell where you want to link the file.
-
Type @ in the cell. A dropdown appears immediately.
-
Start typing the file name. The dropdown filters to show matching files from your Google Drive.
-
Select the file from the dropdown list.
Alternative: Paste the Google Drive file link into the cell and press Tab to create a file chip.
Result: The file appears as a smart chip in the cell. The chip shows the file name and a Drive icon.
Both built-in approaches work well for one or two files, but they become slow when you need to add many links. The next section shows how to link multiple Google Drive files in Google Sheets with their names, links, sizes, and types in one workflow.
Linking Multiple Files Using Drive Explorer Pro
Drive Explorer Pro helps you create a searchable file list in Google Sheets from files stored in Google Drive. Instead of opening files one by one, you can select them once and add each file to your sheet as a separate row.
Each row can include the file name, Google Drive link, file size, file type, and other details you choose.
This works well when you need a shareable file index for product catalogs, client file logs, asset trackers, project documents, or other workflows managed from Google Sheets.
When to use: Use this method when you need to link multiple files and keep their details organized in one place.
Why use Drive Explorer Pro
- Link many Google Drive files at once without copying each URL manually.
- Add file names, Drive links, direct download links, and file sizes to your sheet automatically.
- Set file access before listing, so each listed file uses the access setting you choose.
Install Drive Explorer Pro from the Google Workspace Marketplace:
Launching Drive Explorer Pro
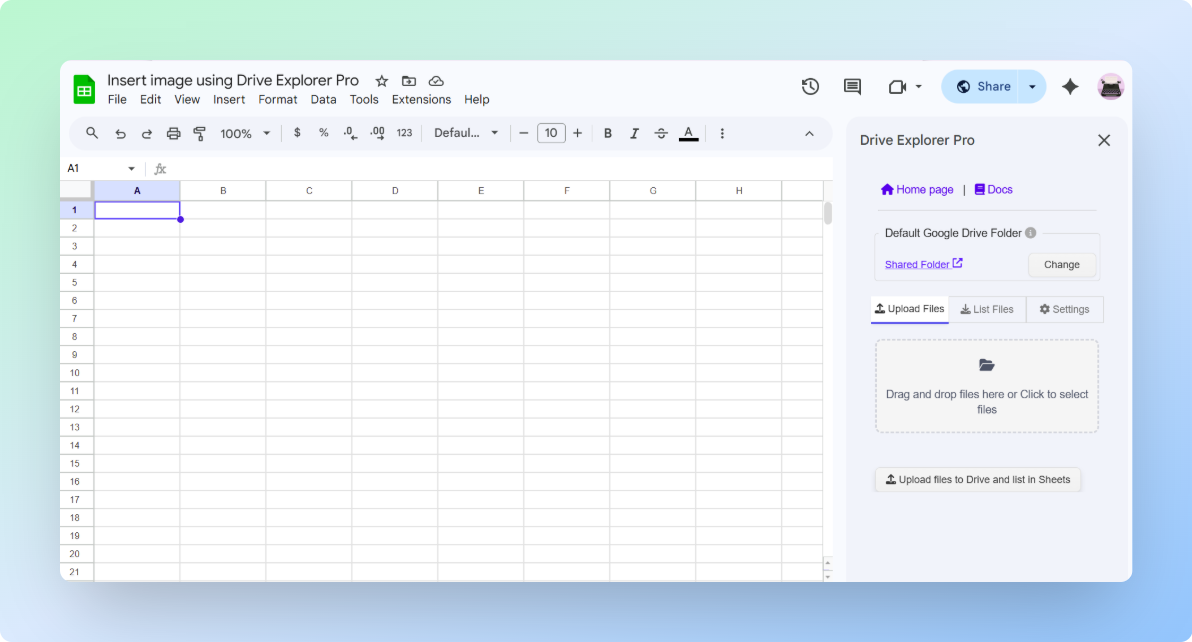
Once Drive Explorer Pro is installed, open it from the Extensions menu in Google Sheets. This opens a sidebar on the right side of your sheet where all the setup and file-listing controls live.
-
Open Google Sheets.
-
Click Extensions > Drive Explorer Pro > Open Drive Explorer Pro.
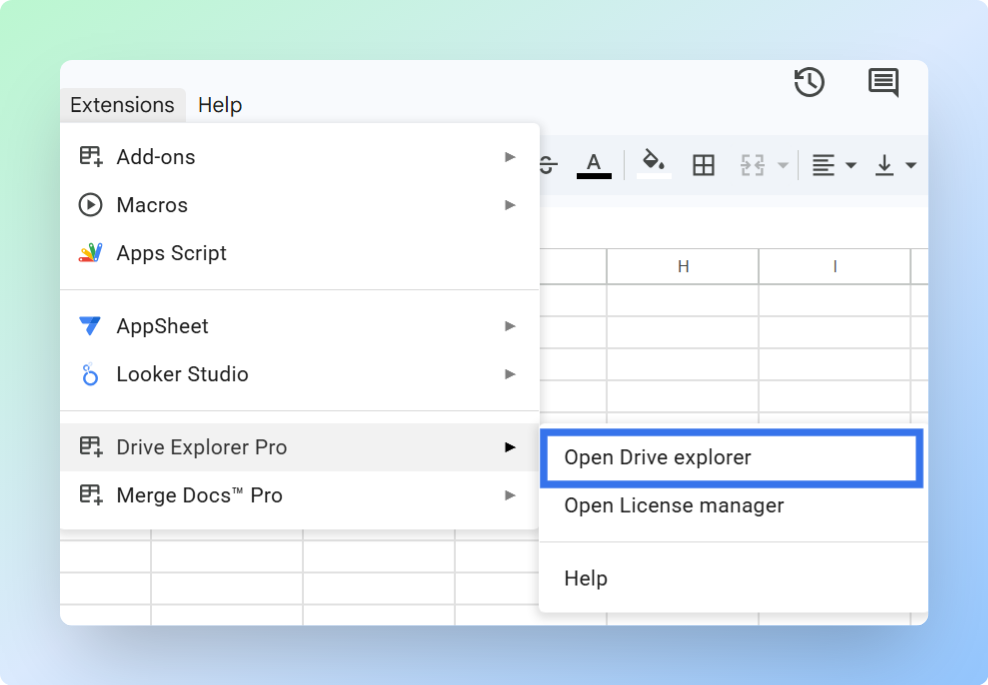
The Drive Explorer Pro sidebar opens on the right side of your sheet.
Note: If Drive Explorer Pro does not appear in the Extensions menu, refresh the Google Sheets page.
One-time setup: Complete the steps below once. Drive Explorer Pro saves your settings for future file-linking tasks.
Setting File Access
Set who can open the file links before listing any files. This prevents recipients from seeing a Request access page when they click a link in your sheet.
-
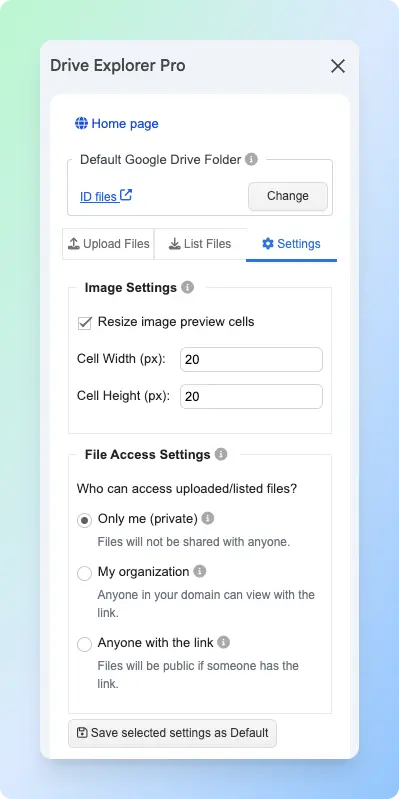
Click the Settings tab in the sidebar.
-
Under File Access Settings, choose the access level you need.
| Setting | Who can open the file | When to use it |
|---|---|---|
| Only me | Only you | Use when the files are not ready to share |
| My organization | People in your Google Workspace organization | Use for internal team files. This only appears on work or school accounts |
| Anyone with the link | Anyone with the link | Use for external sharing with clients or recipients |
- Click Save Selected Settings as Default.
Important: This setting applies to the files you select in this session. It does not change permissions on files already in your Google Drive that you do not select.
Now choose which file details should appear as columns in your sheet.
Choosing File Details to Log
Choose which file details Drive Explorer Pro should add to your sheet. Each detail you select becomes a column in Google Sheets.
-
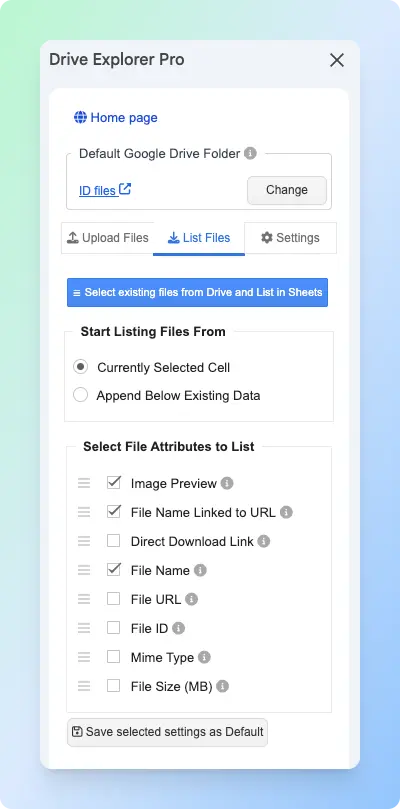
Click the List Files tab in the sidebar.
-
Under Start listing file from, choose one of the following:
| Option | What it does | When to use it |
|---|---|---|
| Currently selected cell | Adds file rows from the selected cell | Use when starting a new file list |
| Append Below Existing Data | Adds new rows below existing content | Use when adding more files to an existing list |
- Under Select File Attributes to list, choose the details you want in your sheet.
| Attribute | What it adds | Best for |
|---|---|---|
| File Name Linked to URL | Clickable file name that opens the file in Google Drive | Sharing and identifying files at a glance |
| File URL | Standard Google Drive link | Copying and sharing the file link |
| Direct Download Link | Link that downloads the file immediately | When recipients need to save the file |
| File Size (MB) | File size in megabytes | Tracking large files |
| Mime Type | File format, such as application/pdf or image/jpeg | Filtering by file type |
For most file-linking workflows, select File Name Linked to URL, Direct Download Link, and File Size (MB). Drag the rows up or down to set the column order you want.
- Click Save Selected Settings as Default.
With settings saved, you are ready to select the files and add them to your sheet.
Listing Files from Google Drive
This is where the setup pays off. Drive Explorer Pro opens a file picker so you can select files directly from your Google Drive. Each file you select gets added as a row in your sheet with all the details you chose in the previous step.
-
Click the List Files tab in the sidebar.
-
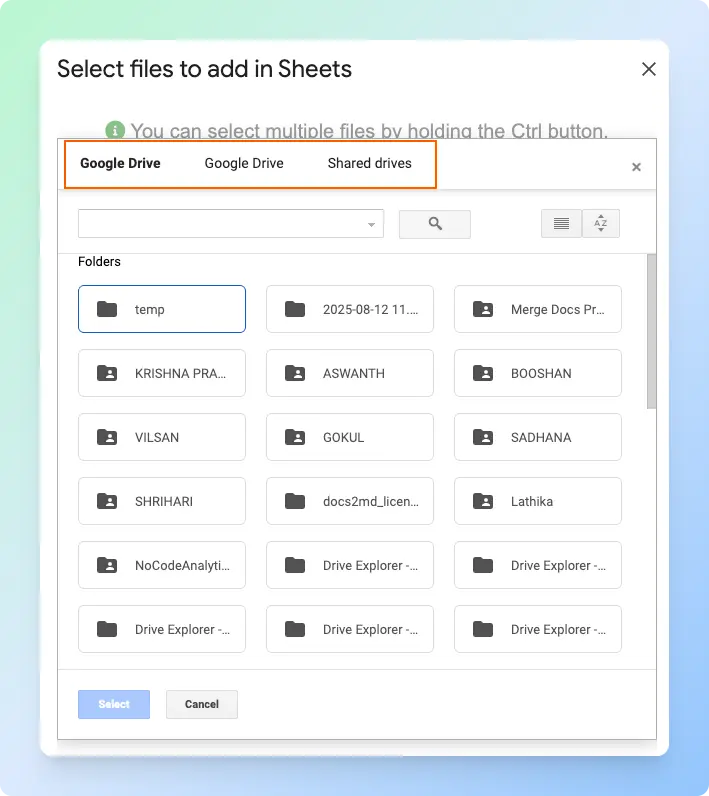
Click Select existing files from Drive and List in Sheets.
-
Browse to the folder that contains your files.
-
Select the files you want to link. Hold Ctrl on Windows or Command on Mac to select multiple files.
-
Click Select.
Note: Do not close the Drive Explorer Pro sidebar while it is listing files. Closing it early can stop the process and leave rows incomplete.
Result: Drive Explorer Pro adds one row per file to your sheet. Each row includes the file name, link, and other details based on the attributes you selected.

Click a link in the File URL column to confirm it opens the file in Google Drive. If you want to generate direct download links instead of standard Drive links, see how to create a direct download link in Google Drive.
Choosing the Right Method
Choose the method that matches your workflow and the level of file detail you need in Google Sheets.
| Method | Best for | Shows file name | Works for many files |
|---|---|---|---|
| Copy and paste | One or two files, plain URL in cell | No | No |
| Smart chip | One file per cell with name and icon visible | Yes | No |
| Drive Explorer Pro | Many files with links and details in rows | Yes | Yes |
Related Free Tools
Linking business PDFs from Drive to Sheets is easier when the documents already exist:
- Expense Report Generator — expense PDFs to link row-by-row
- Invoice Generator — invoice PDFs for billing trackers
- Browse all free business tools
Conclusion
Linking a Google Drive file to Google Sheets keeps related files easy to open from one place.
- Use copy-paste when you only need a clickable URL for one file.
- Use a smart chip when you want the file name and Drive icon to appear in the cell.
- Use Drive Explorer Pro when you need to link many files and list their names, links, sizes, and other details in rows.
Before you share the sheet, check the linked file access. Sharing the Google Sheet does not automatically share the Google Drive files. If a file is still Restricted, others may see a Request access page. Update the file's sharing settings before sending the link.