How to Insert Images in Google Sheets from Google Drive (2 Methods)
Google Sheets lets you insert images directly into cells, so each image stays tied to its row when you sort or filter the sheet.
But pasting a Google Drive link into a cell won't show the image, it stays as a clickable text link. To display the actual image, you need to use a formula or the Insert menu to pull it in.
In this tutorial, you will learn two ways to insert a Google Drive image into Google Sheets and when to use each one.
Table of Contents
Video Tutorial
Prerequisites
Before you start, make sure you have:
- A Google account with access to Google Sheets
- The image files you want to insert
- Image files saved in Google Drive or on your computer, depending on the method you use
Inserting a Single Image Using the Built-in Insert Menu
If you only need to insert a single image, use the built-in Insert menu in Google Sheets. This is the fastest way to insert one image inside a Google Sheets cell without installing anything.
Note: A Google Drive link is only the file address. If you paste the link into Google Sheets, it stays as a clickable link. To show the actual image inside the sheet, insert the image as an in-cell image or use a method that imports the image preview into the cell.
When to use: Use this method for inserting a single image without extra file details such as file name, size, or link. For multiple images or file details, use the Drive Explorer Pro approach.
-
Select the cell where you want to insert the image.
-
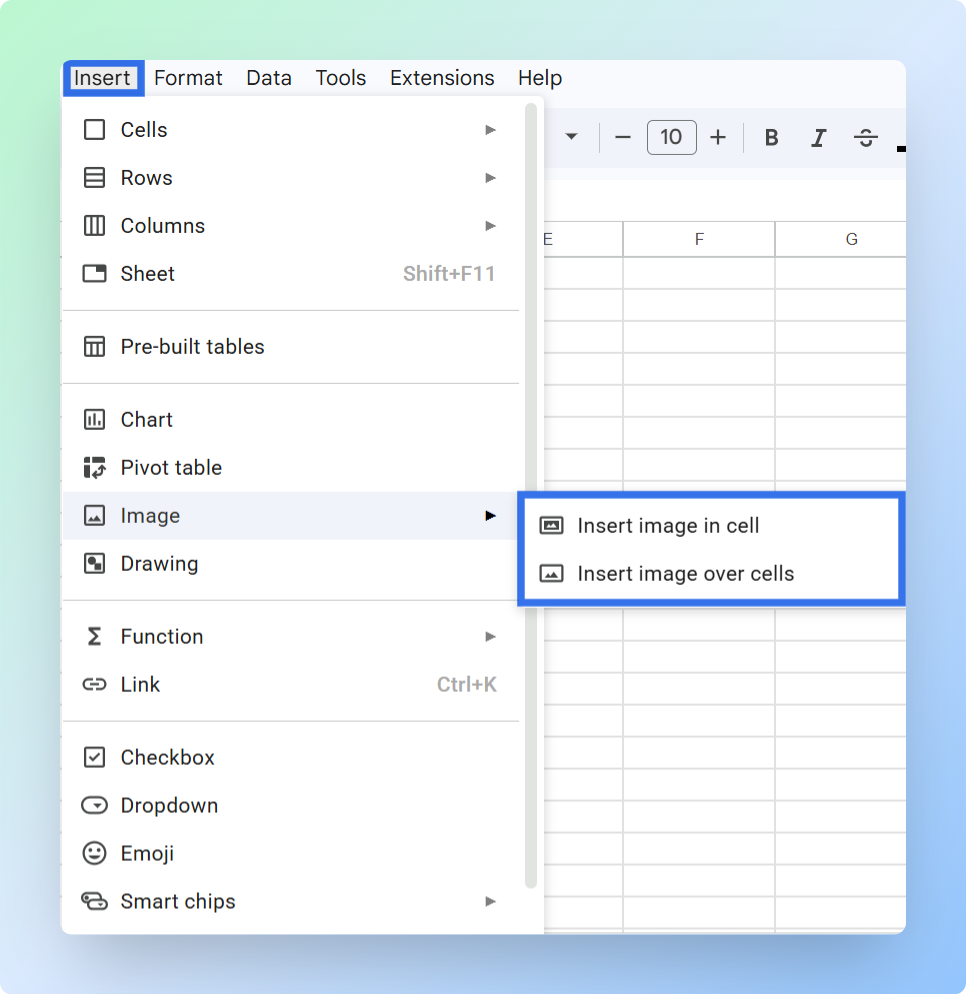
Click Insert in the top menu bar.
-
Select Image.
-
Choose one of the following options:
- Image in cell - Locks the image inside the cell. It moves with the row when sorting or filtering.
- Image over cells - Places the image above the grid. You can move and resize it freely, but it does not stay attached to any row. Use this only for decorative images or logos that are not tied to specific data rows.
Note: In-cell images are recommended for structured datasets because they maintain alignment during sorting, filtering, and data updates.
-
Select the Google Drive tab at the top of the dialog.
-
Browse and select the file from your Drive.
-
Click Insert.
Result: The image appears in the selected cell or above the grid, depending on the option you chose.
-
If you selected In cell, the image moves with the row during sorting and filtering.
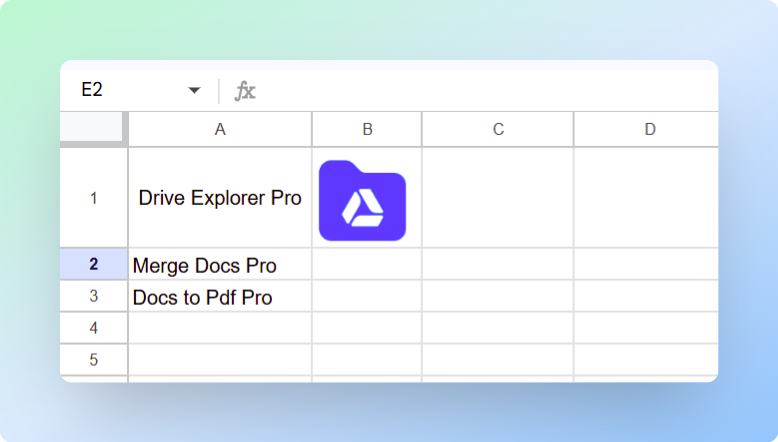 inset-image-in-cell-output.png
 -
If you selected Over cells, the image floats above the grid. You can resize and drag it, but it will not follow the row.
Tip: Increase the column width and row height to make the image larger and easier to see.
- Right-click the column header → click Resize column
- Drag the row border downward to increase height
For all resizing options, including the IMAGE formula and floating images, see how to resize images in Google Sheets.
For more details, refer to the official Google Sheets documentation: Add an image to a spreadsheet
Limitations
- You can insert only one image at a time. To add multiple images, repeat these steps for each file.
- You cannot add file details automatically beside the image, such as the file name, file size, or Google Drive link.
The built-in menu works well for one or two images. When you need to insert multiple images with file details like name, size, and link, the Drive Explorer Pro section below walks you through the bulk workflow.
Inserting Multiple Images Using Drive Explorer Pro
Drive Explorer Pro is a Google Sheets add-on that helps you upload files to Google Drive and organize their links in Google Sheets.
You can use Drive Explorer Pro when you need to insert multiple Google Drive images into Google Sheets and keep each image connected to its file name, link, size, and other details.
This works well for product catalogs, reports, inventories, asset trackers, and dashboards.
Why use Drive Explorer Pro
- Insert multiple images at once.
- Add file details like name, size, and download link automatically.
- Keep images anchored to their rows during sorting and filtering.
- Save settings for future image-listing tasks.
Install Drive Explorer Pro from the Google Workspace Marketplace:
Launching Drive Explorer Pro
- Open Google Sheets.
- Go to Extensions > Drive Explorer Pro > Open Drive Explorer Pro.
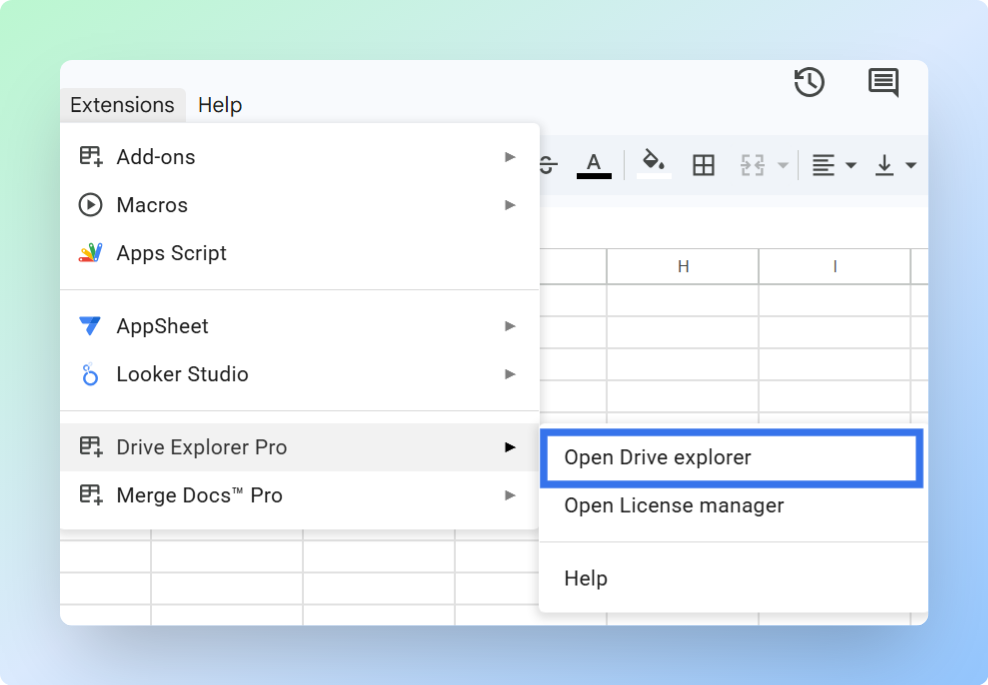
The Drive Explorer Pro sidebar opens on the right side of your sheet.
One-time setup: Configure these settings once. Drive Explorer Pro will reuse them for future image-listing tasks, so you do not need to repeat the setup each time.
Configuring the Sheet Output
Before inserting images, choose where the data should appear and which file details should be added to the sheet.
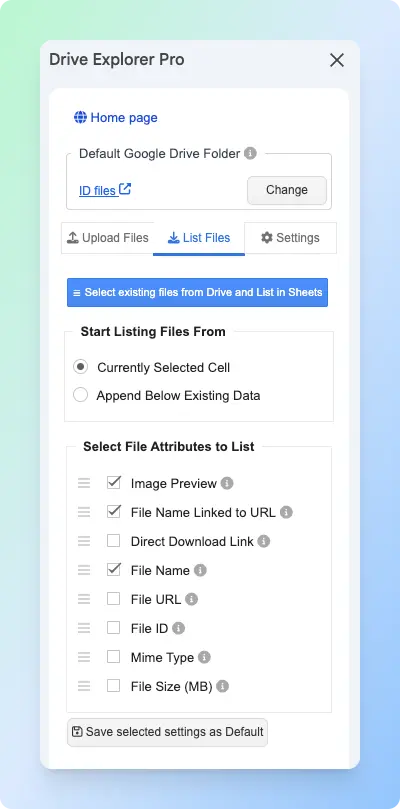
- Go to the List Files tab.
-
Under Start listing file from, choose one option:
- Currently Selected Cell - starts from the selected cell.
- Append Below Existing Data - adds new rows below existing content.
-
Under Select File Attributes to list, choose the details you want to add with each image.
For most image workflows, select Image Preview, File Name Linked to URL, and File Size (MB).
You can drag the selected attributes to change the column order. To understand each option, see the Select File Attributes documentation.
- Click Save Selected Settings as Default.
Setting the Image Preview Size
Set how large each image preview should appear inside the Google Sheets cells.
- Go to the Settings tab.
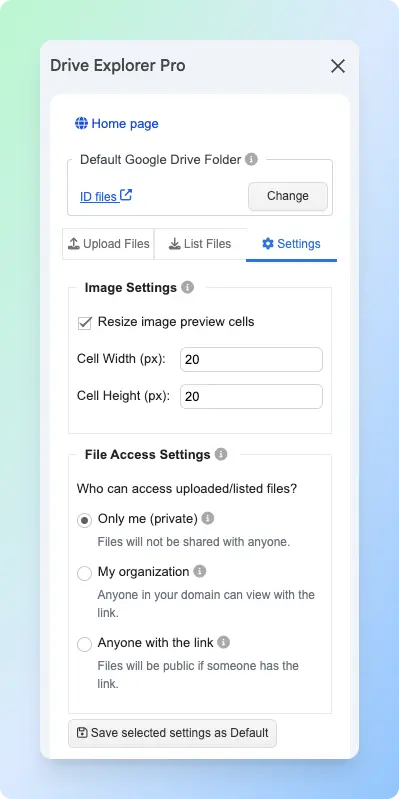
- In the Image Settings, set the Cell Width and Cell Height in pixels.
A size between 100 and 150 pixels works well for most image lists. Use a smaller size for large sheets, or a larger size when users need to identify images without opening them in Google Drive.
-
Under File Access Settings, choose who can open the photo links:
File Access Setting What it means Only me The photos stay private in your Google Drive My organization People inside your company or school can open the photo links Anyone with the link Anyone with the link can open the photos -
Click Save Selected Settings as Default.
Inserting Images from Google Drive
After choosing the folder, file attributes, and preview size, you can insert the images into Google Sheets.
-
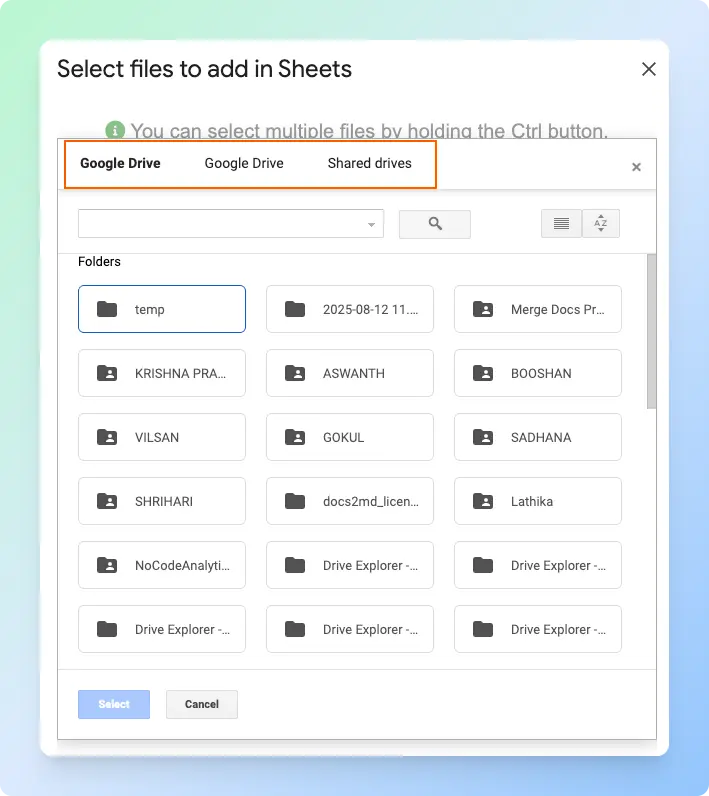
Go back to the List Files tab.
-
Click Select existing files from Drive and List in Sheets.
-
Select one or more images from Google Drive.
-
Click Select.
-
When it finishes, the images appear in the sheet, one row per file.
Do not close the sidebar while the images are being added. Closing it early can stop the process and leave rows incomplete.
File access note: Image previews can appear in Google Sheets, but recipients still need access to the original Google Drive files if they open the file links. To upload photos and create shareable links in one workflow, see Upload Photos to Google Drive and Share a Link.
Result
Your Google Drive images appear in Google Sheets as structured rows. Each row can include the image preview, file name, file size, and link, based on the attributes you selected.
Because the previews are inserted into cells, the images stay connected to their rows when you sort or filter the sheet.

For more details, see the Drive Explorer Pro official documentation.
Choosing the Right Method
The two methods serve different needs. Use the tables below to decide which approach fits your situation
| Feature | Insert Menu | Drive Explorer Pro |
|---|---|---|
| Multiple images at once | ❌ No | ✅ Yes |
| One-time setup required | ❌ No | ✅ Yes |
| Adds file details automatically | ❌ No | ✅ Yes |
| Best for | One image | Many images with previews and file details |
If you work with large datasets or image-heavy reports, the Drive Explorer Pro add-on saves time and reduces repetitive work.
If the images are still on your computer and not yet in Google Drive, see how to mass upload images to Google Sheets automatically to upload and list them in one workflow.
To also list file names, sizes, and IDs alongside images, see how to list files from Google Drive into Google Sheets.
Related Free Tools
Product and inventory sheets often need barcodes or SKU codes alongside images:
- Free Barcode Generator — barcodes for product catalog rows
- Stock Keeping Unit Generator — SKU codes for inventory tracking
- Browse all free business tools
Conclusion
You now have Google Drive images showing in Google Sheets after choosing the right method, inserting the image, and keeping it aligned with the correct row.
Remember the main difference: a Google Drive link only opens the file, but an in-cell image shows the actual image inside the sheet. This matters when you need to sort, filter, or review image-based records such as product catalogs, reports, dashboards, or file trackers.
- Use the Insert menu when you need to add one image from Google Drive.
- Use Drive Explorer Pro when you need to insert multiple images with previews, file names, links, and other file details in the same row.
Before you use or share the sheet, check the row height, column width, and file access settings so the images are easy to view and the original Google Drive files open correctly.