How to Insert Image Inside a Cell in Google Sheets (3 Methods)
Images in Google Sheets can float above the grid instead of staying inside cells. When you sort or filter the sheet, floating images stay in place while rows move. For example, a product photo can end up next to the wrong item.
Inserting images inside cells fixes this. An in-cell image stays attached to its cell, so the image moves with its row and stays aligned with the correct data.
In this tutorial, you will learn three methods to insert an image inside a cell in Google Sheets, along with when to use each one.
Table of Contents
Video Tutorial
Prerequisites
Before you start, make sure you have:
- A Google account with access to Google Sheets
- The image files you want to insert
- Access to Google Drive, if the images are stored there
Inserting Images Using the Insert Menu
You can place an image into a cell using the built-in Insert menu. This is the native Google Sheets tool and does not require any installation or formulas.
When to use: Insert a single image into one cell without any setup.
- Select the cell where you want to insert the image.
- Click Insert in the top menu bar.
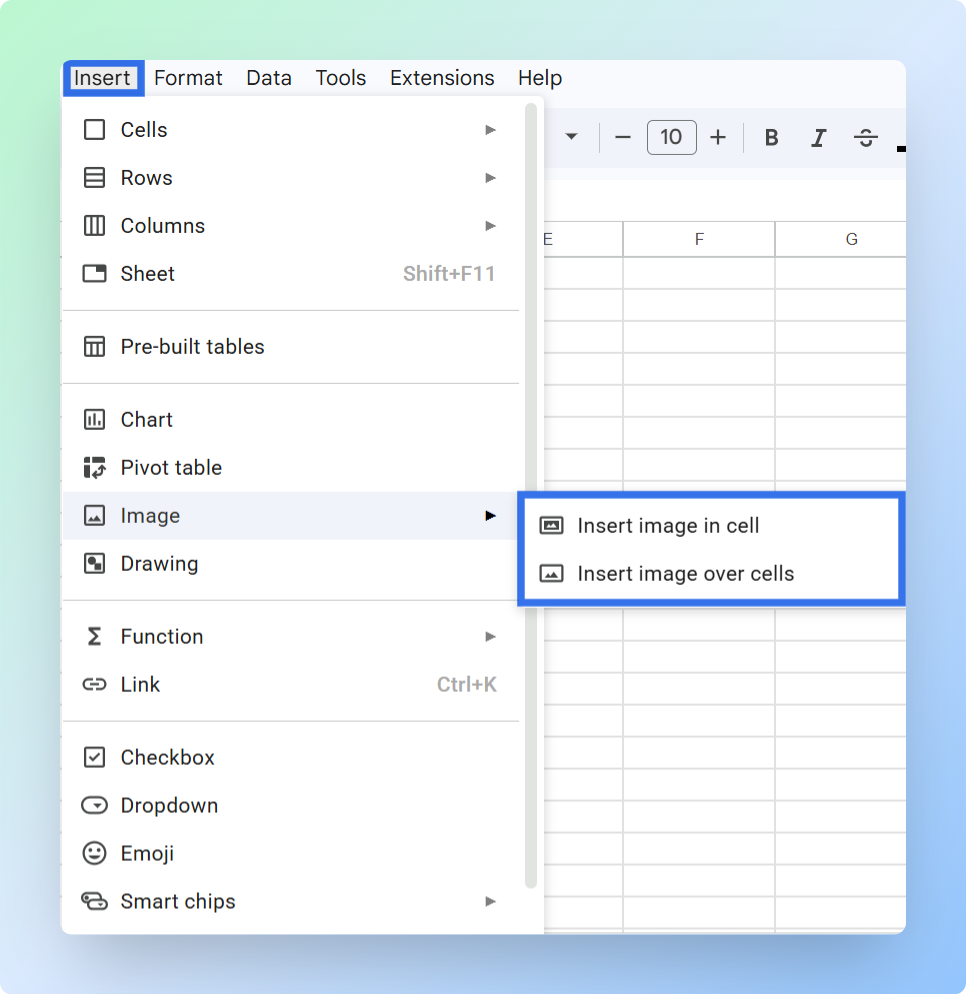
- Select Image.
- Click Insert image in cell.
- Select the tab for where your image is stored:
- Upload for a file on your computer.
- Google Drive for a file already in Drive.
- Link for a public image URL.
- Photos for Google Photos.
After you select a tab, its options appear below.
- Browse or search for your image in the selected panel.
- Select the image file you want to use.
- Click Insert.
Note: Most common image formats work, including JPEG, PNG, GIF, and BMP. If your image does not appear, it may be a WebP or SVG file, use the IMAGE function with a public URL instead.
Result
The image appears inside the cell, scaled to fit the current cell size. The image stays attached to the cell. When you sort or filter the sheet, the image moves with its row and stays aligned with the correct data.
If the image looks too small, resize the row or column: drag the row border down or the column border right until the image is clearly visible. For other sizing options, including exact pixel control with the IMAGE formula, see how to resize images in Google Sheets.
For more details, refer to the official Google Sheets documentation.
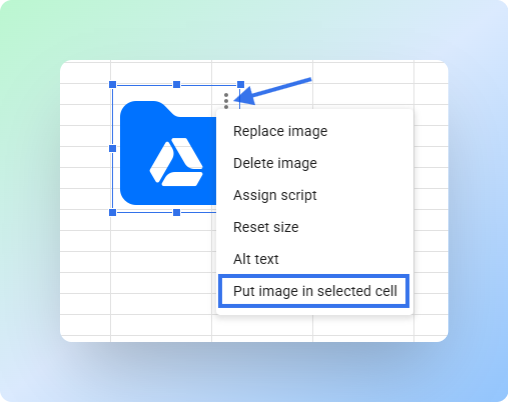
Common mistake: Copying and pasting an image places it over the cells as a floating object. If an image appears over the grid instead of inside the cell, select the image, open the three-dot menu, and choose Put image in selected cell.
Limitations
- You can insert only one image at a time.
- To add images in multiple cells, you must repeat these steps for each one.
The Insert menu works for single images, but it becomes slow when you need images in many rows. The IMAGE function is faster when you already have a list of direct image URLs. For bulk uploads with previews and file details, see how to mass upload images in Google Sheets automatically.
Inserting Images Using the IMAGE Function
You can use the IMAGE function to load images into cells using a URL. This built-in formula pulls an image from a web address and displays it inside the cell.
Instead of inserting images manually, you enter a formula once and copy it down to fill many rows.
Important: The IMAGE function works only when Google Sheets can access the image URL directly. A private Google Drive link will not reliably show the image. Use this method only when the image has a public image URL.
When to use: You have direct image URLs and need to insert images across many rows.
-
Find the image online, right-click it, and select Copy image address to copy the direct image URL.
-
Select the target cell.
-
Enter the formula:
=IMAGE("image_url"). Replaceimage_urlwith the direct web link.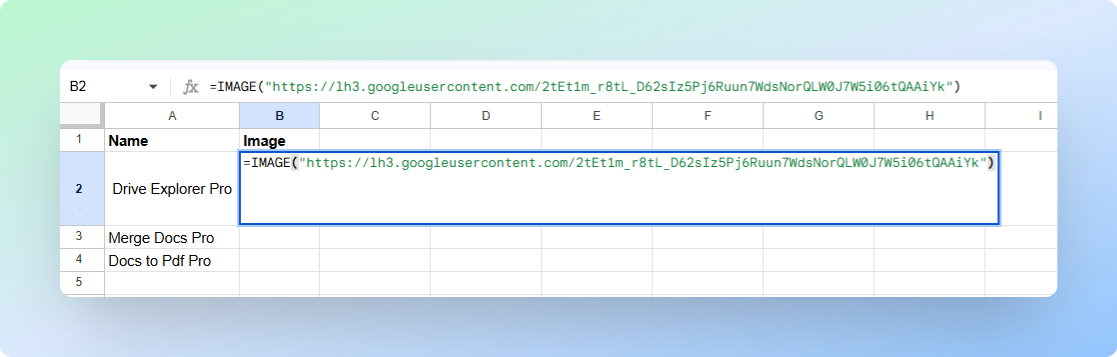
-
Press Enter.
-
If Google Sheets asks for permission, click Allow access.
This lets Google Sheets load the image from the link and show it in the cell. It does not make your sheet public or share your data.
If you click Deny, the cell will show an error instead of the image.
Bulk use: Add your image URLs in one column, then use =IMAGE(A1) in the next column to show each image. Copy the formula down to the other rows with the fill handle.
Result
Images appear inside cells and automatically update based on the URLs.
If the image does not load: Make sure you copied the direct image address.
A webpage URL, such as /product/shoes, will not work. Right-click the image and select Copy image address, not Copy link address.
Limitations
- Depends on external hosting.
- Shows only the image. It does not add file names, links, or file details.
If you need to insert multiple images or manage Google Drive files directly in Google Sheets, use the next section.
Inserting Multiple Images Using the Drive Explorer Pro Add-on
You can use Drive Explorer Pro to insert multiple images directly from Google Drive into Google Sheets without needing public URLs.
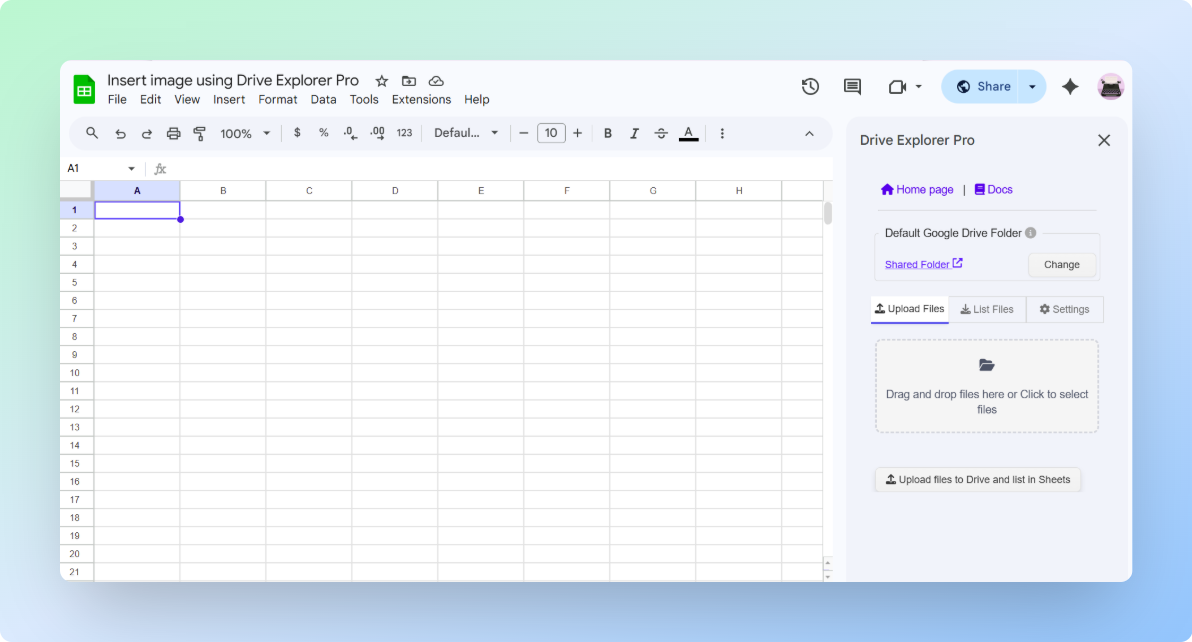
The add-on opens a sidebar on the right side of your spreadsheet, where you configure your output and pick files.
When to use: Use this method when working with large datasets, shared drives, or when you need additional file details such as name and size.
Launching the Add-on
Install Drive Explorer Pro from the Google Workspace Marketplace:
- Go to Extensions → Drive Explorer Pro → Open Drive Explorer Pro
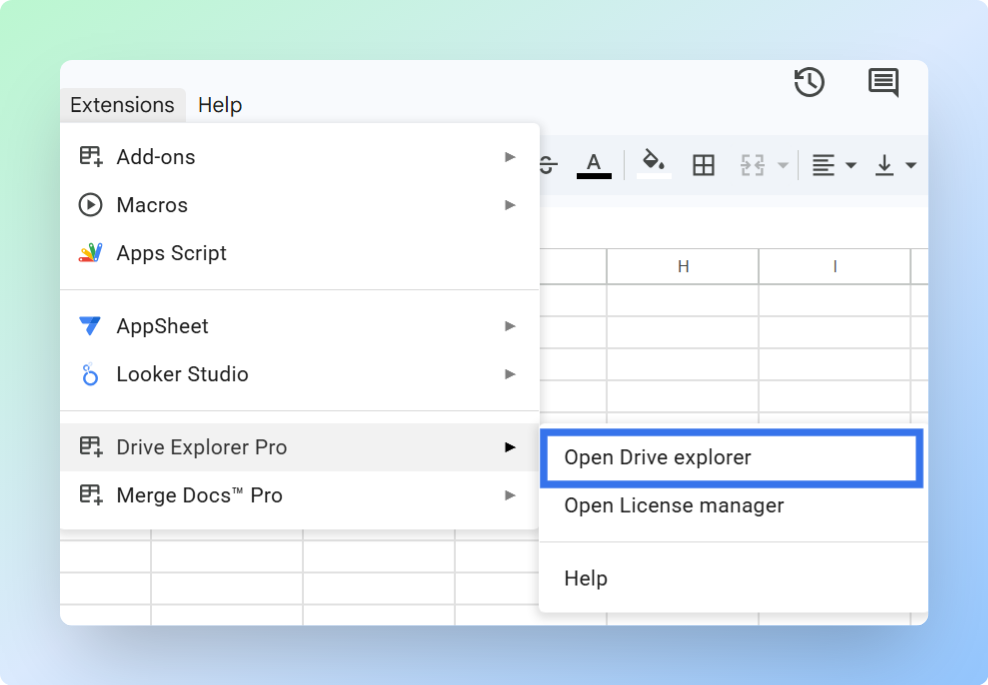
The Drive Explorer Pro sidebar appears on the right side of the screen.
Configuring Drive Explorer Pro Settings
Next, tell Drive Explorer Pro where to put the images and which details to show beside each one. You only need to do this once, it saves the settings for next time.
-
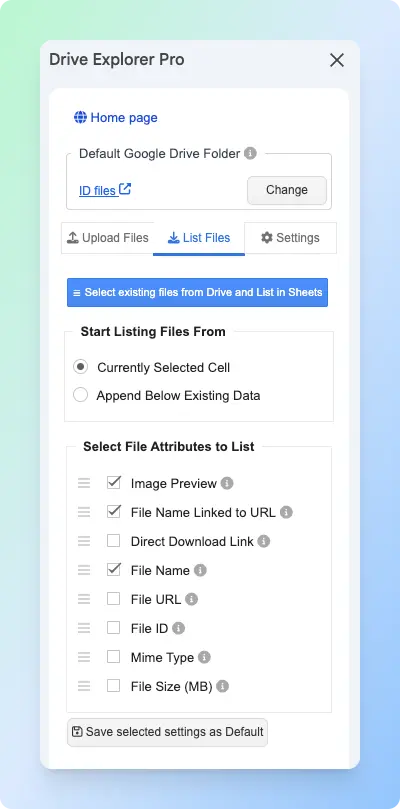
Go to the List Files tab.
-
Under Start listing file from, choose where Drive Explorer Pro should add the image data:
- Currently Selected Cell: starts from the cell you selected in Google Sheets.
- Append Below Existing Data: adds the new image rows below your existing sheet data.
-
Choose what file attributes to display with each image, such as Image Preview, File Name, and File Size. Drag the options to rearrange the column order. To understand each option, see Select File Attributes
-
Click Save selected settings as Default to reuse this configuration in future tasks.
-
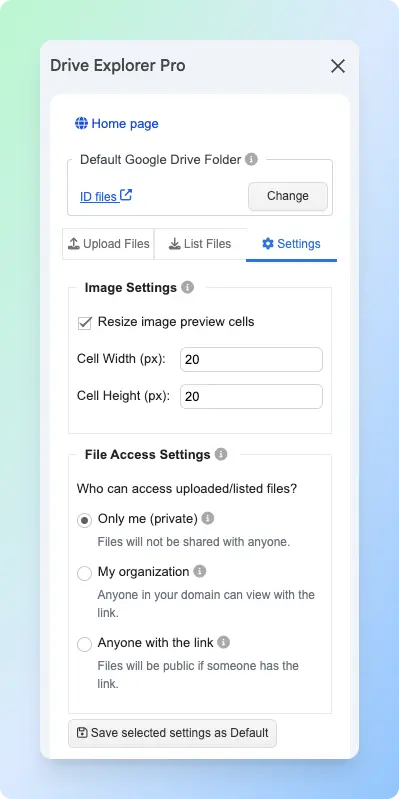
Go to the Settings tab and set the image size using Cell Width and Cell Height (in pixels).
-
Configure File Access Settings to control who can open the image files from their Google Drive links.
- Only me - only you can view the images (default)
- My organization - people in your organization can view the images
- Anyone with the link - anyone with the link can view the images
Note: Drive Explorer Pro reads file details such as file name and size, so it can list them in Google Sheets. Your files stay in your Google Workspace.
Inserting Images from Google Drive
Once your settings are configured, you can insert images:
-
Go to the List files tab.
-
Click Select existing files from Drive and List in Sheets.
-
Choose images from your folder. You can select multiple files by holding Ctrl (Windows) or Cmd (Mac) while clicking.
- Click Select.
The selected images now appear in your sheet, using the insert settings you configured.
Uploading Images from Your Computer
Use this method when the images are still on your computer and you want Drive Explorer Pro to upload them to Google Drive and add them to Google Sheets.
-
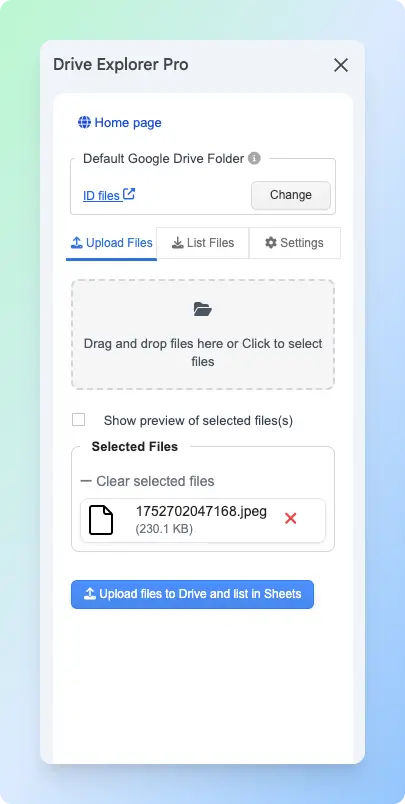
Go to the Upload tab.
-
Check the folder shown under Default Google Drive Folder. Drive Explorer Pro will upload the images there.
To choose another location, click Change and select a different Google Drive folder.
-
Drag and drop files into the upload box, or click the box to select files from your computer. The selected files appear in a list.
-
(Optional) If Show preview of selected file(s) is enabled, check the image previews before uploading.
You can remove a file if needed, or drag files in the preview list to change their upload order.
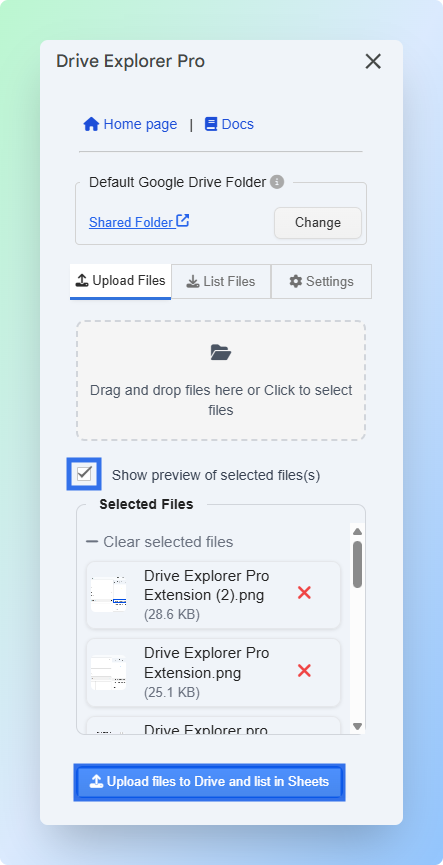
-
Click Upload files to Drive and list in Sheets.
Result
Each file appears in a new row. The columns you selected, such as Image Preview, File Name, and File Size, fill in automatically from left to right starting from your selected cell.
The Image Preview column shows a thumbnail inside the cell.

You can sort and filter the sheet without breaking alignment between images and their corresponding data.
For more details, see Drive Explorer Pro official Documentation
Advantages
- Insert multiple images into Google Sheets in one workflow.
- Add image previews, file names, file links, and other details automatically.
- Keep each image and its file details in the same row.
- Sort and filter the sheet without losing the image-to-row connection.
- Save the same settings for future image uploads or file listings.
- Work with larger image datasets and shared Google Drive folders.
Choosing the Right Method
The right method depends on whether you need one image, many images, or images that stay usable when you sort and filter the sheet.
| Feature | Insert Menu | IMAGE Function | Drive Explorer Pro |
|---|---|---|---|
| Best for | One image from Google Drive | Showing an image from a public URL | Multiple Google Drive images with file details |
| Multiple images at once | ❌ No | ⚠️ Only if you already have image URLs | ✅ Yes |
| Sorts and filters with rows | ✅ Yes, if you choose Image in cell | ✅ Yes, because the image appears inside the cell | ✅ Yes, because previews are added inside cells |
| Adds file details automatically | ❌ No | ❌ No | ✅ Yes |
| Needs public image URLs | ❌ No | ✅ Yes | ❌ No |
| One-time setup required | ❌ No | ❌ No | ✅ Yes |
- Use the Insert menu when you need to add one private Google Drive image to a cell.
- Use the
IMAGEfunction when you already have a public image URL. - Use Drive Explorer Pro when you need to insert multiple Google Drive images with previews, file names, links, and other file details in the same row.
| Situation | Best Method |
|---|---|
| Insert one image quickly | Insert Menu |
| Have public image URLs | IMAGE Function |
| Images are in Google Drive | Drive Explorer Pro |
| Need file name, size, or metadata | Drive Explorer Pro |
If you need to insert many Drive images into Google Sheets, see how to insert images from Google Drive into Google Sheets. Drive Explorer Pro can add the images in bulk without manual URL work.
If your sheet also contains PDF documents alongside images, see how to add a PDF link in Google Sheets to keep all your files accessible from one place.
Conclusion
In-cell images keep your visuals connected to the correct rows in Google Sheets. This makes reports, product catalogs, dashboards, and image trackers easier to sort, filter, and review.
For one or two images, the built-in Insert menu or IMAGE function is enough. But if you need to add many Google Drive images with previews, file names, links, and file details, Drive Explorer Pro is the better option because it builds the image sheet in bulk.
Before sharing the sheet, check the row height, column width, and file access settings. The image may appear in the sheet, but the original Google Drive file still needs the right access if others open the file link.