How to Add a PDF Link in Google Sheets (Link PDFs to Cells Easily)
Adding a PDF link in Google Sheets lets you open the file directly from a cell. Without it, you have to leave the sheet, search Google Drive, and find the file manually each time you need it.
You cannot embed a PDF inside a cell the way you attach a file to an email. Cells store values like text, numbers, and formulas. What you can do is add a clickable link so the PDF opens when someone clicks the cell.
In this tutorial, you will learn three ways to add PDF links in Google Sheets and when to use each one.
- Insert Link menu - quickest option for a few files.
- HYPERLINK formula - useful when you already have a column of URLs.
- Drive Explorer Pro add-on - the practical option when you have multiple files or need to upload from your computer.
Table of Contents
Video Tutorial
Prerequisites
Before you start, make sure you have:
- A Google account with access to Google Sheets
- PDF files saved in Google Drive, or files on your computer ready to upload
- Edit access to the Google Sheet you're working in
- Permission to install Google Workspace add-ons
If your document is still an image, such as a scanned receipt or form, see how to convert an image to PDF in Google Drive before adding its link to the sheet.
Uploading the PDF to Google Drive and Copying the Link
Before you add a PDF link in Google Sheets, the file needs to be in Google Drive and have the right access.
This gives you a shareable URL for the built-in methods and makes the file easier to identify later.
If the PDF is already in Google Drive, skip to the next section.
Organizing the file
Organized folders and clear file names make PDF links easier to recognize and manage.
- Create a dedicated folder in Google Drive, such as
Invoices_2026,Client_Contracts, orProject_Reports_Q2. - Rename vague files like
scan0047.pdfto something clear, such asInvoice_AcmeCorp_March2026.pdf.
Uploading the PDF
- Go to Google Drive and open the folder.
- Click + New > File upload.
- Select the PDF and click Open.

Copying the link
- Right-click the file and click Share > Share.
- Under General access, choose the visibility you need:
- Restricted - Only people you invite can open the file.
- Anyone with the link - Anyone with the URL can open the file.
- My organization - Anyone in your Google Workspace domain can open the file.
- Click Copy link.
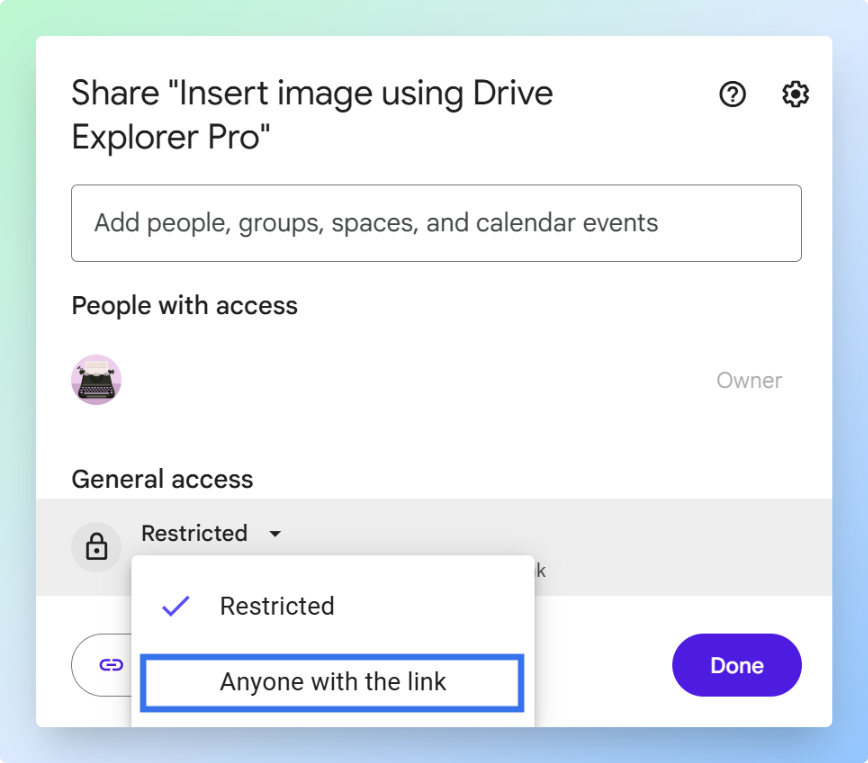
Important: Set the access level before copying the link. If the file stays Restricted, people without access may see a Request access page when they click the link in Google Sheets.
Now that your PDF is in Google Drive with a valid link, you are ready to add it to your sheet. If you have many files or need to upload from your computer, skip to the Drive Explorer Pro method.
Inserting a Single PDF Link Using the Built-In Methods
Google Sheets has two built-in ways to add a clickable PDF link:
- Use the Insert link menu when you want to add one PDF link manually.
- Use the HYPERLINK formula when the PDF URLs are already in cells and you want to create links across multiple rows.
Both work for one or a few files. Choose based on how your URLs are organized.
Using Insert Link Menu Option
Use Insert link to add a PDF link to one cell at a time with clean display text instead of a raw URL.
Use Insert link when you want a standard clickable link that is simpler, clearer, and more predictable.
- Click the cell where you want the link.
- Press
Ctrl+K(Windows) orCmd+K(Mac). You can also right-click the cell and click Insert link.
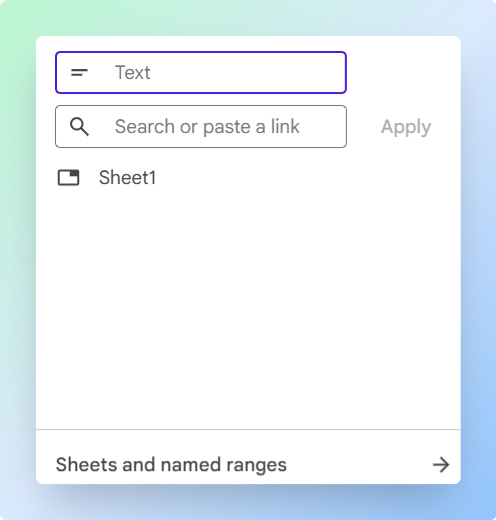
- Type the display text, which is the label shown in the cell. For example,
Invoice_AcmeCorp_March2026. - Paste the Google Drive URL in the link field, or search for the file directly from your Google Drive.
- Click Apply.
The cell now shows your display text as a clickable blue link. To edit it later, right-click the cell and select Edit link.
Alternative: @ Smart Chip :
If you know the file name in Google Drive, type @ in a cell, start typing the file name, and select it from the dropdown.
Use a Smart Chip when you want a richer preview and everyone using the sheet already has access to the file.
This inserts a smart chip that shows the file icon and a hover card with details like the owner and last modified date.
Note: Smart chips do not change file access. If the file is private, the chip still appears, but people without access still cannot open it.
If you already have a column of Google Drive URLs in your sheet, the HYPERLINK formula is a faster approach.
Using the HYPERLINK Formula
You can use the HYPERLINK formula when you want to create clickable PDF links from Google Drive URLs.
Use it to create one link manually or many links by dragging the formula down.
This formula is useful in two situations:
- You want to add one clickable PDF link by typing the URL and link label directly in the formula.
- You already have URLs or label text in other cells and want to create links for multiple rows automatically.
The syntax is:
=HYPERLINK("URL", "display text")
=HYPERLINK("URL", "display text")
Here is what each part means:
"URL"is the PDF link you want to open."display text"is the clickable text shown in the cell.
1. Typing both parts directly
Use this when you only need one PDF link and want to enter both the URL and the label in the formula itself.
=HYPERLINK("https://drive.google.com/file/d/abc123/view", "View PDF")
=HYPERLINK("https://drive.google.com/file/d/abc123/view", "View PDF")
This creates a clickable link labeled View PDF.
2. Referencing values from other cells
Use this when the PDF URLs are already stored in a column and you want each row to generate its own clickable link.
For example, if column B contains the PDF URLs and column A contains client names:
=HYPERLINK(B2, A2)
=HYPERLINK(B2, A2)
In this case:
B2provides the PDF URL.A2provides the clickable label.
Drag the formula down to create a labeled PDF link for each row automatically. Each cell in the formula column shows the client name as a clickable link that opens the corresponding PDF in Google Drive.
Common error: If the formula shows
#ERROR!, check that typed URLs and labels are inside double quotes, or confirm that referenced cells do not contain extra spaces.
Both built-in methods work well for a few files. Beyond that, they quickly become limiting.
- You cannot upload PDFs directly from your computer.
- You do not get file details automatically.
- You have to manage the sheet manually as the list grows.
- Each link becomes one more repetitive task.
If you need to work with multiple PDFs, the next method is more practical.
Inserting Multiple PDF Links Using Drive Explorer Pro Add-On
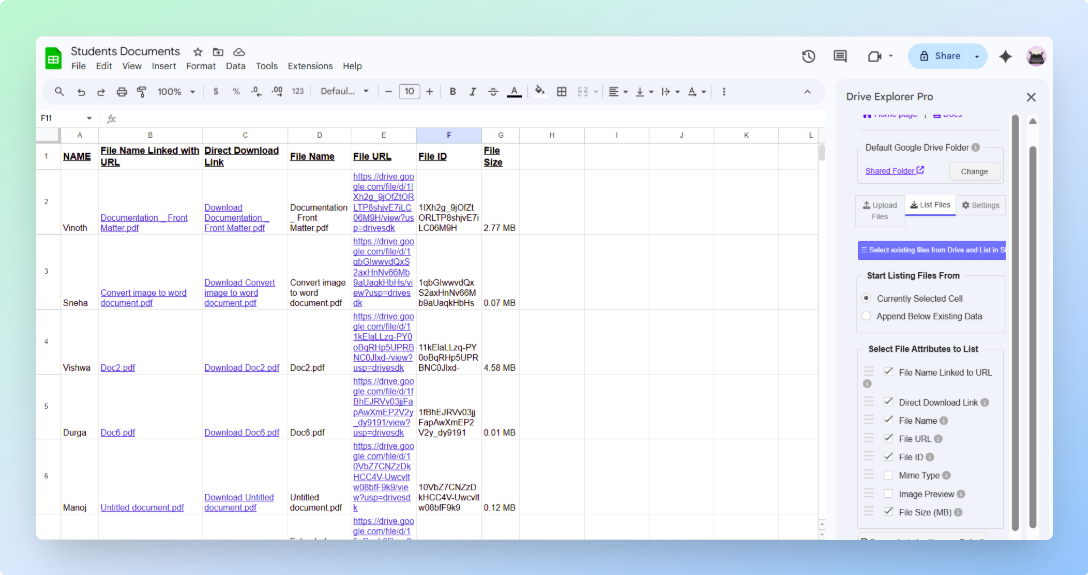
Drive Explorer Pro is a Google Workspace add-on that runs inside Google Sheets. Use it to upload multiple PDFs, add shareable links to your sheet, and log file details like name, size, and type in separate columns.
It works with PDFs already in Google Drive and PDFs stored on your computer. When uploading from your computer, you can set file access before upload so each PDF link is ready to share.
Why use Drive Explorer Pro
- Upload multiple PDFs from your computer - no manual Google Drive upload needed.
- File links, names, sizes, and types are added to your sheet automatically - no copying links one by one.
- Set sharing permissions before upload so every PDF link works when you share the sheet.
- Settings save for future tasks so setup only once.
This works well for invoices, reports, client files, student submissions, audit logs, and other document trackers.
Install Drive Explorer Pro from the Google Workspace Marketplace:
Launching Drive Explorer Pro
Once installed, open the add-on from inside your sheet so the sidebar is available without leaving Google Sheets.
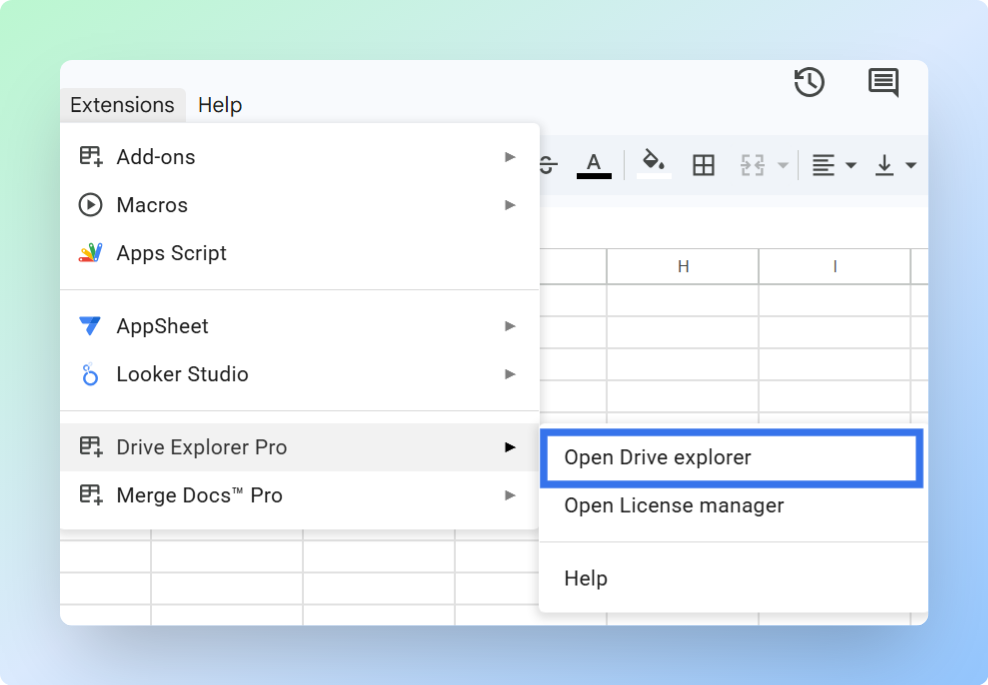
- Click Extensions > Drive Explorer Pro > Open Drive Explorer Pro.
- The sidebar opens on the right side of your sheet.
Configuring Drive Explorer Pro before adding PDF links (One-Time Setup)
Before running either workflow, spend a minute on settings. First set file access, then choose where the files should appear in the sheet and which columns to include.
Configure these settings once. Drive Explorer Pro reuses them for every future upload or listing task.
- In the Settings tab, set File Access to control who can open the linked PDFs:
| Access option | Who can open it | When to use |
|---|---|---|
| Only me (private) | Just you | Drafts, files not ready to share |
| My organization | Anyone in your Google Workspace domain | Internal team documents |
| Anyone with the link | Anyone with the URL | Client files, external sharing |
Select the access level that matches how the PDF links will be shared.
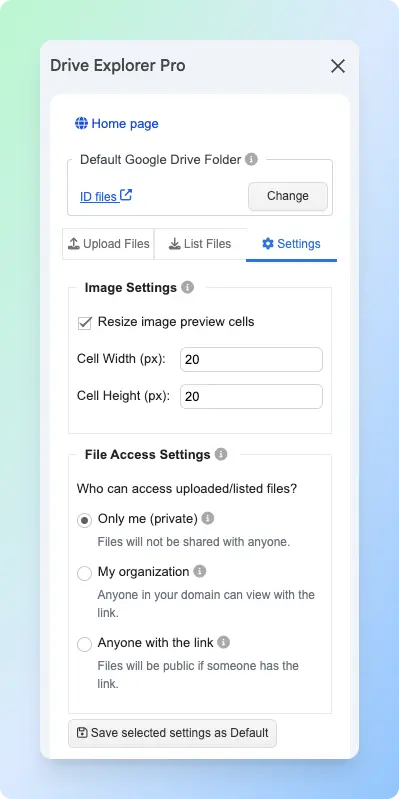
Click Save settings as default to keep these settings for future files.
- Go to the List Files tab, choose where files are written in your sheet and which columns appear:
- Currently Selected Cell - starts at the cell you've clicked.
- Append Below Existing Data - adds below existing rows without overwriting anything.
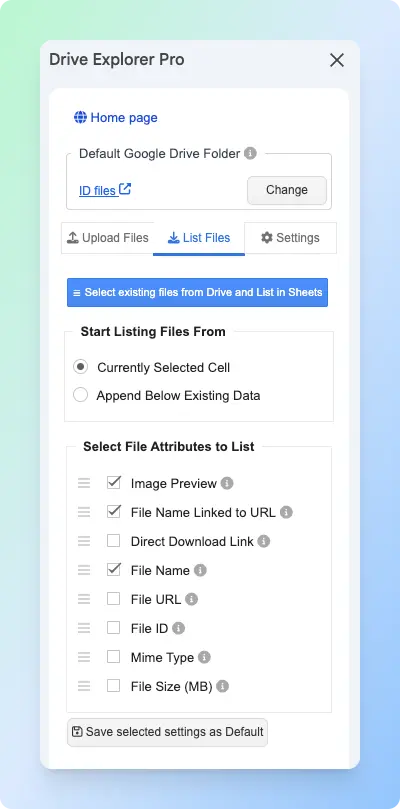
Select the file attributes you want as columns. For most PDF link logs, start with File Name Linked to URL, File URL, and Direct Download Link. The table below explains the other options:
| Attribute | What it puts in the cell |
|---|---|
| File Name Linked to URL | Clickable name - opens the file in Google Drive |
| Direct Download Link | URL that downloads the file immediately |
| File Name | Plain text name, no link |
| File URL | Full Google Drive URL |
| File ID | Unique Drive ID (for API or scripting use) |
| Mime Type | File type, e.g. application/pdf |
| File Size (MB) | File size in megabytes |
You can drag attributes to reorder them. The order you set here becomes the column order in your sheet.
Click Save settings as default when done.
With settings saved, you're ready to run either workflow depending on where your files are.
Listing Existing Google Drive Files in Sheets
Use this when your PDFs are already in Google Drive.
-
In the List Files tab, click Select existing files from Drive and List in Sheets.
-
In the file picker, browse to your PDFs.
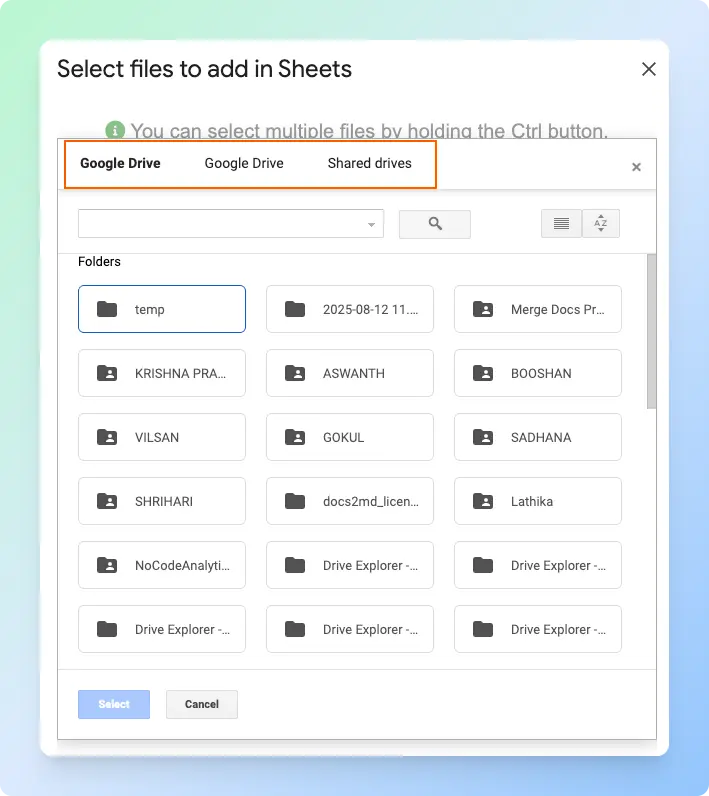
- Select the files and click Select.
Result: Each selected PDF appears as a new row in Google Sheets. The row includes the columns you selected, such as the clickable file name, file URL, and direct download link.
If your PDFs are still on your computer, the next section shows how to upload and link them in a few steps.
Uploading Files from Your Computer and Linking Them
Use this when your PDFs are still on your computer. Drive Explorer Pro uploads them to Google Drive and adds their links to Google Sheets in a few clicks.
- In the sidebar, click Change under Default Google Drive Folder and select the folder where you want the uploaded PDFs saved.
- Go to the Upload Files tab.
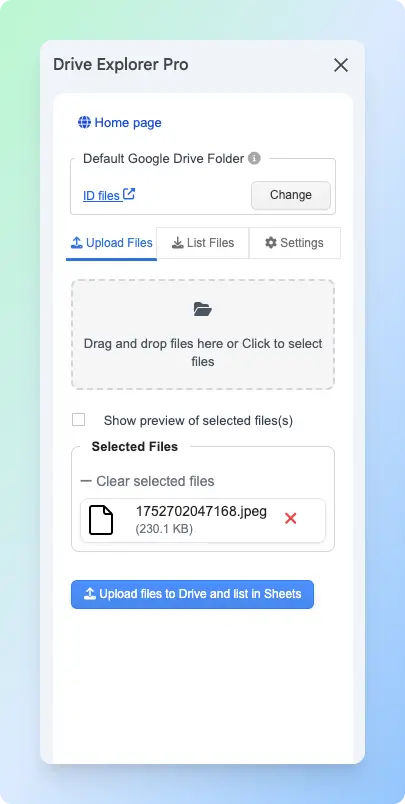
- Drag and drop your PDFs into the upload box, or click to browse and select files manually.
- Select the files and click Open.
- Reorder files by dragging if row order matters.
- Click Upload files to Drive and list in Sheets.
Result: Drive Explorer Pro uploads each PDF to the selected Google Drive folder and adds a new row to Google Sheets. Each row shows the selected file details, such as the clickable file name, file URL, and direct download link.
Choosing the Right Method
Each method fits a different scale. Here's how they compare:
| Insert Link | HYPERLINK Formula | Drive Explorer Pro | |
|---|---|---|---|
| Best for | 1–5 files | Existing URL column | 10+ files or computer uploads |
| Files at once | 1 | Many, with a formula | Many, in a few clicks |
| Works without manual Drive upload first | No | No | Yes |
| Adds metadata columns | No | No | Yes |
You can choose Drive Explorer Pro when you need to upload or manage multiple PDFs with file details.
If the PDF needs to be stored in a team location, see how to upload files to a shared Google Drive folder.
The same linking methods work for other file types too. For Docs, Slides, videos, and any other Drive file, see how to link a Google Drive file to Google Sheets.
If your sheet also contains images alongside PDFs, see how to insert images from Google Drive into Google Sheets to keep previews and file details in the same row.
Related Free Tools
Need to create the PDFs before you link them? These free generators produce professional documents you can upload to Drive and add to your sheet:
- Invoice Generator — create invoices and download as PDF
- Sales Receipt Generator — generate receipts for completed sales
- Expense Report Generator — build expense reports with line items
- Goods and Services Tax Invoice Generator — GST-compliant tax invoices for India
- Browse all 29 free business tools
Conclusion
Choose the method based on how many PDF links you need to add.
- Use Insert Link for one or a few PDFs.
- Use the HYPERLINK formula when you already have PDF URLs in your sheet.
- Use Drive Explorer Pro when you need to upload PDFs, create multiple links, add direct download links, and keep file details in Google Sheets.
Before sharing the sheet, check the file access setting. If a PDF is still Restricted, people without access may need to request access before opening it.