How to Resize Images in Google Sheets
Images in Google Sheets do not all resize the same way. An image inserted inside a cell changes size with the row and column. An image inserted over cells floats above the sheet and resizes when you drag its corners. An image added with the IMAGE formula follows the formula size settings.
The way you add the image controls how you resize it. Before changing the size, first check whether the image is inside a cell, over cells, or loaded with the IMAGE formula.
In this guide, you will learn how to resize images in Google Sheets using four methods, with clear guidance on when to use each method.
Table of Contents
Video Tutorial
Prerequisites
- A Google account with access to Google Sheets
- A spreadsheet with at least one image already inserted. If you haven't done this yet, see How to Insert Images in Google Sheets from Google Drive.
Choosing the Right Resize Method
Use this table first to find the correct method for your image type.
| Image type | How it resizes | Best method |
|---|---|---|
| Image in cell | Changes size with the row height and column width | Resize the row and column |
| Image over cells | Floats above the sheet | Drag the image corners |
| IMAGE formula image | Changes based on the formula mode | Edit the IMAGE formula |
| Multiple Drive images | Need the same preview size across many rows | Use Drive Explorer Pro |
Resizing In-Cell Images by Changing Row and Column Size
In-cell images don't have drag handles. They resize when you change the row height or column width of the cell they occupy.
When to use: You inserted the image via Insert > Image > Insert image in cell. See How to Insert Image Inside a Cell in Google Sheets for the insertion steps.
Steps:
-
Hover over the row number on the left side of the sheet (the grey numbered column) until the cursor becomes a double-headed arrow.
-
Click and drag the bottom border of the row up or down to change the row height.
-
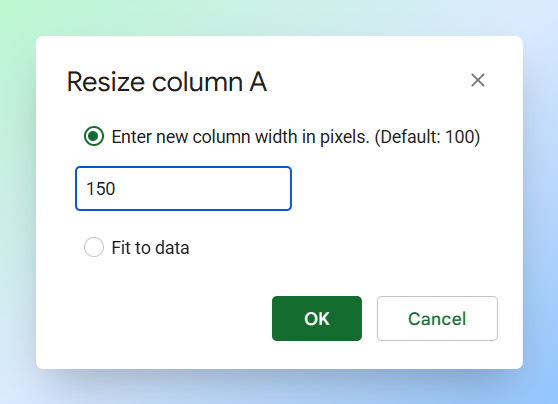
To set an exact height, right-click the row number and select Resize row. In the dialog, select Specify row height and enter a pixel value, then click OK.
-
Right-click the column letter and select Resize column to scale the image horizontally.
For a square preview, use the same value for both row height and column width.
Result: The image scales to fill the resized cell. If it looks stretched, adjust the column width to match the proportional change you made to the row.
Limitations:
- The image always fills the cell. You can't set an independent size for the image separate from the cell dimensions.
- Changing the row height affects every cell in that row. Use a dedicated row if the image needs more space.
Resizing Floating Images Inserted Over Cells
Floating images sit on top of the Google Sheets grid, they are not inside any cell. They resize by dragging their corner handles.
When to use: You inserted the image via Insert > Image > Insert image over cells.
Steps:
-
Click the image to select it. Blue handles appear around the edges and corners.
-
Click and drag any corner handle to resize the image.
Important: Dragging a corner handle keeps the aspect ratio locked. Dragging a side handle stretches only one dimension and distorts the image.
Result: The floating image changes to the size you dragged it to.
Limitations:
- There's no option to enter exact dimensions. Resizing is by drag only.
- Floating images aren't anchored to a cell. Adding rows or columns above or to the left may shift the image out of place.
Resizing Images Inserted with the IMAGE Formula
Formula images are controlled by the IMAGE function, not by drag handles. To set exact dimensions, use mode 4 with height and width values.
Important: The
IMAGEfunction works best with direct image URLs. Regular Google Drive share links don't work reliably. For private Google Drive images, use Insert > Image > Insert image in cell, or use Drive Explorer Pro for multiple images.
When to use: Your image comes from a public, direct image URL and you want to set the exact width and height in pixels without changing the row or column size.
Understanding All Four IMAGE Modes
The mode argument controls how the image fills the cell.
| Mode | How it resizes | Keeps aspect ratio | Exact pixel size |
|---|---|---|---|
1 | Fits the image inside the cell | Yes | No |
2 | Stretches the image to fill the cell | No | No |
3 | Keeps the original image size | Yes | No |
4 | Uses a custom height and width | No | Yes |
Mode 4 is the only mode that accepts exact dimensions. Always use both a height and width value.
Mode 4 can distort the image if the dimensions do not match the original proportions. To avoid distortion, use matching width and height values.
Steps:
-
Click the cell where you want to insert the image.
-
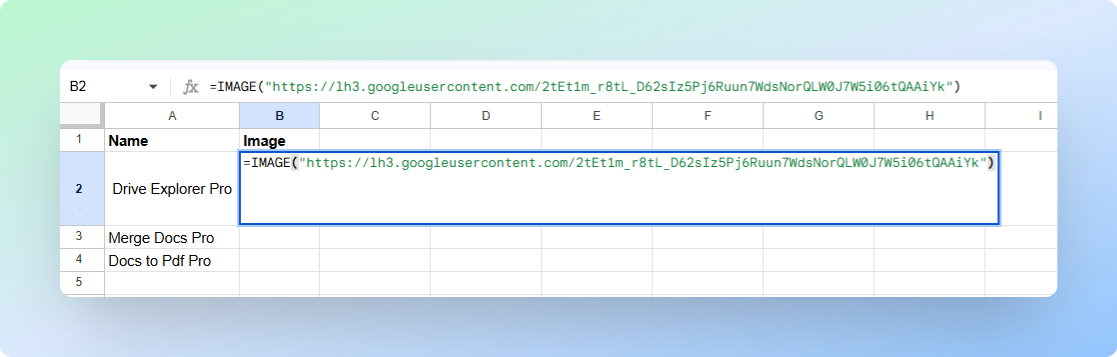
Type the formula into the cell. Every formula in Google Sheets starts with
=:=IMAGE(url, mode, height, width)Replace
urlwith your actual image address in quotation marks. Example:=IMAGE("https://www.example.com/photo.jpg", 4, 150, 300)This displays the image at exactly 150px tall and 300px wide.
Note: If the dimensions you set are larger than the cell, the image will be cropped at the cell's edge. Resize the row height and column width to match your pixel values if the image looks cut off.
-
Press Enter to confirm.
Note: The
heightandwidthparameters are ignored unlessmodeis set to4.
Result: The image appears in the cell at the size you set. If you see a broken image icon, check that the URL points directly to an image file and that it's publicly accessible.
Limitations:
- You can't drag or resize the image with handles. All sizing goes through the formula.
The methods above work for resizing images one by one. When you need multiple images at the same size, Drive Explorer Pro is faster.
Resizing Multiple Images at Once Using Drive Explorer Pro
Drive Explorer Pro lets you set a preview size before you insert images. Every image then lands in your sheet at the same width and height, no manual resizing needed.
When to use: You're building a product catalog, image tracker, asset list, inventory sheet, or any spreadsheet where many images need the same dimensions.
Why use Drive Explorer Pro
- Insert multiple images in one workflow.
- Set the image width and height before inserting.
- Keep every image at the same size in Google Sheets.
- Avoid formulas and manual resizing.
Install Drive Explorer Pro from the Google Workspace Marketplace:
Launching Drive Explorer Pro
Open Drive Explorer Pro from inside Google Sheets.
-
Open Google Sheets.
-
Go to Extensions > Drive Explorer Pro > Open Drive Explorer Pro.
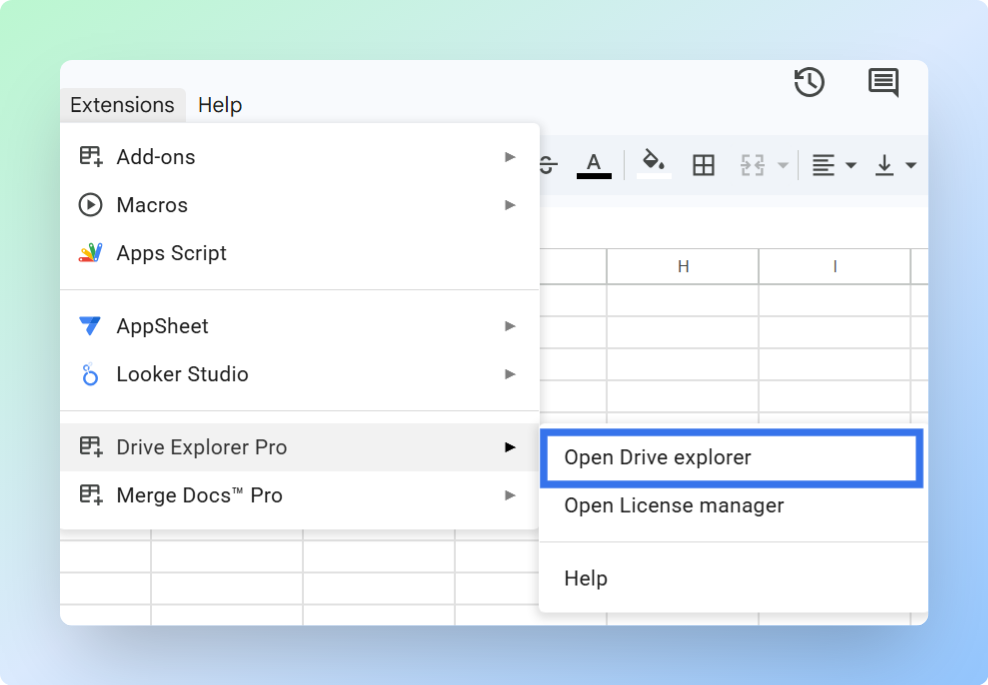
The Drive Explorer Pro sidebar opens on the right side of your sheet.
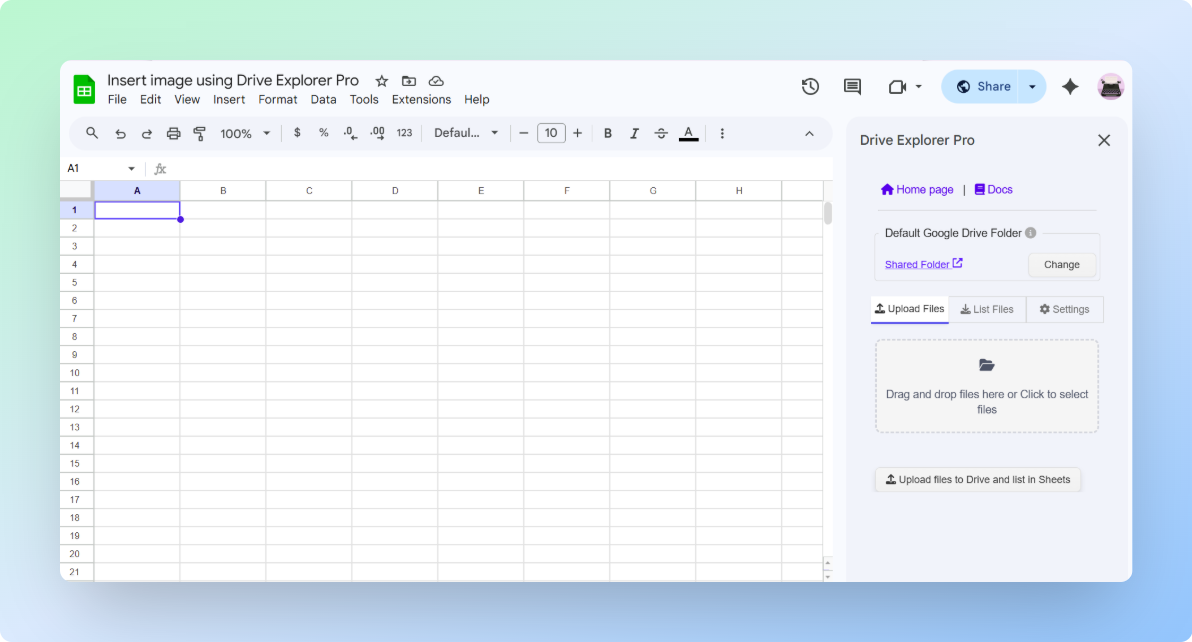
Complete the one-time setup below. Drive Explorer Pro saves your settings for future sessions.
Setting the Image Size
Set the image size before inserting. Drive Explorer Pro applies these dimensions to every image you insert.
Tip: A size between 100 and 150 pixels works well for most spreadsheet previews. Use a smaller size for large image lists and a larger size when users need to identify images without opening Google Drive.
-
Open the Settings tab in the sidebar.
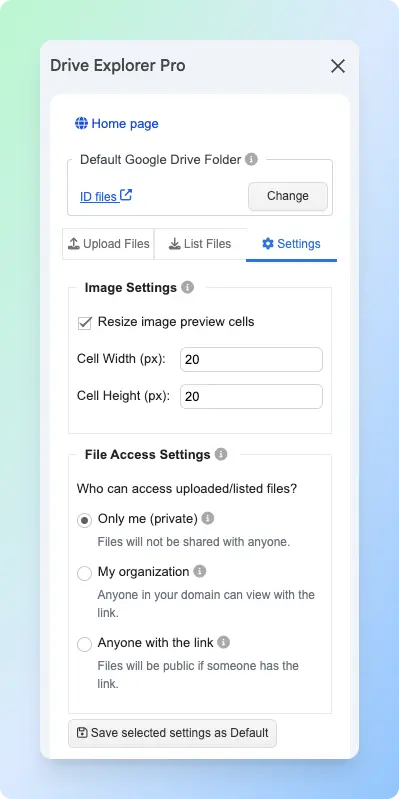
-
Turn on Resize image preview cells.
-
Enter your target width in Cell Width (px) and height in Cell Height (px).
-
Click Save Selected Settings as Default.
Choosing Where the Images Should Appear
Choose where Drive Explorer Pro inserts the image previews in your sheet.
-
Switch to the List Files tab in the sidebar.
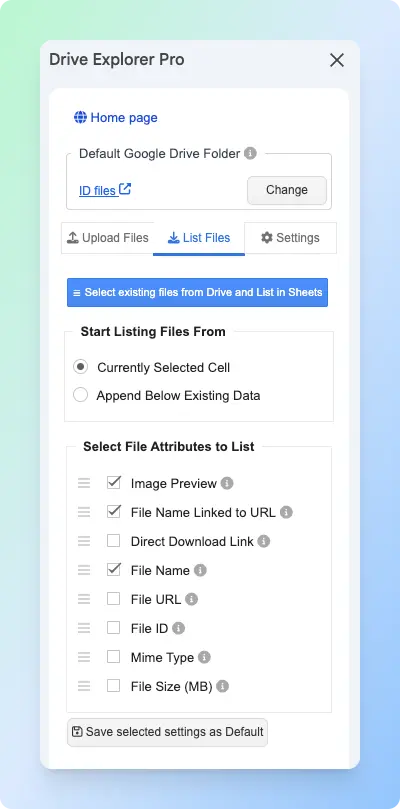
-
Under Start listing files from, choose one of the following:
| Option | What it does | When to use |
|---|---|---|
| Currently selected cell | Starts adding rows from the selected cell | Starting a new image table |
| Append Below Existing Data | Adds rows below existing data | Adding images to an existing list |
-
Under Select File Attributes to list, check Image Preview. You can also check File Name Linked to URL, File URL, or File Size (MB) to log image attributes alongside each preview.
-
Click Save Selected Settings as Default.
Inserting the Images at the Same Size
Drive Explorer Pro opens a Google Drive file picker, lets you choose the images you need, and inserts each one at the size you set.
-
Switch to the List Files tab in the sidebar.
-
Click Select existing files from Drive and List in Sheets.
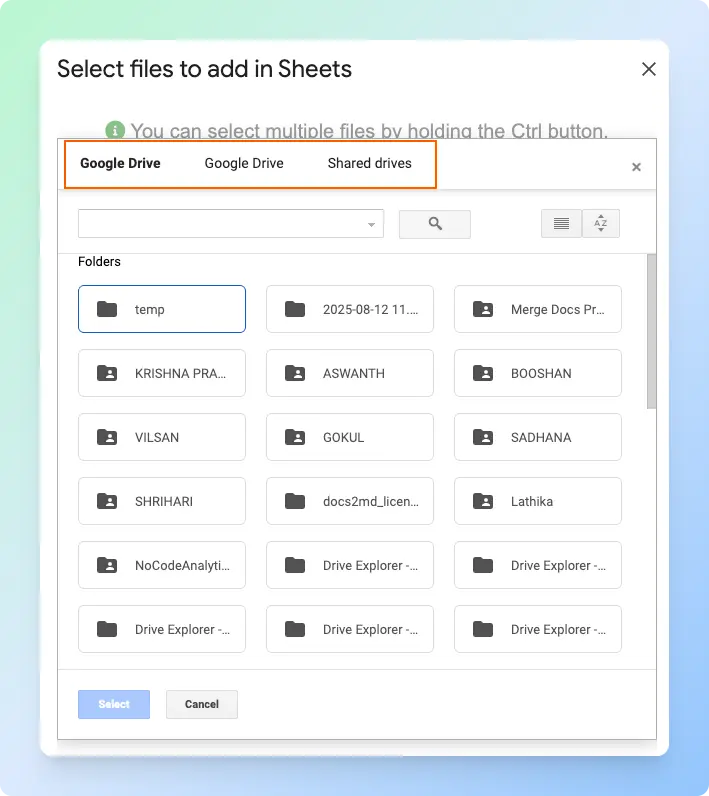
-
Navigate to the folder containing your images and select the images you want to insert.
-
Click Select.

Result: Drive Explorer Pro inserts each image at the size you set. No manual resizing needed.
Uploading Images from Your Computer
Drive Explorer Pro can also upload images from your computer directly into Google Sheets. It uploads each file to Google Drive and inserts the preview in one step, at the size you already set.
Before you start, open the Settings tab, click Change in the Default Google Drive Folder selector, and choose where Drive Explorer Pro should save your uploaded files.
-
Switch to the Upload Files tab in the sidebar.
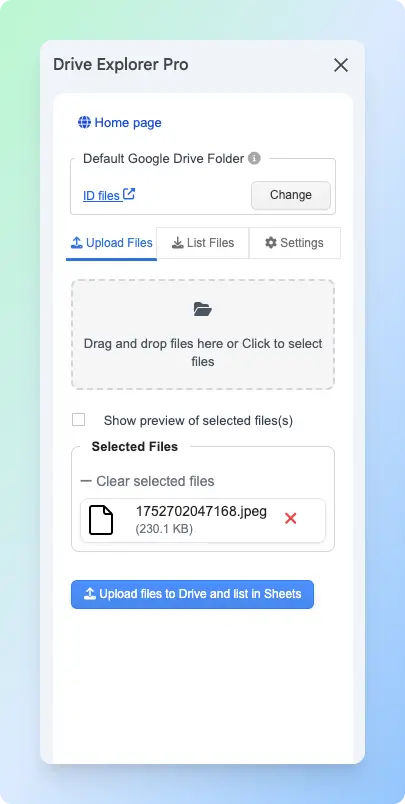
-
Drag and drop your images into the upload area, or click to select them from your computer.
-
Check Show preview of selected files to review and reorder the images before uploading.
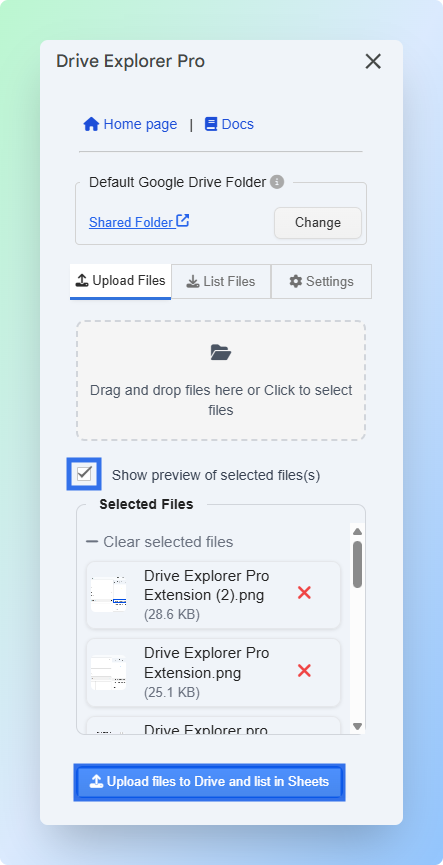
-
Click Upload files to Drive and list in Sheets.
Result: Drive Explorer Pro uploads each image to your selected Google Drive folder and inserts the preview at the size you set in Settings.
If your sheet also contains PDF links alongside images, see how to add a PDF link in Google Sheets to keep file links and previews in the same row.
Conclusion
Images in Google Sheets resize differently depending on how they were inserted. In-cell images scale with the row and column. Floating images resize by dragging. Formula images are controlled entirely by the IMAGE function's mode and pixel parameters.
When you need many images at the same size, none of the native methods scale well. You'd have to resize each one manually. Drive Explorer Pro solves this by letting you set the size once before inserting, so your sheet stays consistent from the start.