How to Upload Photos to Google Drive and Share a Link
Google Drive lets you upload photos and share them through a link instead of sending each photo as a separate attachment.
Messaging apps can compress photos and make large batches hard to manage. With Google Drive, you can keep photos in full quality, organize them in folders, and share them with a link when needed.
But uploading a photo to Google Drive does not automatically make it shareable. The file stays private until you change its access settings. This is the step many people miss.
In this tutorial, you will learn how to upload photos to Google Drive and share a working link using three different approaches, along with guidance on when to use each one.
Table of Contents
Video Tutorial
Prerequisites
Before you start, make sure you have the following ready.
- A Google account with access to Google Drive
- The photo files saved on your device
- For the mobile method: the Google Drive app installed on your phone (Android or iOS)
- Enough storage space in your Google account. Check your usage at Google Drive Settings before uploading large batches.
Uploading Photos to Google Drive and Sharing the Link on the Web
You can upload photos to Google Drive and share a link directly from your browser.
This works best when you are on a desktop or laptop and need to upload a small batch quickly.
Uploading the Photo or Folder
Before you upload, decide what to share. If you are sharing multiple photos, create a folder first so you can share one link instead of many.
-
Go to Google Drive and sign in.
-
Open the folder where you want to upload your photos. If you skip this step, Google Drive saves the photos to My Drive. You can move them later by dragging them to the correct folder.
-
Click the + New button in the top-left corner.

-
Select File upload to choose photos, or Folder upload to upload a photo folder.
-
Choose your photos or folder:
- To select multiple photos, hold Ctrl on Windows or Command on Mac.
- Click each photo you want to upload.
- Click Open to confirm your selection.
-
Wait until Google Drive shows that the upload is complete. The upload progress appears in the bottom-right corner of the screen.
For more details, see Upload files to Google Drive.
Sharing the Photo or Folder
Once the upload finishes, your photo or folder appears in the Google Drive file list. Now you can set who can open it and copy the sharing link.
-
Right-click the uploaded file or folder and select Share > Share.
-
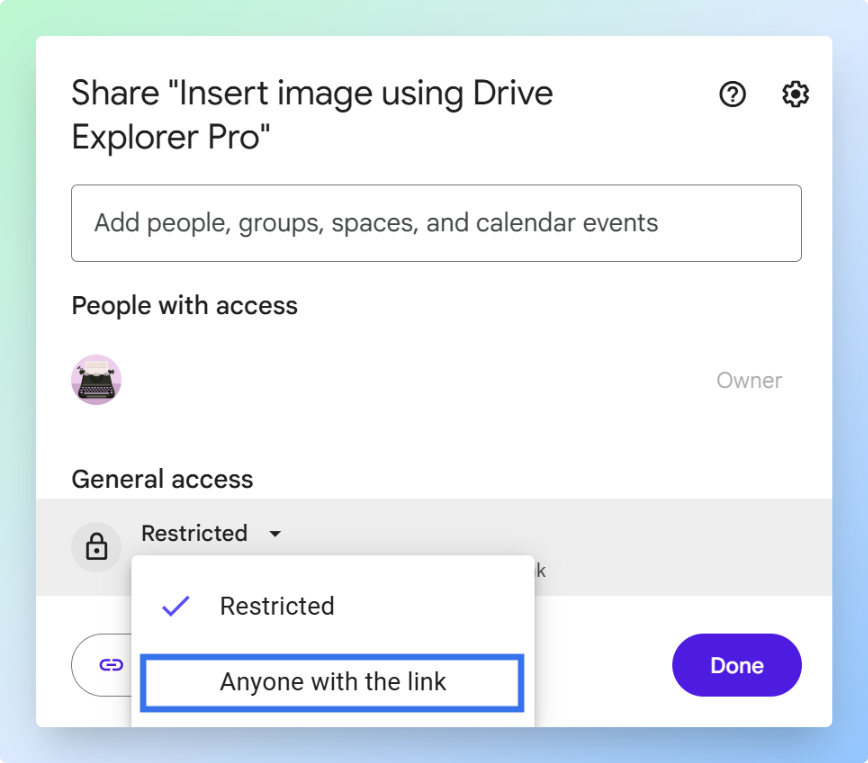
Under General access, click the dropdown next to Restricted and select Anyone with the link.
Choose Anyone with the link only when the photos are safe to share broadly, such as event photos, portfolios, or client deliverables.
For personal or sensitive photos, share with specific people by email instead. If Anyone with the link does not appear, your school or work account may have disabled public sharing. Contact your Google Workspace admin for help.
-
Set the permission level based on how much control you want to give.
Permission What It Allows Viewer People can view and download the photos, but they cannot change or delete them Commenter People can view and comment where comments are supported, but they cannot edit the files Editor People can edit files. For folders, they can also add, move, or delete files For most photo sharing, choose Viewer. It gives recipients access to the photos without giving them control over your files.
-
Click Copy link, then click Done.
-
Test the link before sending it. Open the link in an incognito window or another browser where you are not signed in to Google. If the photo or folder opens without a Request access page, the link is ready to share.
-
Paste the link into an email, chat message, or document.
When the recipient opens the link, they can view and download the photos at full quality. If you shared a folder, they can download individual photos or the entire folder as a zip file.
Note: To stop sharing later, change General access back to Restricted. This stops the link from working for anyone who has it.
For more details, see Share files from Google Drive.
If the photos are on your phone, the next method lets you upload and share directly from the Google Drive mobile app.
Uploading Photos to Google Drive and Sharing the Link on Mobile App
You can upload photos to Google Drive directly from your phone when the files are already in your gallery or camera roll.
This saves you from transferring them to a desktop or laptop before sharing a link.
Uploading the Photo or Folder
To save the photos in a specific folder, open that Google Drive folder first. Otherwise, the photos upload to the location you are currently viewing in Google Drive.
-
Open the Google Drive app on your phone.
If you are uploading many large photos, connect to Wi-Fi first.
-
Open the folder where you want to upload the photos.
-
Tap + New.

-
Tap Upload, then choose the photos you want to add to Google Drive.
-
To choose multiple photos:
- Tap and hold the first photo.
- Tap each additional photo to add it to your selection.
- Tap Upload and wait for the upload to complete.
When the upload finishes, the photo appears in your chosen Google Drive folder with a thumbnail.
For large batches, keep the Google Drive app open and your phone awake until the upload completes to avoid interruptions.
Sharing the Photo or Folder
Once the upload finishes, change the access so other people can open the photo or folder from a link.
-
Tap the three-dot menu (⋮) next to the uploaded photo or folder.

-
Select Manage access.
-
Under General access, tap the current setting and select Anyone with the link.
-
Set the permission level to Viewer.
Viewer lets recipients view and download the photos without changing or deleting your files.
-
Tap Copy link or the link icon at the top of the screen.
-
Test the link before sending it. Open it in an incognito window where you are not signed in to Google. If it opens, the link works.
Paste the link into WhatsApp, iMessage, email, or any other app.
The recipient can view and download the photos in their browser without a Google account or the Google Drive app.
If you need to upload multiple photos, the next method helps you upload them at once and list each photo's preview, file name, and shareable link in Google Sheets.
Uploading Multiple Photos to Google Drive and Sharing Links with Drive Explorer Pro
Drive Explorer Pro is a Google Sheets add-on that connects Google Drive files with Google Sheets.
Drive Explorer Pro lets you upload multiple photos to Google Drive and list each photo's name, image preview, and shareable link in Google Sheets automatically.
Use this method for large photo sets, such as event photos, product images, client deliverables, or project documentation. It saves time because you do not need to upload photos one by one, change access manually, or copy each link separately.
Why use Drive Explorer Pro
- Image previews let you identify photos inside the sheet without opening Drive.
- Upload a full batch in a few steps, no file-by-file repeat.
- Each photo gets a shareable link automatically, no manual permission changes.
- Every link stays in one spreadsheet, easy to send or reference later.
Install Drive Explorer Pro from the Google Workspace Marketplace:
Launching Drive Explorer Pro
You open Drive Explorer Pro from inside Google Sheets after installing it.
-
Open Google Sheets.
-
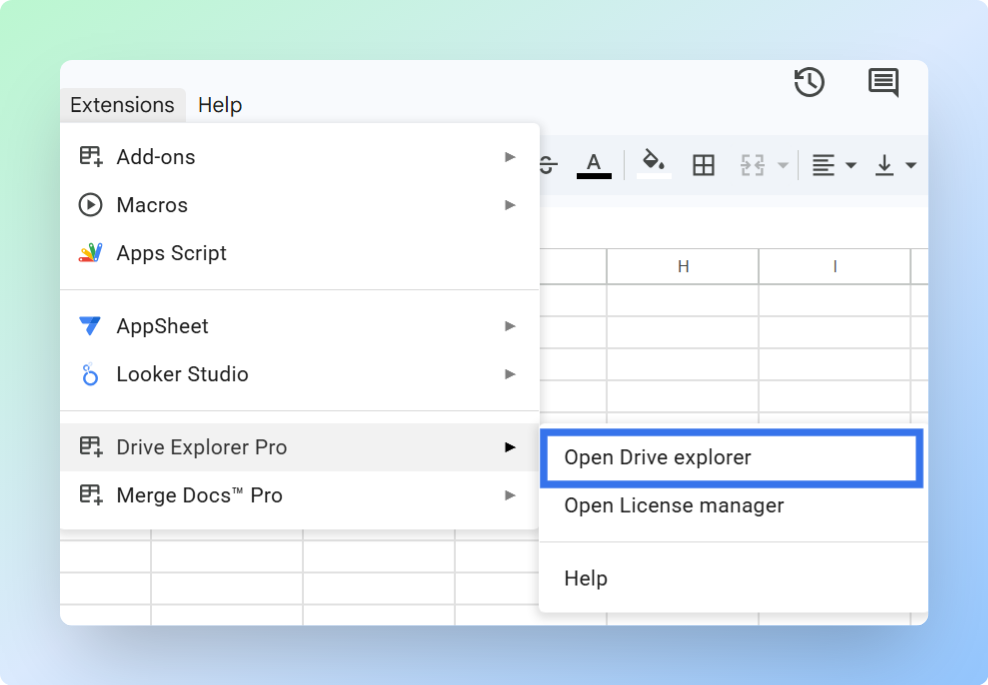
Go to Extensions > Drive Explorer Pro > Open Drive Explorer Pro.
The sidebar opens on the right side of your sheet.
Before uploading, complete this one-time setup. Drive Explorer Pro can reuse these settings for future photo uploads:
- The destination folder
- The file details to log
- The image preview size and sharing permissions
Setting Your Destination Folder
Choose where the uploaded photos should be saved in Google Drive.
- In the sidebar, click Change under Default Google Drive folder.
- Select the folder where you want to save the photos.
Use a dedicated folder, such as Event Photos June or Client Project Assets, so the photos stay organized and are easier to find later.
Configuring File Attributes to Log in Google Sheets
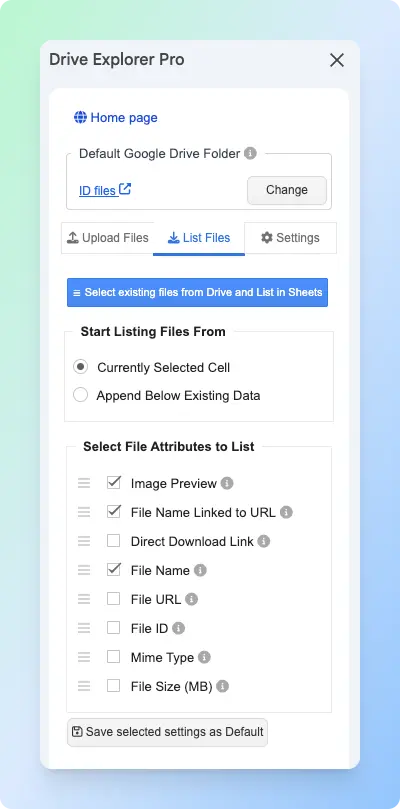
Use the List files tab to choose which photo details Drive Explorer Pro should add to Google Sheets after upload.
- Click the List files tab in the sidebar.
-
Under Start listing file from, choose one of the following:
- Currently selected cell - logs data starting from wherever your cursor is in the sheet.
- Append below existing data - adds new rows below any content already in the sheet.
-
Under Select File Attributes to list, choose the details you want to log.
| Attribute | What It Logs | Best For |
|---|---|---|
| Image Preview | Thumbnail preview inside the Google Sheets cell | Identifying photos without opening Google Drive |
| File Name Linked to URL | Clickable photo name that opens the file in Google Drive | Sharing with clients, teams, or recipients |
| File URL | Standard link that opens the photo in Google Drive | Copying and sharing the photo link |
| Direct Download Link | Link that downloads the photo immediately | When recipients need to download the photo |
| File Size (MB) | File size in megabytes | Tracking large photo uploads |
| Mime Type | File format, such as image/jpeg or image/png | Filtering or organizing photos |
| File ID | Unique identifier for the file | Automations or advanced workflows |
For most photo-sharing workflows, select Image Preview, File Name Linked to URL, and File URL.
Note: The Image Preview attribute shows each photo directly in Google Sheets, so you can identify the right image without opening Google Drive.
- Click Save Selected Settings as Default.
Setting Image Preview Size and Sharing Permissions
Before uploading, set the image preview size and file access. This controls how large the photo preview appears in Google Sheets and makes each uploaded photo shareable.
- Click the Settings tab in the sidebar.
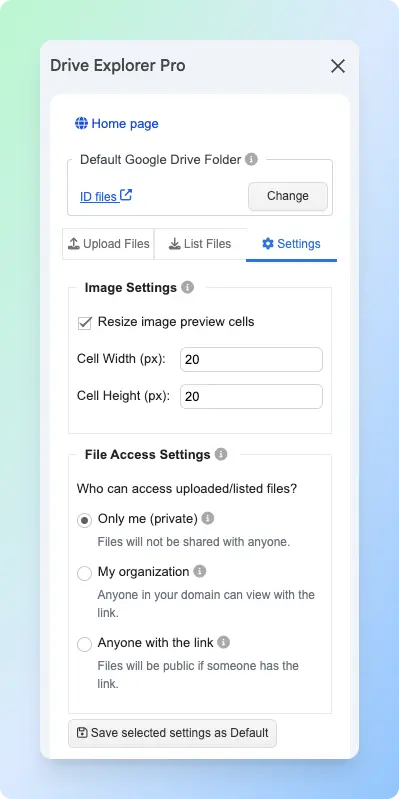
- Set the preview size in the Image Settings section. Enter the width in Cell Width (px) and the height in Cell Height (px).
For most photo-sharing workflows, set the preview size between 100 and 150 pixels.
- Use a smaller size (around 75 pixels) when you are adding many photos to one sheet.
- Use a larger size (around 200 pixels) when recipients need to recognize each photo from the preview without opening it in Google Drive.
-
Set file access so every uploaded photo gets a shareable link, under File Access Settings, select Anyone with the link.
-
Click Save Selected Settings as Default.
Drive Explorer Pro applies these settings during upload.
Note: This setting applies to newly uploaded files only. It does not change the permissions of files already in your Drive.
Uploading Photos and Generating Links
With your folder, attributes, and sharing settings configured, upload your photos.
-
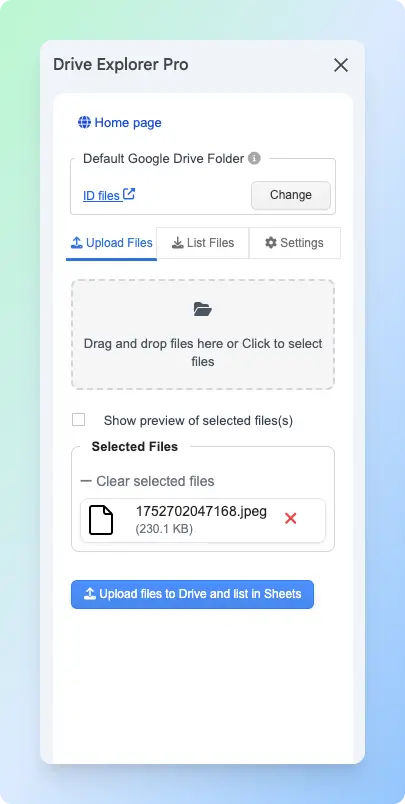
Click the Upload files tab in the sidebar.
-
Drag and drop your photos into the upload box, or click the box to select files.
-
Check Show preview of selected files if you want to review the photos before uploading.
-
You can drag photos in the Selected files section to change their upload order before you continue.
-
Click Upload files to Drive and list in Sheets.
Drive Explorer Pro uploads each photo to the selected Google Drive folder and adds the selected details to your sheet. Each row represents one photo.
If a row is missing or incomplete, the upload was likely interrupted. Re-upload that photo, and Drive Explorer Pro will add a new row below the existing ones.

You can now identify photos from the Image Preview column and copy links from the File URL column to share. Use the Direct Download Link column when recipients need to download the file directly.
If recipients need to download the photos directly instead of opening a preview, see how to create a direct download link in Google Drive to generate download links for your uploaded photos.
Sharing All Photo Links at Once
If you uploaded several photos with Drive Explorer Pro, you do not need to send each photo link one by one. Share the Google Sheets file instead.
Important: The Google Sheets link and the photo links have separate access settings. Recipients need access to both. Because you already set the uploaded photos to Anyone with the link in the Settings tab, the photo links are ready. The steps below only share the Google Sheets file.
- Click Share in the top-right corner of Google Sheets.
- Under General access, change Restricted to Anyone with the link.
- Set the permission to Viewer.
- Click Copy link, then click Done.
Send the link to your client, team, or recipient. They can open the sheet, view the photo previews, and click the links they need.
If you are working with videos, see how to upload videos to Google Drive and share a link.
If your photos are already in Google Drive and you only need to create a shareable link, see how to create a link for photos in Google Drive.
Conclusion
Choose the method based on where the photos are stored and how many links you need to manage.
- Use the web app for a quick upload from your browser. It works best for a few photos.
- Use the mobile app when the photos are on your phone and you need to share them right away.
- Use Drive Explorer Pro when you upload multiple photos regularly and want every link tracked automatically in Google Sheets.
Whichever method you use, change General access from Restricted to Anyone with the link before sharing. If you skip this step, the recipient sees an access request page instead of the photo.