How to Upload Video to Google Drive and Share Link (Step-by-Step Guide)
Videos are often too large to send through email or messaging apps. Google Drive lets you upload the video and share a link, so others can open it without receiving the file directly.
But uploading a video to Google Drive does not automatically make it shareable. The link works only when the video’s access setting allows recipients to open it.
In this tutorial, you will learn how to upload a video to Google Drive and share a working link using three different approaches, along with guidance on when to use each one.
Table of Contents
Video Tutorial
Prerequisites
Before you start, make sure you have the following ready.
- A Google account with access to Google Drive.
- Enough Google Drive storage, especially for large videos.
- The video file saved on your device.
- For the mobile method: the Google Drive app installed on your phone, available for iOS and Android
Uploading Videos to Google Drive and Sharing the Link on the Web
You can use this method when you are on a desktop or laptop and want to upload and share a small number of videos.
Uploading the Video
- Sign in to Google Drive.
- Click the + New button in the top-left corner.
- Select File upload.
- Choose your video file and click Open.

Tip: You can also drag and drop the video file directly into the Google Drive window. Google Drive starts uploading it automatically.
Large video files take several minutes to upload. When the upload finishes, the progress bar disappears and the video appears in your Google Drive file list with a thumbnail or video icon.
For supported file types and size limits, see Google’s file upload documentation.
Sharing the Video
After the upload finishes, share the video:
- Right-click the video file, hover over Share, then click Share.
- Under General access, click the dropdown next to Restricted and select Anyone with the link.
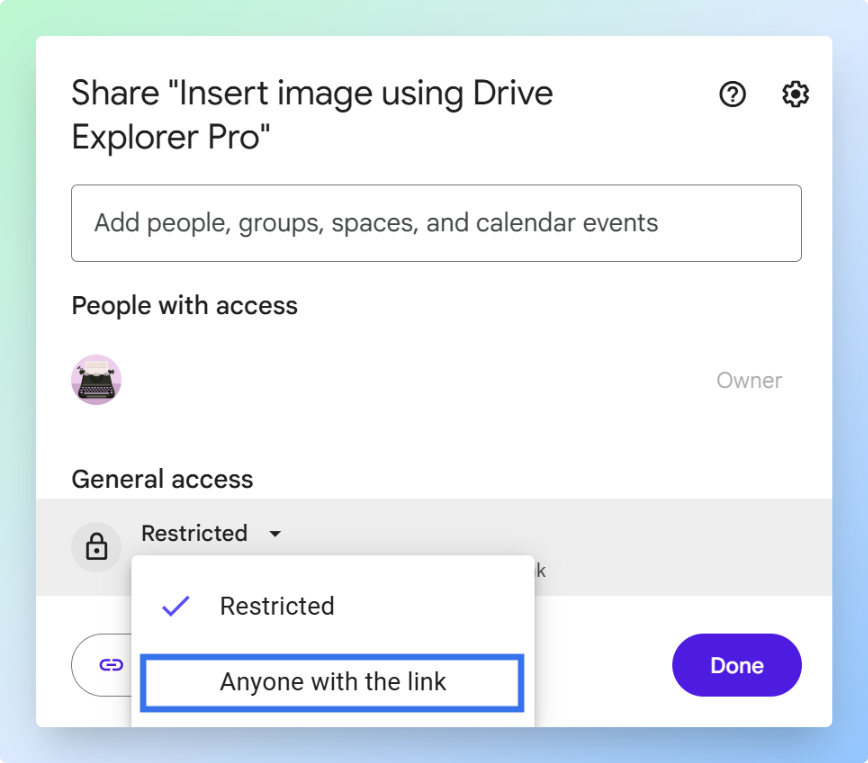
Note: If access stays on Restricted, only people you add by email can open the video. Select Anyone with the link when you want the recipient to open the video from a shared link.
- Set the permission level:
| Permission | What It Allows | When to Use It |
|---|---|---|
| Viewer | Watch the video only | Sharing with clients, family, students, or anyone who only needs to watch |
| Commenter | Watch the video and leave comments | Asking for feedback without giving full access |
| Editor | Change sharing settings and manage the file | Only for trusted collaborators |
For most video sharing, such as client deliverables, family clips, or assignment submissions, Viewer is the right choice.
- Click Copy link, then click Done.
Tip: Before sending the link, paste it into a private or incognito browser window. If the video opens without asking you to sign in, the sharing settings are correct.
Paste the link into an email, chat message, or document.
Note: You can revoke access at any time by going back to the sharing settings and switching General access back to Restricted. After that, people who only had the link can no longer open the video.
For more on how link access works, see Share files from Google Drive.
Now that you know how to share from a desktop, let's look at how to do the same from your phone.
Uploading Videos to Google Drive and Sharing the Link on Mobile
You can upload a video from your phone using the Google Drive app. Use this method when the video is already on your device and you need to share it without using a desktop.
Uploading the Video
-
Open the Google Drive app on your phone.
-
Start the upload:
- On Android: tap + New > Upload.
- On iPhone or iPad: tap the + button, then choose the Upload File option.
-
Select your video from your gallery or files app.
-
Tap Upload.
-
Wait for the upload to finish before sharing.
Large video files can take several minutes to upload. Keep the Google Drive app open until the upload finishes.
When the upload is complete, the video appears in your Google Drive file list with a thumbnail or video icon.
Sharing the Link
Once the upload is complete, here's how to get the shareable link.
- Tap the three-dot menu next to the uploaded video.

- Tap Manage access.
- Under General access, tap Change.
- Select Anyone with the link.
- Set the permission to Viewer.
- Tap Copy link.
You can now paste the link into any message or email app on your phone. The recipient can open and watch the video in a browser, as long as access is set to Anyone with the link.
For more on how link access works, see Share files from Google Drive.
If you only share videos occasionally, the web or mobile app is enough. But if you upload multiple videos regularly and need to track each link, the next method can save you a lot of time.
Uploading Multiple Videos to Google Drive and Sharing Links Using Drive Explorer Pro
Drive Explorer Pro lets you upload multiple videos to Google Drive and automatically log their shareable links in a Google Sheets spreadsheet.
This saves you from opening each video one by one to copy its link.
Use this method when you upload videos regularly, such as training videos, client deliverables, assignments, event recordings, or course materials. It is useful when you also need a video delivery log in Google Sheets with file names, links, file sizes, and direct download links.
Why use Drive Explorer Pro
- Upload several videos in one workflow.
- Set sharing access before upload, so each video gets a working link.
- Log every video link in one Google Sheets spreadsheet for easy sharing and tracking.
Install Drive Explorer Pro from the Google Workspace Marketplace:
Launching Drive Explorer Pro
You open Drive Explorer Pro from inside Google Sheets after installing it.
- Open Google Sheets.
- Go to Extensions > Drive Explorer Pro > Open Drive Explorer Pro.
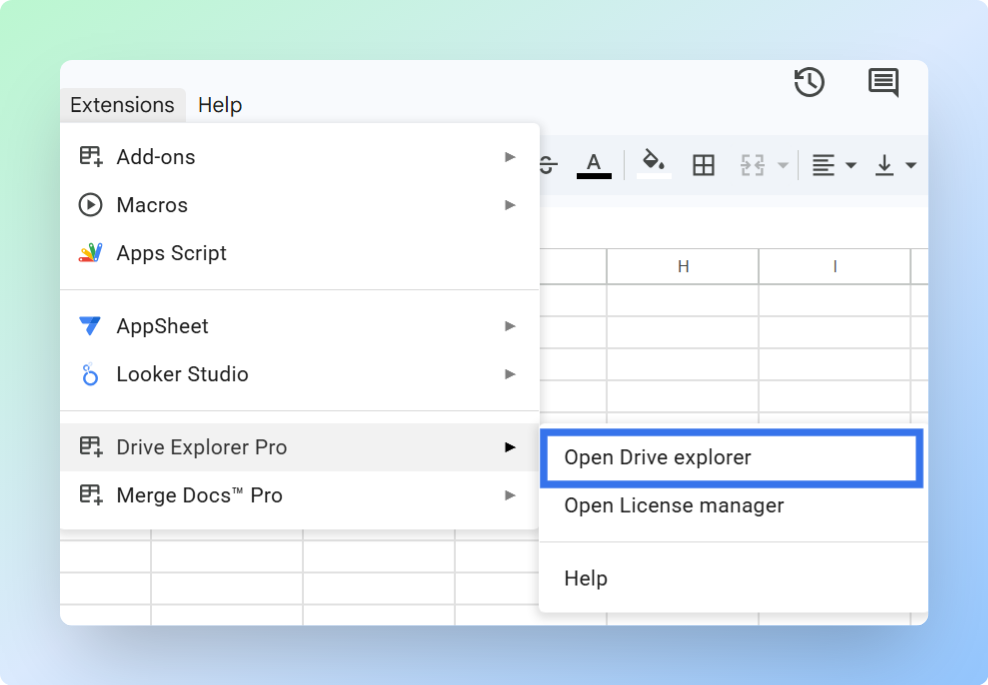
- The Drive Explorer Pro sidebar opens on the right side of your sheet.
Before uploading, complete this one-time setup. Drive Explorer Pro can reuse these settings for future video uploads:
- Folder - where the videos will be saved
- File details - what information appears in Google Sheets
- Sharing access - who can open the video links
Setting Your Destination Folder
Choose the Google Drive folder where your uploaded videos will be saved.
- In the sidebar, click Change under the Default Google Drive folder section.
- Browse to your preferred folder and select it.
Using a dedicated folder, such as "Client Videos 2026" or "Training Recordings", keeps the videos easier to find and reshare later.
Configuring File Attributes to Log in Your Sheet
Choose which video details Drive Explorer Pro logs into your Google Sheets spreadsheet before you upload anything.
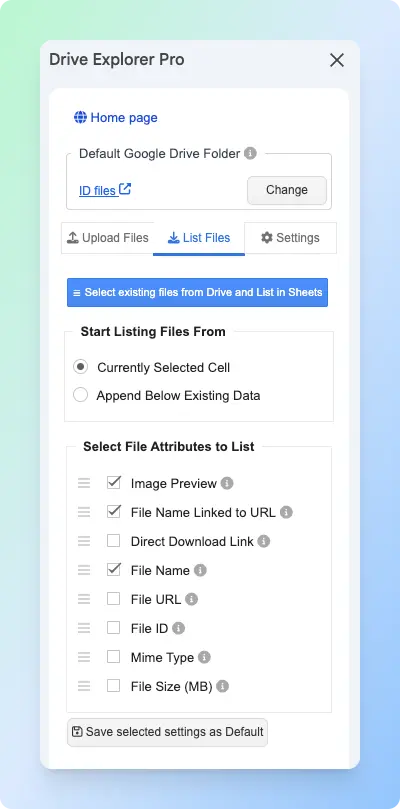
- In the sidebar, click the List files tab.
-
Under Start listing file from, choose one of the following:
- Currently selected cell - logs data starting from wherever your cursor is in the sheet.
- Append below existing data - adds new rows below any content already in the sheet.
-
Under Select File Attributes to list, check the details you want logged:
| Attribute | What It Logs | Best For |
|---|---|---|
| File Name Linked to URL | Clickable name that opens the video in Google Drive | Client or team delivery sheets |
| File URL | Standard Google Drive video link | Copying and sharing manually |
| Direct Download Link | Link that downloads the video immediately | When recipients need to download the file |
| File Size (MB) | File size in megabytes | Tracking large uploads |
| Mime Type | File format, such as video/mp4 or video/quicktime | Filtering or automation |
| File ID | Unique identifier for the file | API integrations or advanced workflows |
For most video-sharing workflows, select File Name Linked to URL, File URL, and File Size (MB).
- Click Save Selected Settings as Default to keep these preferences for future uploads.
Setting Sharing Permissions Before You Upload
Set the sharing access before uploading so each video gets a working shareable link when the upload finishes.
- Go to the Settings tab in the sidebar.
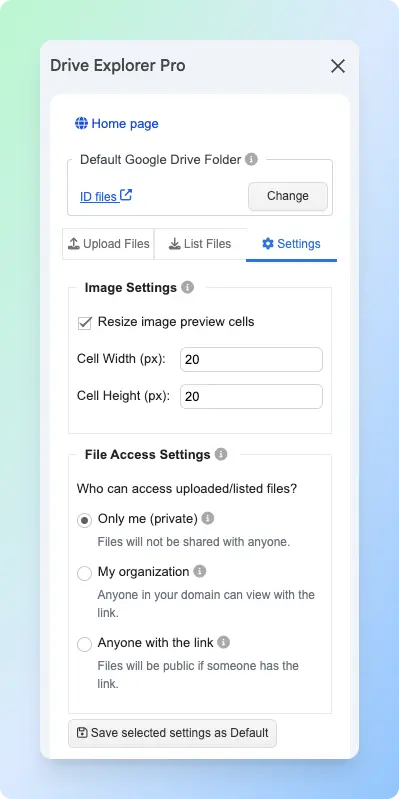
- Under File Access Settings, choose the access level you need.
| File Access Setting | What It Means |
|---|---|
| Only me (private) | Only you can open the videos. |
| My organization | People in your organization can open the videos when they have the link. |
| Anyone with the link | Anyone with the link can open the videos. |
Select Anyone with the link so recipients can open the video without requesting access.
- Click Save Selected Settings as Default.
Drive Explorer Pro applies this setting during upload. Each uploaded video gets a shareable link when the upload finishes.
Note: This setting applies to newly uploaded videos only. It does not change the permissions of videos already in your Google Drive.
Uploading Videos and Generating Links
With your folder, attributes, and sharing settings configured, you are ready to upload.
Before uploading, make sure the sheet is open and your cursor is placed where you want the first video row to appear.
- Click the Upload files tab in the sidebar.
- Drag and drop your video files into the upload box, or click the box to browse and select files manually.
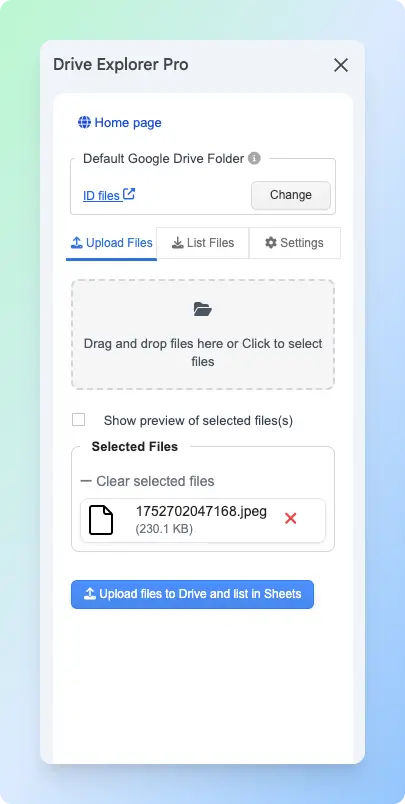
You can drag files in the Selected Files to reorder them before uploading. The order you set here is the order they appear in your sheet.
- Click Upload files to Drive and list in Sheets.
Important: Large video files take longer to upload and log. Do not close the tab until Drive Explorer Pro finishes uploading the videos and adding all rows to Google Sheets. Closing the tab early can stop the upload and leave rows incomplete.
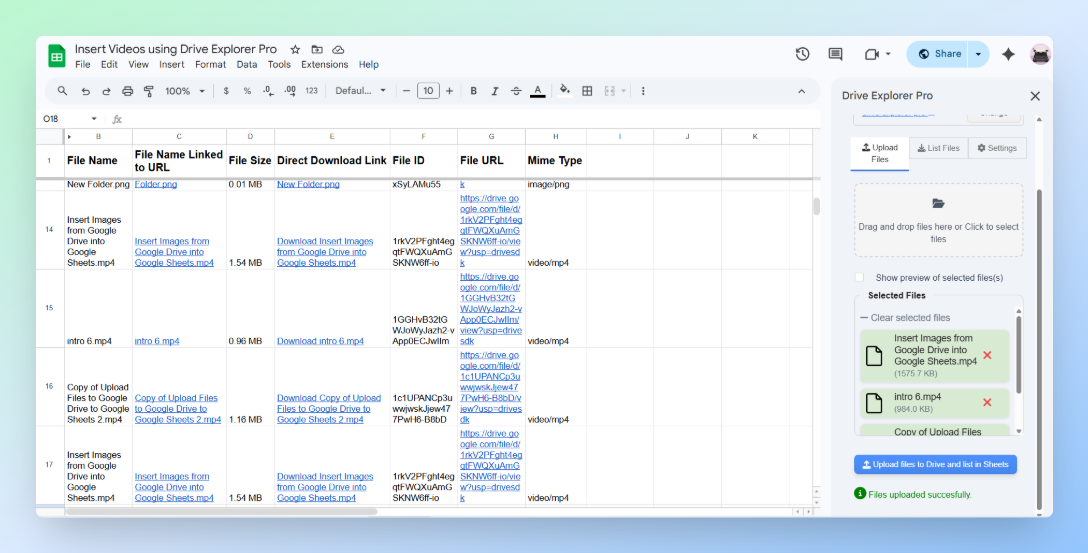
Drive Explorer Pro uploads each video to your chosen folder and adds a new row in your spreadsheet. The row includes the video name, file size, and shareable link based on the attributes you selected.
To share an individual video, copy the link from the File URL column and paste it wherever you need.
Sharing All Video Links at Once
If you need to share several video links together, share the spreadsheet instead of sending each link one by one.
- Click Share in the top-right corner of Google Sheets.
- Under General access, change Restricted to Anyone with the link.
- Set the permission to Viewer.
- Click Copy link, then Done.
Send this one link to your team, client, or class. They can open the sheet, see every video listed, and click the links they need.
Note: Sharing the spreadsheet only gives people access to the sheet. The video links will open only if the uploaded videos are also set to Anyone with the link.
If you are uploading photos instead of videos, the workflow is similar. See how to upload photos to Google Drive and share a link from your browser or phone.
For general file sharing, see how to upload files to Google Drive and share a link.
Conclusion
You now have three ways to upload a video to Google Drive and share a working link.
- Use the web app for a quick upload from your browser. It works best for a few videos.
- Use the mobile app when the video is on your phone and you need to share it right away. For the full mobile walkthrough on Android, iPhone, and iPad, see how to upload a video to Google Drive and share a link on mobile.
- Use Drive Explorer Pro when you upload multiple videos regularly and need a Google Sheets record. It can list each video with its file name, Google Drive link, direct download link, file size, and file type.
Whichever method you use, change General access from Restricted to Anyone with the link before sharing. If you skip this step, the recipient sees an access request page instead of the video.