How to Create a Google Form in Google Sheets
Google Sheets is a great place to store information, but it's not a great place for other people to enter it. When you share a sheet for data entry, people can overwrite formulas, delete rows, or paste data in the wrong column.
But there's a cleaner way. You can create a Google Form directly from Google Sheets so people enter information through a dedicated form instead of editing the spreadsheet itself.
Google Forms collects the answers, and Google Sheets stores them automatically as new rows, with no risk of anyone changing the rest of your data.
In this guide, you'll learn how to create a Google Form from Google Sheets, customize it, share it with respondents, check responses, and connect an existing form to a spreadsheet.
Table of Contents
Prerequisites
- A Google account.
- Access to Google Sheets on desktop or mobile.
- The spreadsheet you want to link responses to (or a new blank one).
Creating a Google Form from Google Sheets
You can create a connected Google Form from any open Google Sheet using the Tools menu. Use this method when you already have a spreadsheet and want new entries to appear there without anyone editing the sheet directly.
You can create a Google Form from an existing Google Sheet so people enter information through a separate form while responses are saved automatically in the spreadsheet.
-
Open Google Sheets and select the spreadsheet you want to link to your form. If you don't have one yet, click Blank spreadsheet to create one.
-
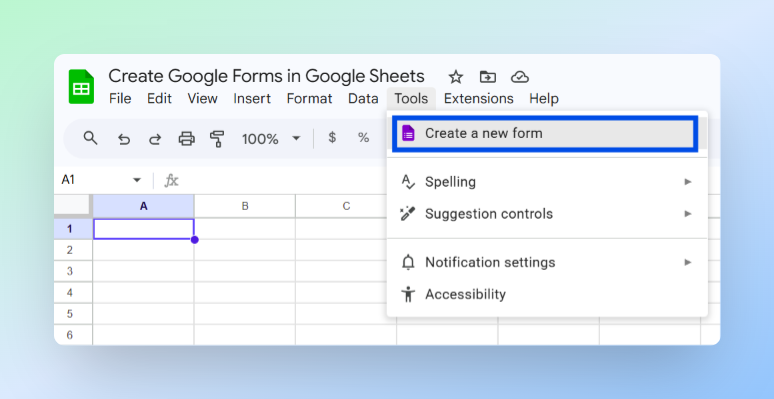
Click Tools in the top menu bar.
-
Click Create a new form.
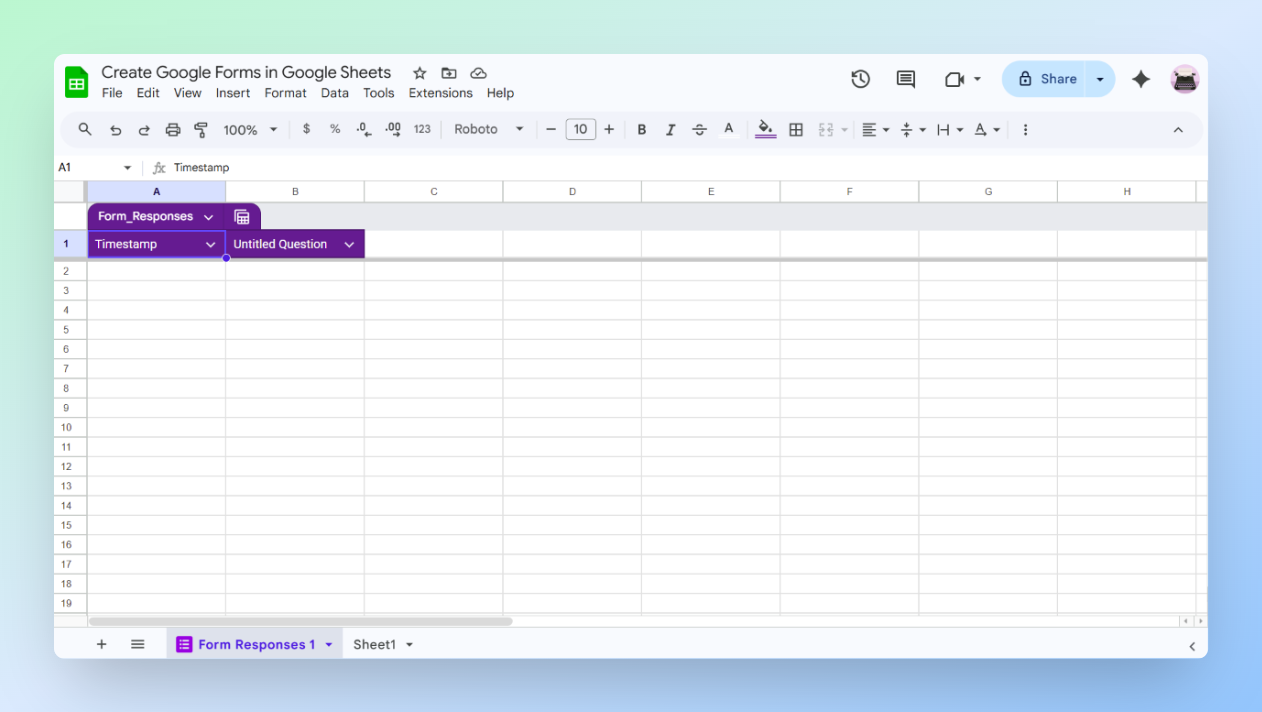
Google Forms opens in a new browser tab with one blank question. At the same time, Google Sheets creates a linked Form Responses 1 tab automatically. This connection is created immediately, even before anyone submits a response.
Click the form title at the top and replace Untitled form with a descriptive name, such as Event Registration or Team Availability Survey. This is what respondents see when they open the form, so choose a name that clearly explains its purpose.
You now have a form connected to your spreadsheet. Next, add your questions, adjust the settings, and prepare the form for sharing.
Building and Customizing Your Google Form
This is where you add questions, choose answer formats, adjust settings, and style the form. Everything happens inside the Google Forms editor that opened when you created the form.
Adding Questions
Each question you add becomes a column in the linked spreadsheet, and submitted answers appear under the matching column.
-
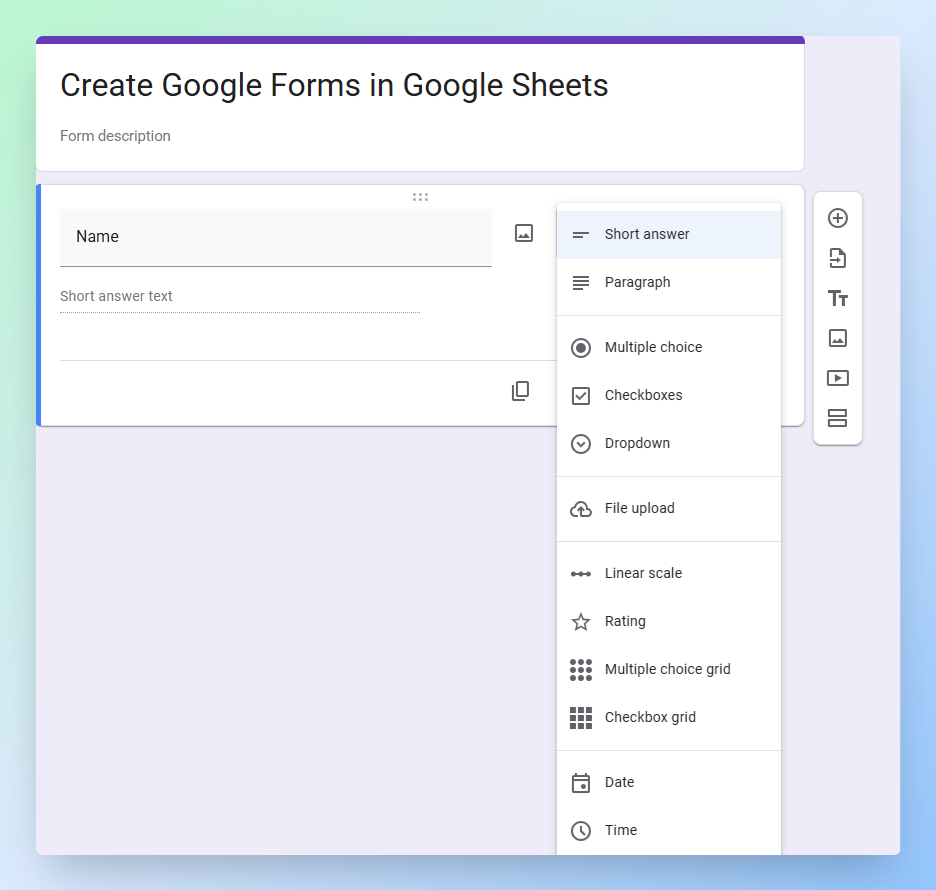
Click the + icon on the right-hand toolbar to add a new question.
-
Click Untitled Question and type your question.
-
Click the question type dropdown and choose the question type you need.
Note: If you add a question after people have already submitted responses, Google Sheets creates a new column for it. Earlier submissions will have blank cells in that column.
Here's a quick guide to the main question types:
| Question type | What it does | When to use it |
|---|---|---|
| Short answer | Single-line text box | Names, emails, phone numbers, short text |
| Paragraph | Large text box | Feedback, comments, descriptions |
| Multiple choice | Choose one option | Yes/no, preference, or fixed-answer questions |
| Checkboxes | Choose more than one option | Questions where several answers can apply |
| Dropdown | Options in a dropdown list | Long option lists such as country or department |
| File upload | Upload a file from device or Drive | Documents, photos, assignments, forms |
| Linear scale | Number rating scale | Satisfaction, agreement, or likelihood questions |
| Multiple choice grid | One answer per row in a grid | Rating several items with the same choices |
| Checkbox grid | More than one answer per row in a grid | Comparing items where multiple choices apply |
| Date | Date picker | Appointment requests, deadlines, availability |
| Time | Time picker | Appointment or meeting times |
Note: File upload questions require respondents to sign in with a Google account. The uploaded files are saved in a Google Drive folder connected to your form.
To set up a dedicated shared folder for submissions, see how to create a shared Google Drive folder.
To share those files or create shareable links, see how to upload files to Google Drive and share a link.
Making a Question Required
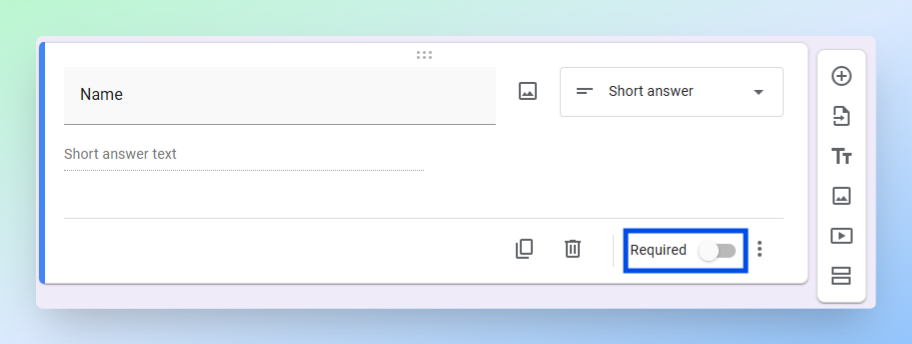
Toggle the Required switch at the bottom of any question to make it compulsory. Respondents can't submit the form without answering required questions. Turn this on for any field you can't work without, such as name or email.
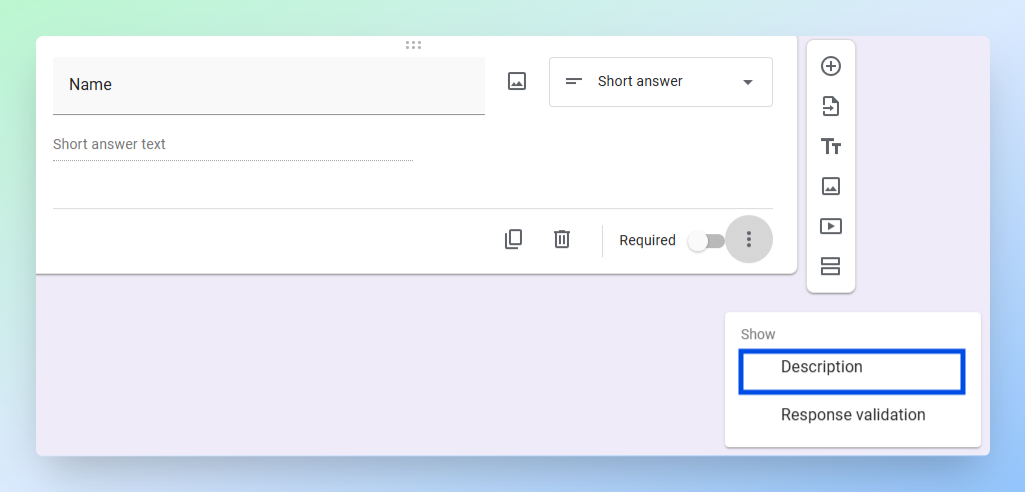
Adding a Description to a Question
Use a description when a question needs an example, formatting guidance, or extra instructions.
-
Click the question you want to explain.
-
Click the three-dot menu at the bottom-right of the question.
-
Select Description.
-
Type the helper text under the question title. For example: Enter your date of birth in DD/MM/YYYY format.
Once your questions are ready, configure the form settings before you share it.
Understanding the Questions, Responses, and Settings Tabs
Google Forms has three tabs at the top of the editor:
- Questions: Build and edit the form.
- Responses: View submitted answers and manage response collection.
- Settings: Control who can respond and how the form behaves.
Responses tab
After people submit the form, this tab shows the total number of responses and three ways to review them:
- Summary: Charts and totals across all responses.
- Question: Responses grouped by question.
- Individual: Each submission one by one.
Click View in Sheets to open the connected spreadsheet. The three-dot menu next to it gives you more options:
| Option | What it does |
|---|---|
| Get email notifications for new responses | Sends you an email each time someone submits the form |
| Select destination for responses | Create a new response spreadsheet or connect to an existing one |
| Unlink form | Disconnects the form from the current spreadsheet |
| Download responses (.csv) | Downloads responses for use in Excel or another tool |
| Print all responses | Opens responses in a printable format |
| Delete all responses | Removes all responses from the form permanently |
Settings tab
Controls who can respond, how responses are collected, and what respondents see.
| Setting | What it does |
|---|---|
| Collect email addresses | Choose whether to collect respondent emails |
| Send responders a copy of their response | Emails respondents their answers after submission |
| Allow response editing | Lets respondents update their answers after submitting |
| Limit to 1 response | Prevents the same Google account from submitting more than once |
| Show progress bar | Shows respondents how far through the form they are |
| Shuffle question order | Randomises question order each time the form opens |
| Confirmation message | Controls the message respondents see after submitting |
Note: If your form includes a File upload question, respondents must sign in to a Google account regardless of your email collection setting.
Defaults
- Collect email addresses by default sets your preferred email collection option for all new forms.
- Make questions required by default automatically marks every new question as required when you add it.
Make this a quiz
Turn this on to assign points, set correct answers, and grade responses in Google Forms. Use this for quizzes, tests, or graded assessments. For more details, see Turn a form into a quiz.
Customising the Look of Your Form
Click the palette icon at the top right of the form editor to open the theme panel. From here you can change the font, colours, and header image.
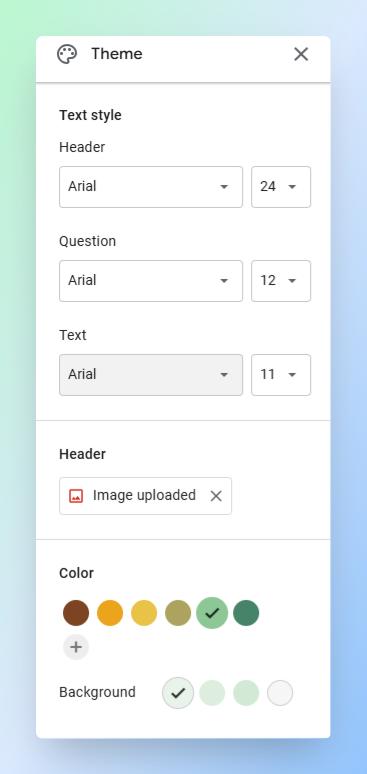
- Text style: Sets the font and size for the form title, question labels, and body text.
- Header: Upload an image to display at the top of the form.
- Color: Choose a theme colour for the form header and buttons.
- Background: Choose a background colour behind the form card.
These settings only affect how the form looks for respondents. They don't change how responses are collected or saved in Google Sheets.
Publishing and Sharing the Form
Sharing a Google Form is different from sharing a Google Sheet. Respondents see only the form, not your spreadsheet, your data, or your other sheet tabs.
Publishing the Form
Before sharing the form, make sure it's published and that the responder access settings are configured correctly.
Click Publish at the top right of the form editor. The Publish form dialog appears.
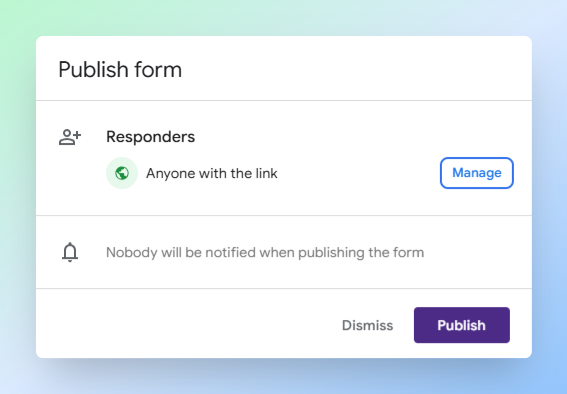
The dialog also shows who can respond to the form. The default is Anyone with the link.
To change who can respond, click Manage before publishing. The Share dialog opens with two sections:
- People with access: Shows who has direct access. Use the search field to add specific people and assign them a role.
- General access: Controls access for anyone with a link. Editor view lets someone edit the form. Responder view lets someone fill it in and submit.
Important: Editors can view and delete all form responses permanently. Be careful about who you give editor access to.
Once you're happy with the access settings, close the Share dialog and click Publish. The button changes to Published. The form is now live and ready to accept responses.
Note: Any changes you make after publishing take effect immediately. You don't need to republish after editing questions or settings.
Sharing the Form
After publishing, share the form with the people who need to respond.
By link:
- Click the link icon at the top of the Google Forms editor.
- In the Copy responder link box, select Shorten URL if you want a shorter link.
- Click Copy.
- Paste the link wherever you want to share the form.
If someone sees a Request access screen, the form is still restricted for that person. Open Share, then either add them by email or change General access to Anyone with the link.
By embedding:
- Click the three-dot menu at the top right of the editor.
- Select Embed HTML.
- Copy the HTML code and paste it into your webpage or blog post editor.
Note: Forms with File upload questions have additional sign-in requirements. If respondents have trouble accessing an embedded form, share the responder link instead.
For more details, see Publish and share the form.
Checking Responses in Google Sheets
Every form submission appears in your spreadsheet as a new row. Switch back to the Google Sheets tab and click Form Responses 1 at the bottom of the spreadsheet.
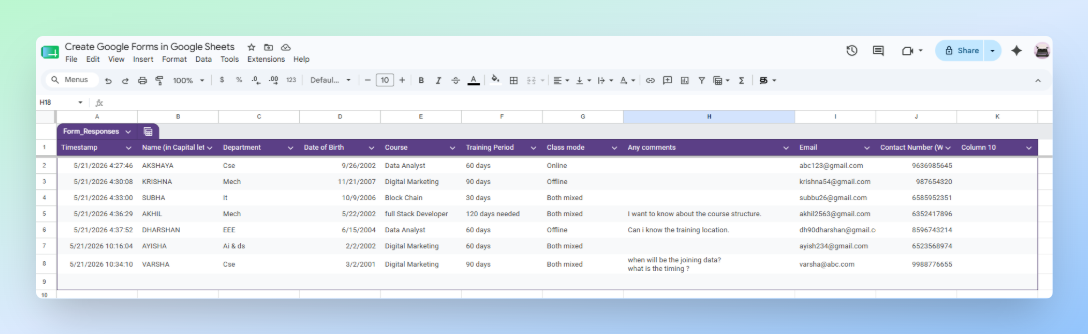
Each column matches one question from your form. The first column is always a Timestamp, the date and time each response was submitted. The sheet updates automatically every time someone submits the form.
Note: In newer versions of Google Sheets, the Form Responses 1 sheet may be formatted as a table automatically, with alternating row colours and a filter row. To remove this, click the down arrow next to the tab and select Revert to unformatted data.
You can rename the tab by double-clicking it and typing a new name, such as Scores or Registrations. This doesn't affect the form connection or how new responses arrive.
You can use standard Google Sheets tools on this data - filters, sorting, charts, pivot tables, and VLOOKUP, without affecting the form or incoming responses.
Important: Avoid deleting or changing column headers in the response sheet. Google Forms uses these columns to organise incoming responses, and changing them can disrupt how future responses are recorded.
Connecting an Existing Google Form to Google Sheets
If you already have a Google Form and want to link it to a spreadsheet, you can do this from inside Google Forms. Use this method when the form was created separately and you want responses to flow into a specific sheet.
- Go to Google Forms and open the form you want to connect.
- Click the Responses tab at the top.
- Click the green Sheets icon (Link to Sheets).
- Select Create a new spreadsheet or Select existing spreadsheet.
- Click Create or Select.
Google Sheets opens with a Form Responses 1 tab containing all existing responses. Future submissions appear there automatically.
Tip: If you select an existing spreadsheet, Google Forms adds a new Form Responses 1 tab inside it. Your existing sheet tabs and data are not affected.
If you want to link supporting Drive files, such as reference documents, PDFs, or templates to rows in that sheet, see how to link a Google Drive file to Google Sheets.
To build a full index of all files in a Drive folder, see how to list files from Google Drive into Google Sheets.
Conclusion
You now have a Google Form connected to your spreadsheet, so people can submit information without editing the sheet directly. Every response is added automatically as a new row, keeping your data organised and protected.
Before you share it, double-check your permissions. Give editor access only to people who need to manage the form itself. For everyone else, share the responder link instead. This keeps your spreadsheet protected while still collecting responses automatically.