How to Mass Upload Images in Google Sheets Automatically
Google Sheets is useful for organizing image records, such as product photos, client images, event photos, student submissions, and asset files.
However, Google Sheets does not have a built-in workflow for uploading multiple images, inserting previews, and adding file details automatically.
If you do it manually, you must upload each image to Google Drive, copy its link, paste it into Google Sheets, add a preview, and repeat the process for every file.
This works for a few images, but becomes slow when you have 30, 100, or more images.
In this tutorial, you will learn how to mass upload images in Google Sheets using Drive Explorer Pro. You will upload images from your computer, add existing Google Drive images, insert previews, and list file details such as file names, Drive links, and direct download links.
Table of Contents
Prerequisites
Before you start, make sure you have:
- A Google account
- Access to Google Sheets and Google Drive
- A Google Drive folder where the images should be saved
- Images on your computer, or images already in Google Drive, if you need help uploading files to Google Drive first, see How to Upload Files to Google Drive and Share a Link
- Permission to install Google Workspace add-ons
Launching Drive Explorer Pro
Drive Explorer Pro is a Google Workspace add-on for Google Sheets. It helps you upload multiple images to Google Drive and add their details to your Google Sheet.
Use it when you want to add multiple images to Google Sheets without copying links one by one.
Install Drive Explorer Pro from the Google Workspace Marketplace:
After installing it, open Drive Explorer Pro inside your sheet:
- Open the Google Sheets where you want to add the images.
- Go to Extensions → Drive Explorer Pro → Open Drive Explorer Pro.
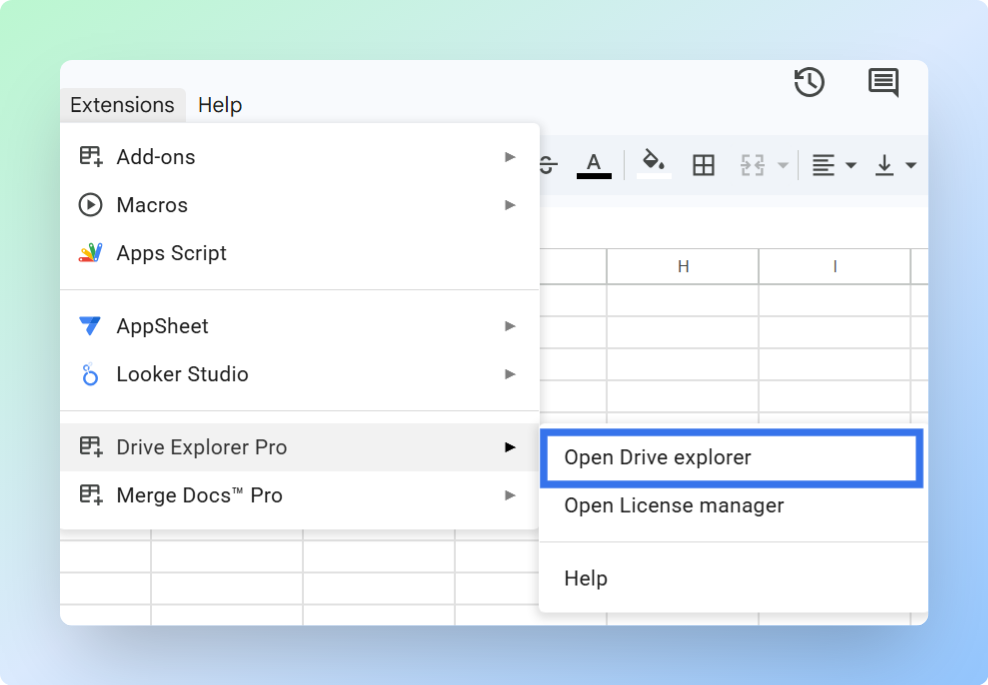
The Drive Explorer Pro sidebar opens on the right.
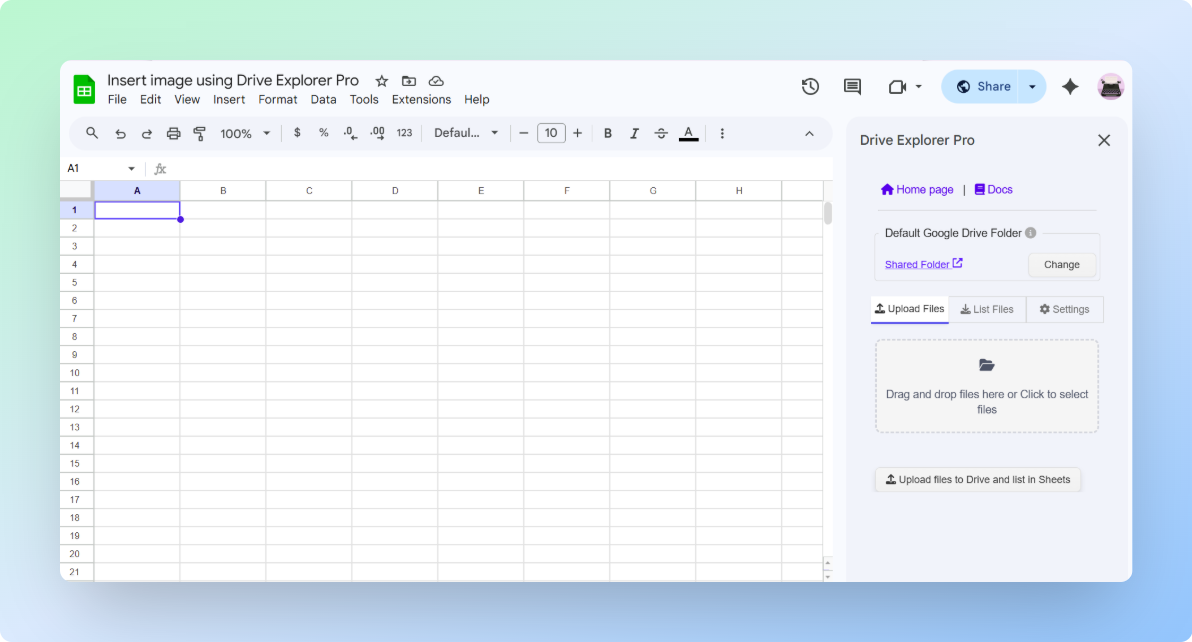
Now that the sidebar is open, configure the basic settings before adding images.
Configuring Drive Explorer Pro Before Adding Images (One-Time setup)
These settings prevent common mistakes before the first image is added.
You only need to check four things:
- Folder
- Preview size
- File access
- Sheet columns
Choosing the Google Drive folder
Select the correct Google Drive folder before you upload. After the images are uploaded, you must move them from Google Drive, not from Drive Explorer Pro.
- In the Drive Explorer Pro sidebar, find Default Google Drive Folder.
- Click Change.
- Choose the Google Drive folder where you want to save the images.
- Click Select. New image uploads will go to this folder.
Setting the image preview size
Set the preview size so the images are easy to see in the sheet. The default size of 20 × 20 px is too small to identify images at a glance, which makes the sheet hard to use as a visual tracker.
- Click the Settings tab.
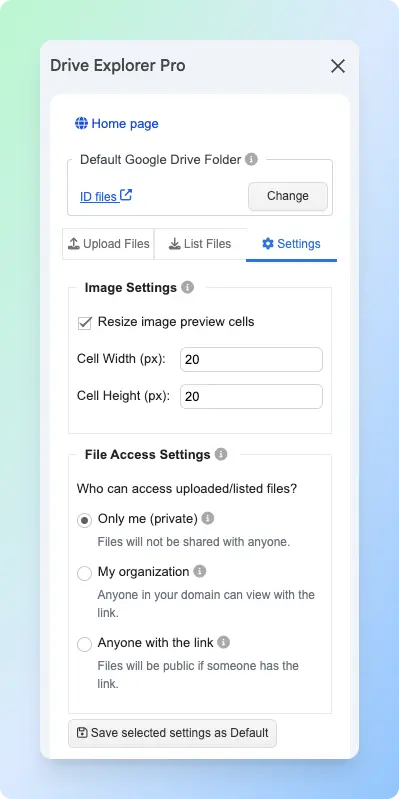
- Go to Image Settings.
- Turn on Resize image preview cells.
- Enter the Cell Width (px).
- Enter the Cell Height (px).
- Use 100 to 150 px for most workflows. Use 100 px if you have many rows. Use 150 px if you want larger previews.
-
- Click Save selected settings as Default.
Setting file access
File access controls who can open the image links. Set this before uploading because it applies to every file in the batch, changing it after means updating each file individually in Google Drive.
- Choose the access before uploading or listing images.
| Setting | Who can open the image |
|---|---|
| Only me | Only you |
| My organization | People in your Google Workspace organization |
| Anyone with the link | Anyone who has the link |
If you want clients, vendors, or students to open the images, choose Anyone with the link.
- Click Save selected settings as Default.
Note: This setting applies to newly uploaded PDFs only. It does not change the permissions of PDFs already in your Google Drive.
For Google’s official file-sharing guidance, see Share files from Google Drive.
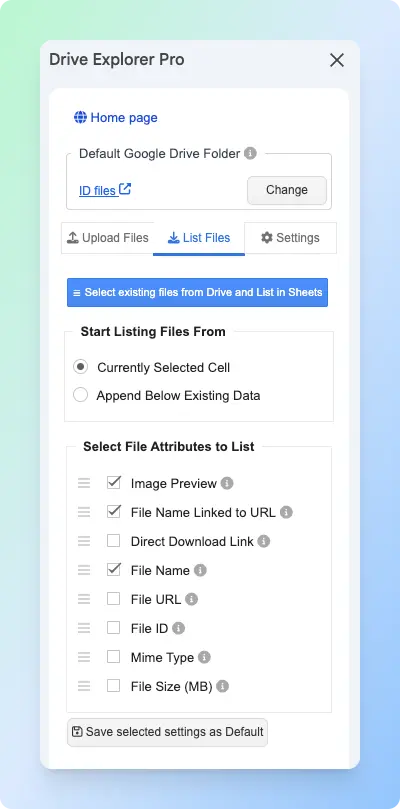
Choosing File Details nd Row Placements
Choose which image details should appear in Google Sheets. The order you set here becomes the column order in your sheet, so arrange them the way you want to read them before saving.
- Click the List Files tab.
-
Under Start listing file from, choose where Drive Explorer Pro should place the rows:
- Current Cell if you are starting a new sheet.
- Append Below Existing Data if the sheet already has image rows.
-
Choose the file details you want to add to Google Sheets.
| File detail | What it means |
|---|---|
| Image Preview | Shows the image inside the sheet. |
| File Name Linked to URL | Shows the file name as a clickable link. |
| File Name | Shows the file name as plain text. |
| File URL | Shows the Google Drive link. |
| Direct Download Link | Shows a download link for the file. |
| File Size (MB) | Shows the file size. |
| MIME Type | Shows the file type, such as image/jpeg. |
| File ID | Shows the unique Google Drive file ID. |
Select Image Preview, File Name Linked to URL, File URL, File Size (MB), and Mime Type so each image is listed with a preview, clickable link, and basic file details.
-
Drag the details into the order you want.
-
Click Save selected settings as Default to reuse the same column and row settings next time.
Result: Drive Explorer Pro now knows where to save files, who can open links, how previews should look, and which columns to add. For a full reference of all settings, see the Drive Explorer Pro documentation.
With setup complete, you are ready to add images. Start with the section that matches where your images are stored.
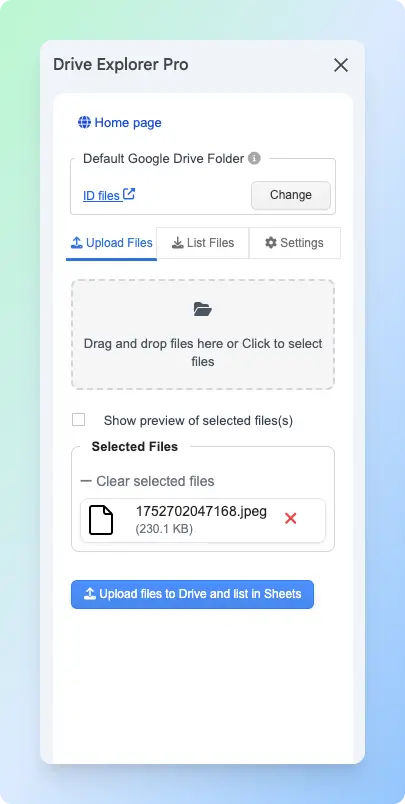
Uploading Images in Bulk From Your Computer
Drive Explorer Pro uploads the images to Google Drive first. Then it adds the image details to Google Sheets in one step.
Use this method when the images are on your computer.
-
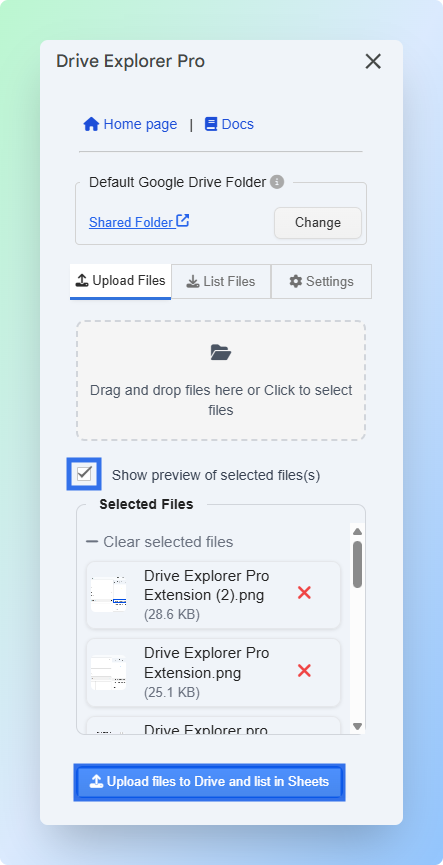
Click the Upload Files tab.
-
Drag your images into the upload area or click the upload area and select files from your computer.
-
Turn on Show preview of selected files.
-
Review the selected images and their order before uploading.
The row order in Google Sheets will match the order shown in the preview. Drag images up or down to change the order. To remove an image, click the delete icon next to it.
-
Click Upload files to Drive and list in Sheets.
-
Wait for the upload to finish.
Result: Drive Explorer Pro uploads the images to the selected Google Drive folder and adds one row for each image in Google Sheets.

Each row can include the image preview, clickable file name, Drive link, file size, and file type.
Note: The images are stored in Google Drive. Google Sheets shows the image details.
If your images are already in Google Drive and you do not need to upload them again, use the next section instead.
Adding Existing Google Drive Images to Google Sheets
If the images are already uploaded to Google Drive, use this method. Drive Explorer Pro lists the existing images in Google Sheets without uploading duplicate files.
Use this method for product photo folders, client image folders, event photos, student submissions, or project assets already saved in Drive.
- Click the List Files tab.
- Click Select existing files from Drive and List in Sheets.
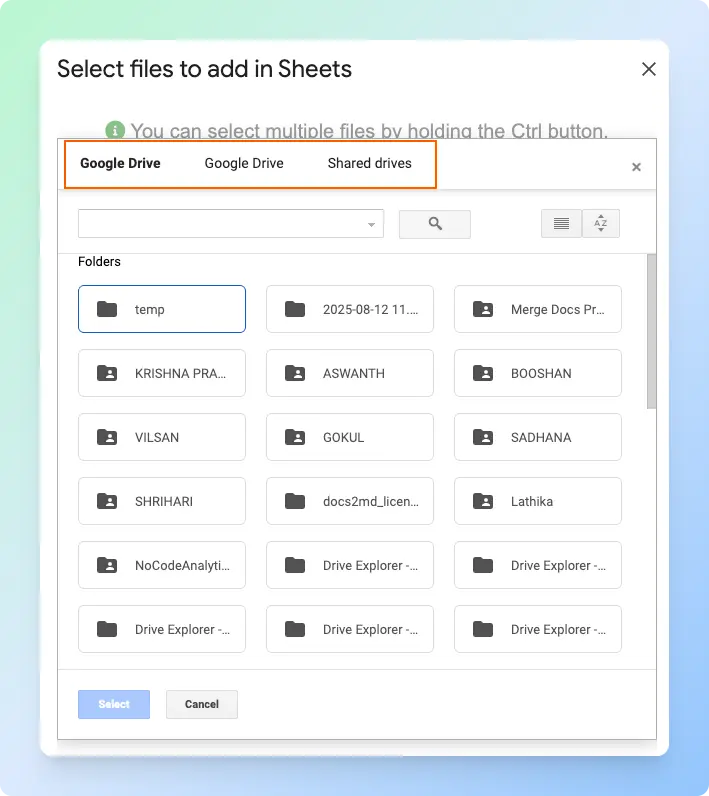
- Browse to the folder that has your images.
- Select the images you want to add.
- Click Select.
Result: Drive Explorer Pro adds the selected Google Drive images to your sheet as rows.
The images stay in Google Drive. The sheet gets the preview, file name, link, and other details you selected.
Once the images are in your sheet, you can keep growing it over time without starting over.
Adding More Images Over Time
This is useful when you update the sheet every week or month.
- Click the List Files tab.
- Under Start listing file from.
- Select Append Below Existing Data. This tells Drive Explorer Pro to add new rows below the existing ones instead of overwriting them.
- Upload new images or list existing Drive images.
Result: The new images are added below the old rows. Your existing rows stay in place.
Use this for product updates, client deliveries, event galleries, student submissions, and asset logs.
If you are sharing this sheet, check that each image has its own row, the previews are visible, the links open correctly, and the files are saved in the correct Google Drive folder.
For Google’s official guide to adding images in Google Sheets, see Add images to a spreadsheet.
If you need to insert a single image from Google Drive into a specific cell, see How to Insert Images in Google Sheets.
Conclusion
Mass uploading images works better when Google Drive stores the image files and Google Sheets keeps the organized record.
- Use Upload Files when the images are on your computer.
- Use List Files when the images are already in Google Drive.
- Use Append below existing data when you want to add new image batches later.
With Drive Explorer Pro, you can upload images, add previews, create links, and keep the full image list in one sheet.