Upload Multiple Images in Google Sheets
Managing image-heavy spreadsheets in Google Sheets is easy when you only have a few rows. But once your sheet grows past a few dozen entries, problems start to appear. Uploading images one by one takes time. Images shift out of place. Sorting can break the layout.
What starts as a simple task can quickly turn into a bigger challenge.
In this guide, you will learn three ways to upload images and when to use each one:
-
Using the Insert menu - Add images directly into cells using built-in function. This works well for small sheets but can be slow for large ones.
-
Using the IMAGE() Formula - Show images from links. This method works best when your images are stored online and publicly available.
-
Using Drive Explorer Pro Extension - Upload many images in the right order while keeping rows aligned and data accurate.
Each method works best for a different sheet size and workflow.
By the end of this guide, you’ll know how to choose the right way to insert images based on your data size and how you work.
Table of Contents
Uploading Images Using the Insert Menu
Google Sheets allows direct image insertion into individual cells through a built-in menu option. The image stays fixed inside the selected cell.
When to Use This Method
Use Insert menu when:
- Working with fewer than 20–30 images
- Updating occasional rows
- Sorting is minimal
If the sheet structure stays stable, this method is a good fit.
To upload an image using this method, follow these steps:
-
Select the target cell.
-
From the top menu, click Insert → Image → Insert an image in the cell, as shown below.
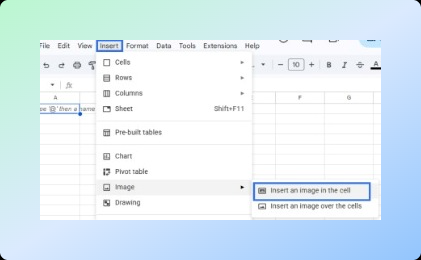
By selecting Insert an image in the cell, a pop-up upload window will open, allowing you to choose files from your device or Google Drive.
-
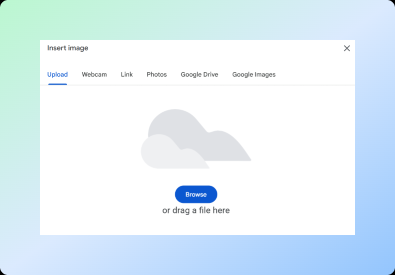
Browse and upload the image file from your device or Google Drive, as shown below. You can also drag and drop images directly into the upload window.
The image will appear inside the selected cell.
Limitations
- Images are inserted at a default size and may require manual resizing to fit the row or column.
- Images must be uploaded one at a time, which becomes slow as the sheet grows.
- Sorting or adding rows can cause alignment issues because images remain fixed to their original cells.
This method works well for small updates, but it does not scale efficiently because related data must still be entered manually.
Uploading Images Using the IMAGE() Formula
Google Sheets allows you to display images in cells using the IMAGE() function. Rather than uploading image files, you provide a publicly accessible image URL.
Because the images come from links, the sheet depends on an outside source. This works well for sheets that already have image URLs, as long as the links stay active.
When to Use This Method
Use the IMAGE() formula when:
- Images are already hosted online
- URLs are publicly accessible
- Automatic image updates are required
- Bulk rendering from structured links is preferred
To use the IMAGE() function, follow these steps:
-
Store image URLs in a dedicated column.
-
Enter the
=IMAGE(A2)formula in the target cell. (WhereA2contains the image URL.)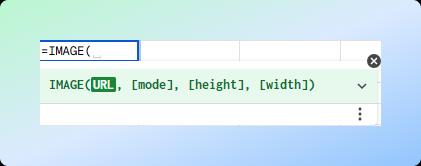
-
Drag the formula down to render images across rows.
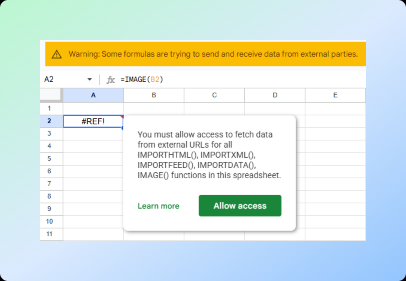
When using external image URLs, Google Sheets may ask for permission to access the link as shown in the below image. You must allow access so the image can be displayed in the sheet.
For additional guidance, refer the IMAGE() Documentation.
Images render dynamically inside cells.
Limitations
- Requires publicly accessible image URLs
- Only direct image links (ending in .jpg, .png, etc.) work reliably
- Images may break if the hosting source changes or goes offline
- Does not allow bulk uploads from local storage
While this method works well for larger datasets, it does not allow you to select and upload multiple files at once inside Google Sheets.
As the number of images grows, keeping them in the correct order and aligned with the right rows becomes more important than simply displaying them.
Both native methods rely on manual uploads or public URLs and do not support structured bulk insertion. As your sheet grows, the main problem becomes keeping images in the correct rows.
Drive Explorer Pro allows you to select multiple images at once and insert them in sequence, keeping rows aligned and reducing manual effort.
Uploading Multiple Images Using Drive Explorer Pro
When working with large datasets, you need a structured way to add many images without breaking row alignment.
Drive Explorer Pro allows multiple image uploads directly inside Google Sheets while keeping rows aligned.
Instead of uploading images one by one, select multiple files simultaneously and specify the cell where insertion should begin.
When to Use This Method
Use Drive Explorer Pro when:
- Working with 100+ images
- Managing product or inventory sheets
- Using internal Google Drive files that are not publicly accessible
This method provides a structured way to add images to your sheet.
The process follows a clear sequence: install the tool, define file details, select images, and insert them in order.
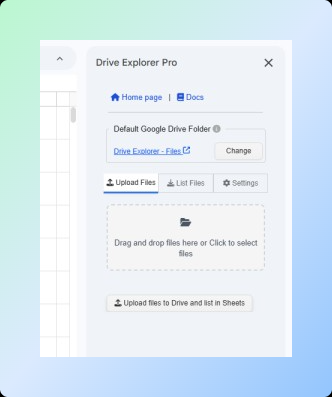
1. Installation and Setup
To install and open the extension, follow the process below:
- Install Drive Explorer Pro from the Google Workspace Marketplace.
- Open Google Sheets.
- Navigate to Extensions → Drive Explorer Pro → Open.
The Drive Explorer Pro sidebar opens within the sheet, as shown below.
For detailed setup instructions, refer to the Drive Explorer Pro documentation.
Once the sidebar is open, you can select your image source and adjust file settings before insertion.
2. Selecting the Target Cell and Configuring File Attributes
Before inserting images, select the target cell and define which file details should appear alongside each image.
Choosing the target cell Inside the Selecting and Listing Images section,select one of the following options:
- Currently Selected Cell
- Append Below Existing Data This determines where image insertion will begin.
Configure File Attributes
- Click List Files in the sidebar.
- Select Select Attributes from the menu
- Choose the file attributes you want to include, such as:
- File Name
- URL
- File ID
- Size
- Type
Once selected, your configuration will look similar to the example below:
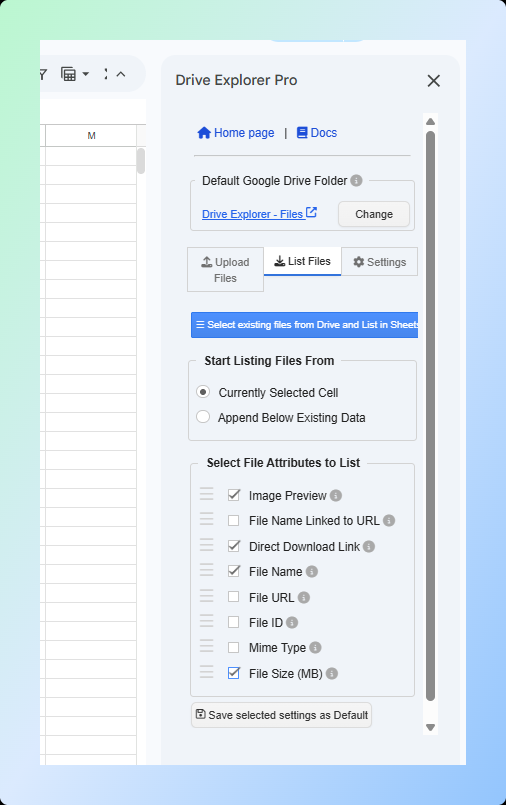
After confirming your attribute selection, the chosen details will automatically populate in adjacent columns next to each inserted image, keeping rows properly aligned.
This structured setup removes manual data entry and helps reduce mapping errors.
3. Selecting and Listing Images
After configuring the target cell and file attributes, you can insert images into your sheet. You can do this in two ways: upload images from your computer or select existing images from Google Drive.
Uploading Images from Your Computer
Use this method when the images are stored locally on your device.
- Click Upload Files in the Drive Explorer Pro sidebar.
- Select multiple images from your computer (hold Ctrl on Windows or Command on Mac), or drag and drop them into the upload window.
- Click Open to confirm your selection.
The images will appear in the Selected Files section.
If needed, enable Show Preview for Selected Files to review them before insertion.
- Click Upload Files to Drive and List in Sheets.
The images will be uploaded and inserted into the sheet. A confirmation message, Files uploaded successfully, will appear once the process is complete.
Selecting and Listing Images from Google Drive
Use this method when your images are already stored in Google Drive.
-
Click List Files in the sidebar.
-
Click Select Existing Files from Drive and List in Sheets.
-
Browse your Google Drive and select the images.
-
Click Select to confirm.
If you select many images, the listing process may take a few seconds to complete.
Once completed, the images and selected file details will automatically populate in the sheet based on the target cell and attribute settings you configured earlier.
The example below shows how the images appear in sequence inside the sheet:
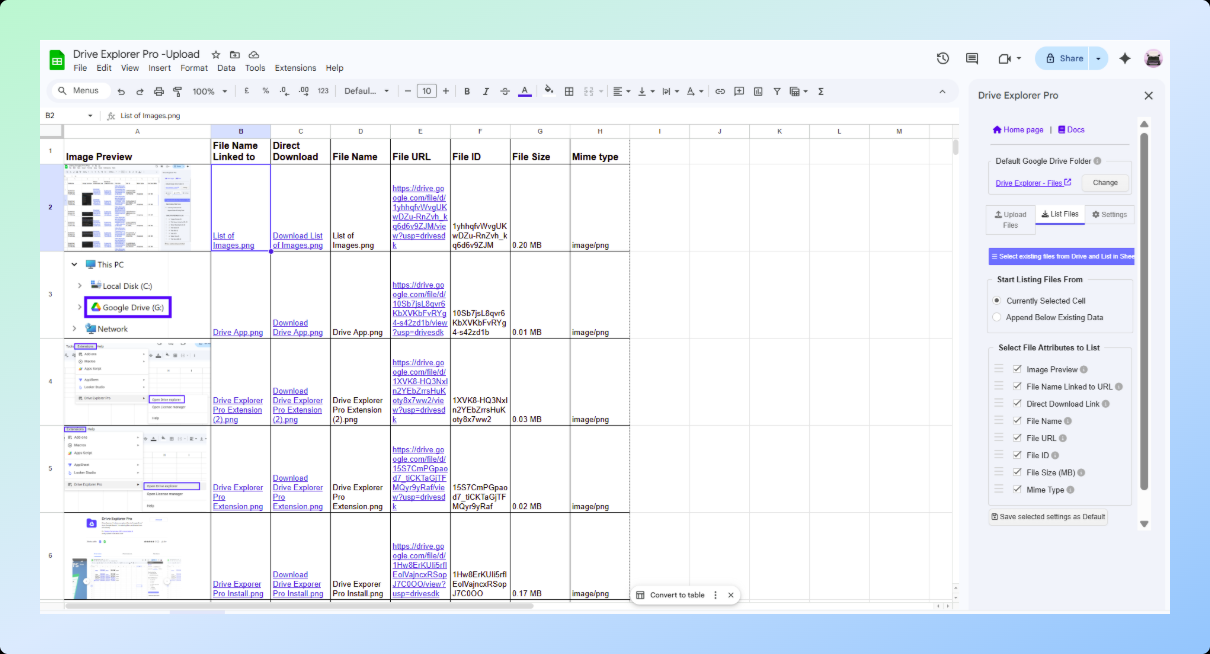
The starting cell determines the row alignment, ensuring each image matches the correct data row.
This process saves time and keeps image placement consistent, especially when working with large datasets.
As you continue using this workflow, the efficiency gains become more noticeable in day-to-day operations.
Key Benefits of Using Drive Explorer Pro
After understanding how the tool works, let’s look at the main advantages it offers.
-
Bulk Image Insertion –Add multiple images at once instead of uploading them individually, which improves efficiency for large datasets.
-
Controlled Row Alignment – Insert images from a chosen starting cell so each image stays aligned with the correct row.
-
Better Scalability – Manage large product lists, inventory sheets, or asset libraries without slowing down your workflow.
-
Less Manual Work – Remove repetitive upload steps and speed up recurring updates.
-
Fewer Placement Errors – Reduce misaligned or misplaced images that often occur with manual uploads.
These benefits translate directly into practical applications across different industries.
Practical Real-Time Use Cases
These benefits become even clearer when applied to real-world workflows.
-
Team Collaboration – Share image-based sheets with colleagues or friends in real time. Everyone can view the images directly inside the sheet and download them using the generated download link when needed.
-
Personal Organization – Track photos, certificates, or documents stored in Google Drive while keeping them organized in a reference sheet.
-
E-commerce Catalogs – Insert product images in bulk while keeping each image aligned with the correct SKU.
-
Inventory Management – Link item images to inventory records without uploading files one by one.
-
Real Estate Listings – Add property photos in order so each listing keeps the correct images.
Method Comparison
Let’s summarize the key points and decide which method fits your workflow best.
| Method | Best For | Scalability | Requirements | Main Risk |
|---|---|---|---|---|
| Native Insertion | Small edits and quick updates | Low | None | Images may shift when sorting |
| IMAGE() Formula | Sheets that use image links | Medium | Public image URLs | Links may stop working |
| Drive Explorer Pro | Large image uploads | High | Add-on setup | Very low risk |
Conclusion
Google Sheets supports two basic methods for adding images: direct insertion and the IMAGE() formula. Both work well for small to medium datasets.
As your dataset grows, maintaining structured alignment becomes more important than simply inserting images.
Use:
- Insert menu option for occasional updates.
- The
IMAGE()formula for sheets that use image URLs. - Bulk insertion tools for large datasets that require consistent row alignment.
The right method depends on your data size and how your images are stored. Choosing the appropriate method ensures your spreadsheet remains scalable, organized, and easy to maintain over time.