How to Upload Files to Google Drive and Share a Link
Sending files over email creates problems fast. Attachments hit size limits, recipients end up with outdated copies, and your inbox fills up with versions you never needed.
Google Drive fixes this. You upload once, share a single link, and control who can access the file at any time.
This guide shows you how to upload files to Google Drive and share a link using three methods:
- Web App
- Mobile App
- Drive Explorer Pro (Google Sheets add-on)
Table of Contents
Prerequisites
Before you begin, make sure you have everything required to upload, manage, and share your files smoothly in Google Drive.
- A Google account with access to Google Drive
- Files ready on your computer or mobile device
- For Drive Explorer Pro: access to Google Sheets and permission to install Google Workspace add-ons
Uploading and Sharing via the Web App
You can upload files to Google Drive and share a link directly from your browser. This works best when you're on a desktop or laptop and need to upload one or a few files.
- Go to Google Drive and sign in.
- Click the + New button in the top-left corner.
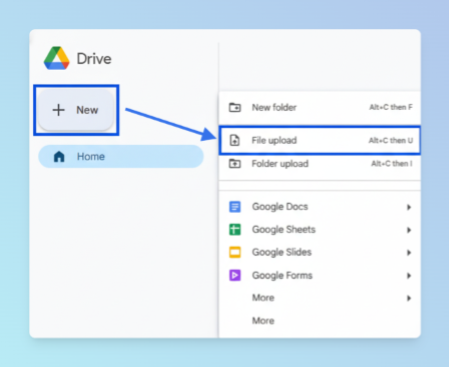
- Select File Upload.
- Choose your files and click Open.
Alternatively, drag and drop files directly into the Drive window, Google Drive uploads them automatically.
Once the upload finishes, share the file:
- Right-click the file and select Share > Share.
- Under General access, Click the dropdown next to Restricted, then select Anyone with the link to make the file accessible.
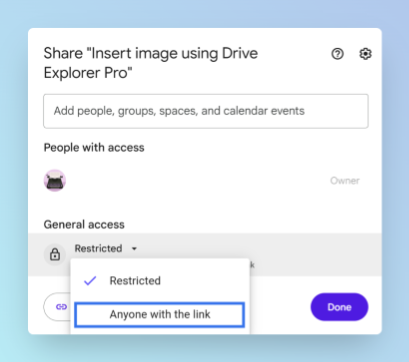
- Set the permission level by clicking the dropdown next to the role (for example, Viewer), then choose one of the following:
- Viewer - Can only see the file
- Commenter - Can see and comment, but not edit
- Editor - Can view, comment, and edit the file
- Click Copy link to copy the link, then click Done.
Paste this link into an email, chat message, or document. Anyone with the link can access the file at the permission level you set.
Uploading and Sharing via the Mobile App
You can upload files and share links from your phone using the Google Drive app. This is useful when you need to share a file while away from your desk.
- Open the Google Drive app on your phone.
- Tap the + New button in the bottom-right corner.
- Select Upload and choose your file.
- Once uploaded, tap the file to open it.
- Tap the three-dot menu and select Manage access.
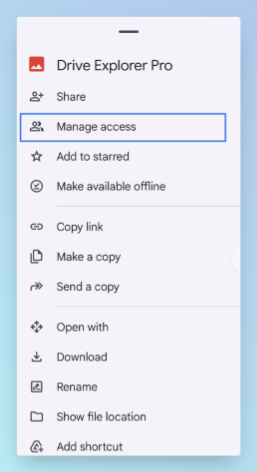
- Under General access, tap Change and select Anyone with the link.
- Set the permission level - Viewer, Commenter, or Editor.
- Tap Copy link or the link icon in the top-right corner.
You can now share the link via any messaging or email app on your phone.
Uploading Multiple Files and Sharing Links with Drive Explorer Pro
Drive Explorer Pro lets you upload files to Google Drive and automatically log their details, including shareable links into a Google Sheets spreadsheet.
This is the right approach when you're uploading several files and need to track and share all their links without doing it manually one by one.
Drive Explorer Pro lets you upload files to Google Drive and list shareable links directly in Google Sheets, no code needed. Install it free from the Google Workspace Marketplace.
Install Drive Explorer Pro from the Google Workspace Marketplace. Click Install and grant the required permissions.
Launching Drive Explorer Pro
Launch the add-on from inside Google Sheets once it's installed.
- Open Google Sheets
- Go to Extensions > Drive Explorer Pro > Open Drive Explorer Pro.
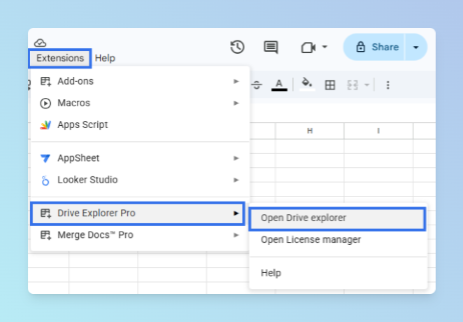
- The Drive Explorer Pro sidebar opens on the right side of your sheet.
Setting Your Destination Folder
Choose the Google Drive folder where your uploaded files will be saved.
- In the sidebar, click Change under the Default Google Drive folder section.
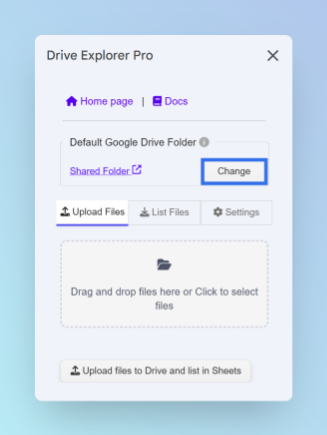
- Browse to your preferred folder and select it.
Configuring File Attributes to List in Your Sheet
Set up which file details Drive Explorer Pro logs into your spreadsheet before you upload anything.
- In the sidebar, click the List files tab.
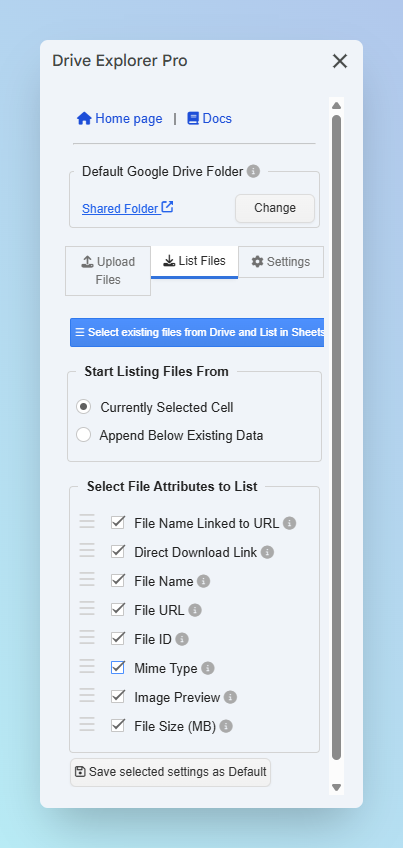
- Under Start listing file from, choose one of the following:
- Currently selected cell - logs data starting from wherever your cursor is
- Append below existing data - adds new rows below any existing content in the sheet
- Under Select File Attributes to list, check the details you want logged:
| Attribute | What It Logs |
|---|---|
| File Name Linked to URL | Clickable file name that opens the file in Google Drive |
| Direct Download Link | A link that downloads the file immediately when clicked |
| File Name | Plain file name with no link |
| File URL | Standard link that opens the file in Google Drive |
| File ID | Unique file identifier, useful for automations |
| Mime Type | The file format or type (e.g. image/jpeg, application/pdf) |
| Image Preview | Thumbnail preview inside the cell, images only |
| File Size (MB) | File size in megabytes |
- Click Save Selected Settings as Default to keep these preferences for future uploads.
Managing Sharing Settings Before You Upload
You can set file sharing permissions before uploading, directly from the Drive Explorer Pro sidebar.
- Go to the Settings tab in the sidebar and change access to Anyone with the link.
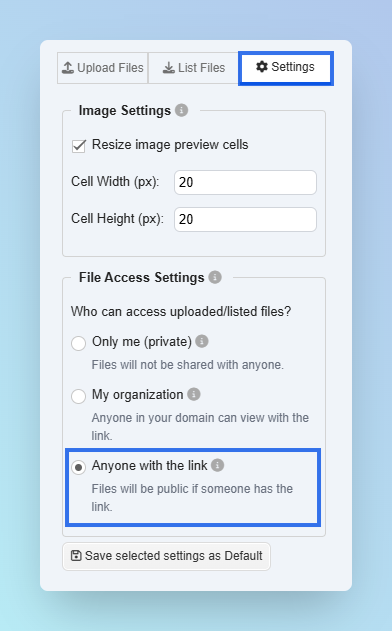
- Click Save Selected Settings as Default to keep these preferences for future access.
This means every file you upload will already have a shareable link ready, no need to go back into Google Drive to update permissions for each file individually.
Uploading Files and Generating Links
With your folder, attributes, and sharing settings configured, you're ready to upload.
-
Click the Upload files tab in the sidebar.
-
Drag and drop files from your computer into the upload box, or click the box to browse and select files manually.
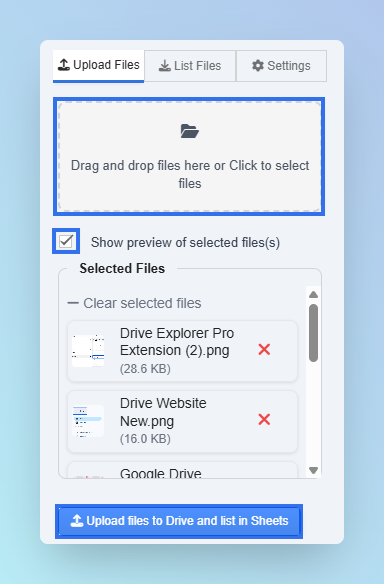
You can reorder the files to be listed by dragging them.
-
(Optional) Check Show preview of selected files if you're uploading photos and want thumbnail previews in your sheet.
-
Click Upload files to drive and list in sheets.
Drive Explorer Pro uploads each file to your chosen Google Drive folder and immediately logs the selected file details as new rows in your spreadsheet, including the shareable link in the relevant column.
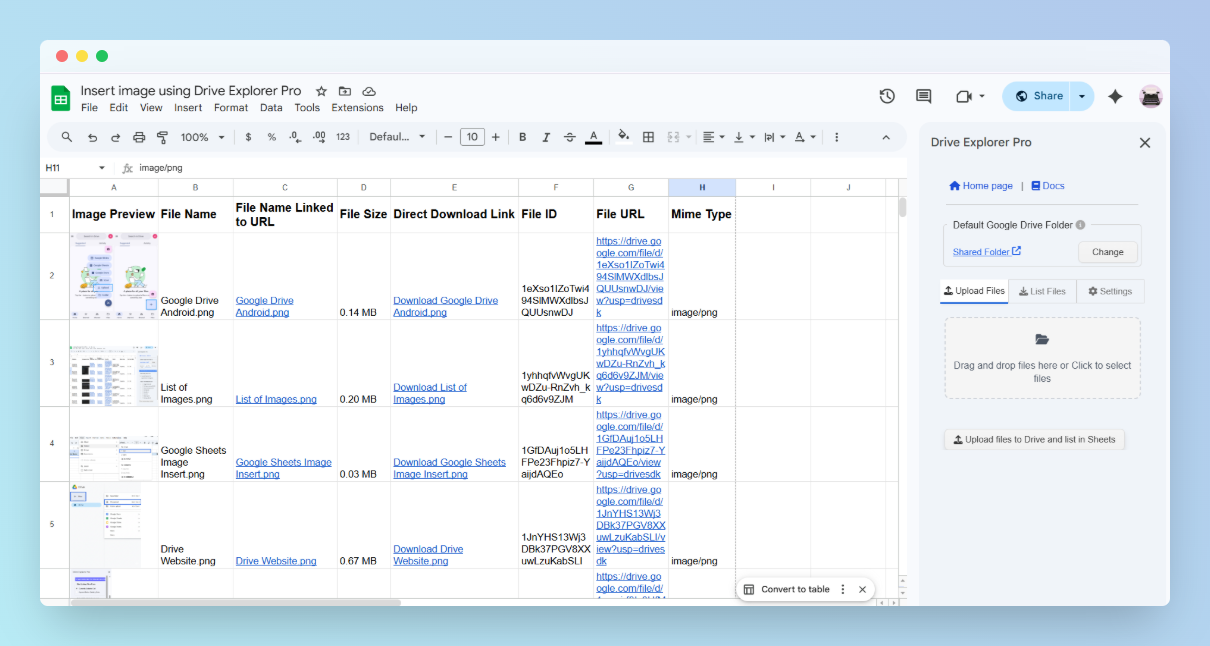
To share an individual file, copy the link from the File URL or Direct Download Link column and paste it wherever you need.
Sharing All File Links at Once
If you need to share multiple file links, share the entire spreadsheet instead of sending each link separately.
- Click Share in the top-right corner of Google Sheets.
- Under General access, change Restricted to Anyone with the link.
- Set the permission level - Viewer, Commenter, or Editor.
- Click Copy link, then Done.
Send this one link to your team or clients. They open the sheet, see every file, and click whichever link they need, without you sending anything separately.
Conclusion
You now have three ways to upload files to Google Drive and share links, the web app for quick browser-based uploads, the mobile app for on-the-go sharing, and Drive Explorer Pro for bulk uploads with automatic link logging in Google Sheets.
For one or two files, the web or mobile app is the fastest path. For uploading multiple files and sharing or tracking their links without manual work, Drive Explorer Pro handles everything in one step.
Drive Explorer Pro lets you upload files to Google Drive and list shareable links directly in Google Sheets, no code needed. Install it free from the Google Workspace Marketplace.